|
home /
infca /
piZero
(navigation links)
|
r u F*©# ? |
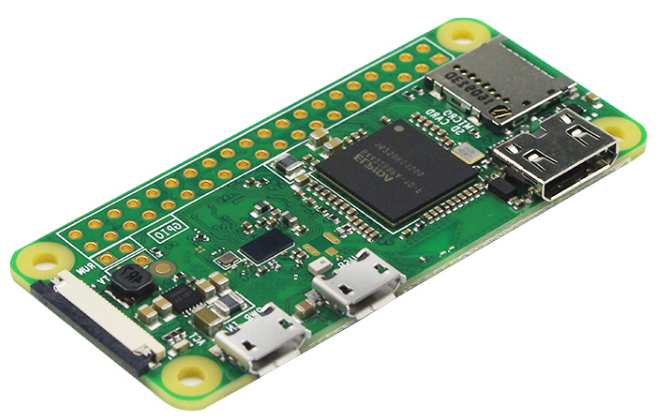
Pi Zero W, Novembre de 2019
go 2 top
PiZero = Pi0
Gracias, Luis - 20160711. Specs :
- 1 GHz, single-core CPU
- 512 MB RAM
- mini HDMI port
- micro USB OTG (On-The-Go) port
- micro USB power (no data)
- HAT-compatible 40-pin header
- composite video and reset headers
- micro SD card slot
- no ETH port - get "USB ethernet"
- version 1-3 : $5.00
url
Obsolescence statement - Raspberry Pi Zero W will remain in production until at least January 2026
Some projects !
Pi0 "w" specs
20190910 en Albertinyu em regala un Raspberry Pi Zero W, aca "pizero", amb "W" per wireless,
brand Pimoroni
Raspberry
Zero
"W" :
Novetats :
- conector CSI para cámara
- Bluetooth 4.0
- Wifi 802.11 n
El sufix "w" ve de "wifi", que el Pi0 no portava.
El CSI inteface es fa servir per conectar una camara al Pi0w
La resta de especificacions son gairebé iguals :
[ Pi Zero W ]
|
.--- CPU : ARMv6
|
.--- RAM : 512 MB
|
.--- HD : 64 GB SD card
|
.--- USB : {lsusb}
|
.--- Network : {ifconfig + iwconfig}
PiZero Max Current
In /boot/config.txt, specify
max_usb_current=1
raspberrypi.stackexchange.com
my PiZero internals
En detall :
pi@pi0alby:~ $ cat /proc/cpuinfo
processor : 0
model name : ARMv6-compatible processor rev 7 (v6l)
BogoMIPS : 697.95
Features : half thumb fastmult vfp edsp java tls
CPU implementer : 0x41
CPU architecture: 7
CPU variant : 0x0
CPU part : 0xb76
CPU revision : 7
Hardware : BCM2835
Revision : 9000c1
Serial : 000000009fcd29ce
Sebas@pi0alby:/proc $ cat /proc/meminfo
MemTotal: 443100 kB
MemFree: 67148 kB
MemAvailable: 288652 kB
Buffers: 49840 kB
Cached: 214132 kB
pi@pi0alby:~ $ df -h
Filesystem Size Used Avail Use% Mounted on
/dev/root 55G 5.9G 47G 12% /
devtmpfs 213M 0 213M 0% /dev
tmpfs 217M 0 217M 0% /dev/shm
tmpfs 217M 3.2M 214M 2% /run
tmpfs 5.0M 4.0K 5.0M 1% /run/lock
tmpfs 217M 0 217M 0% /sys/fs/cgroup
/dev/mmcblk0p6 253M 40M 214M 16% /boot
tmpfs 44M 0 44M 0% /run/user/1000
sebas@pi0alby:~ $ df -Th
Filesystem Type Size Used Avail Use% Mounted on
/dev/root ext4 55G 8.1G 44G 16% /
pi@pi0alby:~ $ ifconfig wlan0
wlan0: flags=4163<UP,BROADCAST,RUNNING,MULTICAST> mtu 1500
inet 192.168.1.209 netmask 255.255.255.0 broadcast 192.168.1.255
inet6 fe80::515d:f113:6e9b:2e5e prefixlen 64 scopeid 0x20<link>
ether b8:27:eb:98:7c:9b txqueuelen 1000 (Ethernet)
RX packets 795 bytes 60083 (58.6 KiB)
RX errors 0 dropped 0 overruns 0 frame 0
TX packets 643 bytes 118709 (115.9 KiB)
TX errors 0 dropped 0 overruns 0 carrier 0 collisions 0
sebas@pi0alby:~ $ iwconfig wlan0
wlan0 IEEE 802.11 ESSID:"WLAN_GAS2"
Mode:Managed Frequency:2.452 GHz Access Point: 40:4A:03:AF:5B:FB
Bit Rate=54 Mb/s Tx-Power=31 dBm
Retry short limit:7 RTS thr:off Fragment thr:off
Power Management:off
Link Quality=50/70 Signal level=-60 dBm
Rx invalid nwid:0 Rx invalid crypt:0 Rx invalid frag:0
Tx excessive retries:0 Invalid misc:0 Missed beacon:0
sebas@pi0alby:~ $ lsusb
Bus 001 Device 003: ID 046d:08da Logitech, Inc. QuickCam Messanger
Bus 001 Device 001: ID 1d6b:0002 Linux Foundation 2.0 root hub
pi@pi0alby:~ $ lsusb -t
/: Bus 01.Port 1: Dev 1, Class=root_hub, Driver=dwc_otg/1p, 480M
|__ Port 1: Dev 3, If 0, Class=Vendor Specific Class, Driver=gspca_zc3xx, 12M
|__ Port 1: Dev 3, If 1, Class=Audio, Driver=snd-usb-audio, 12M
|__ Port 1: Dev 3, If 2, Class=Audio, Driver=snd-usb-audio, 12M
sebas@pi0alby:~ $ usb-devices
T: Bus=01 Lev=00 Prnt=00 Port=00 Cnt=00 Dev#= 1 Spd=480 MxCh= 1
D: Ver= 2.00 Cls=09(hub ) Sub=00 Prot=01 MxPS=64 #Cfgs= 1
P: Vendor=1d6b ProdID=0002 Rev=04.19
S: Manufacturer=Linux 4.19.97+ dwc_otg_hcd
S: Product=DWC OTG Controller
S: SerialNumber=20980000.usb
C: #Ifs= 1 Cfg#= 1 Atr=e0 MxPwr=0mA
I: If#=0x0 Alt= 0 #EPs= 1 Cls=09(hub ) Sub=00 Prot=00 Driver=hub
T: Bus=01 Lev=01 Prnt=01 Port=00 Cnt=01 Dev#= 3 Spd=12 MxCh= 0
D: Ver= 1.10 Cls=00(>ifc ) Sub=00 Prot=00 MxPS= 8 #Cfgs= 1
P: Vendor=046d ProdID=08da Rev=01.00
C: #Ifs= 3 Cfg#= 1 Atr=a0 MxPwr=100mA
I: If#=0x0 Alt= 0 #EPs= 2 Cls=ff(vend.) Sub=ff Prot=ff Driver=gspca_zc3xx
I: If#=0x1 Alt= 0 #EPs= 0 Cls=01(audio) Sub=01 Prot=00 Driver=snd-usb-audio
I: If#=0x2 Alt= 0 #EPs= 0 Cls=01(audio) Sub=02 Prot=00 Driver=snd-usb-audio
The ext4 filesystem writes data to disk every 5 seconds
url - "commit" parameter
Lets buy a Pi0
amazon.es
o
amazon.es
- 26€
You will sure need some additional components :
- a good quality 5V power supply - either a 5V 2A with cable or combine a 5V 1A power supply and a Micro B USB cable -
8 €
- 4GB+ class 10 micro SD Card with Operating System - 8G card with Jessie - 32 GB
18 €,
14 €
Seems PiZero does NOT like 64 GB SD cards ... {SAG 20190914, FAT32 required, no exFAT support by Pi's bootloader}
Newer Pi Zero 2 W can handle 64 GB cards - bootloader supports the SDXC standard, which includes cards up to 2TB
- mini HDMI to HDMI adapter - converts the little port on the Zero to a standard sized HDMI jack.
You can get 1080P HDMI video + audio out of this little computer -
6,3 € (1,8 m)
- USB OTG (On The Go) cable = conversor micro USB-B macho a USB-A hembra -
lets you plug in a normal USB device such as WiFi dongle, USB hub, keyboard, mouse, etc into the Zero -
1,75 €
Total = 26 + 8 + 14 + 9 + 2 = 59€
Adafruit
Pi Zero v 1.3 ($ 10),
Pi Zero W ($ 15)
+ OTG cable ($ 2,50)
+ conversor mini HDMI to HDMI ($ 2,95)
o cable mini HDMI to HDMI ($ 5,95)
+ 2x20 connector ($ 1,75)
+ 5,25 v 1 A ($ 5,95)
See Raspberry Pi Zero 2 W setup - 10 min video
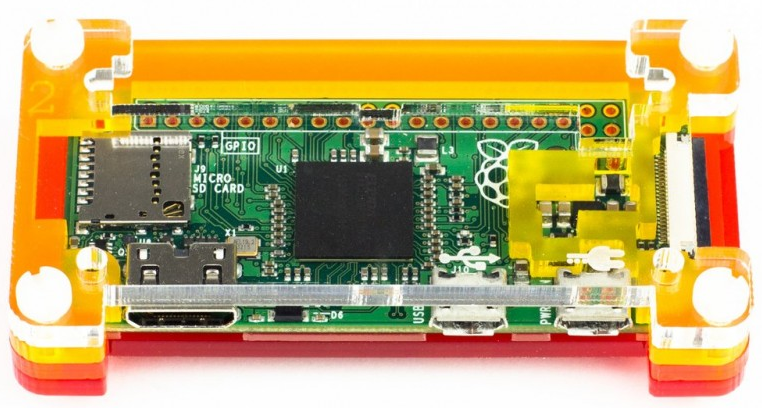
Muntatge
HW
Punts importants :
- posar en NOOBS a la tarja SD i posar la tarja a la placa
- treure el film protector de les peces de plastic
- posem el nivell "0" (blau fosc) amb el numero "0" a dalt a l'esquerra - el forat horitzontal te un baixant a la dreta
- posem a sobre el nivell "1" (lila)
- ara toca encaixar la plaqueta transparent, amb el forat a dalt i el baixant a la dreta
- posem la placa del PiZero, amb la tarja SD amb el NOOBS
- posem el nivell "2" (vermell) - la part mes buida va a l'esquerra,, a sobre de la SD
- posem el nivell "3" (transparent), de manera que els simbols de "xarxa" i "power" queden a sobre dels micro-USBs, per fora
- posem els 4 cargols
assembly
How to provide power to Pi0
Both micro-USBs can be used to provide "power" (ie. 5V)
but only the "USB" labelled port has (USB) data connections,
ie. the "PWR" port has 5V/GND connections only
SW
- posem NOOBS 3.2 a una micro SD de 64 GB
- botem per instalar "Raspbian full" - needed 5.623 MB, available 57.376 MB
- kernel version :
pi@pi0alby:~ $ uname -a
Linux pi0alby 4.19.97+ #1294 Thu Jan 30 13:10:54 GMT 2020 armv6l GNU/Linux
- Linux version :
sebas@pi0alby:~/webcam $ cat /etc/os-release
PRETTY_NAME="Raspbian GNU/Linux 10 (buster)"
NAME="Raspbian GNU/Linux"
VERSION_ID="10"
VERSION="10 (buster)"
VERSION_CODENAME=buster
ID=raspbian
ID_LIKE=debian
HOME_URL="http://www.raspbian.org/"
SUPPORT_URL="http://www.raspbian.org/RaspbianForums"
BUG_REPORT_URL="http://www.raspbian.org/RaspbianBugs"
pi@pi0alby:~ $ cat /etc/debian_version
10.3
- wireless := WLAN_GAS2
- instalem Raspbian (1 horeta)
- el configurem : detalls
/boot/config.txt
At 20210118 we have :
sebas@pi0alby:/var/log $ cat /boot/config.txt
# For more options and information see
# http://rpf.io/configtxt
# Some settings may impact device functionality. See link above for details
# uncomment if you get no picture on HDMI for a default "safe" mode
#hdmi_safe=1
# uncomment this if your display has a black border of unused pixels visible
# and your display can output without overscan
#disable_overscan=1
# uncomment the following to adjust overscan. Use positive numbers if console
# goes off screen, and negative if there is too much border
#overscan_left=16
#overscan_right=16
#overscan_top=16
#overscan_bottom=16
# uncomment to force a console size. By default it will be display's size minus
# overscan.
#framebuffer_width=1280
#framebuffer_height=720
# uncomment if hdmi display is not detected and composite is being output
#hdmi_force_hotplug=1
# uncomment to force a specific HDMI mode (this will force VGA)
#hdmi_group=1
#hdmi_mode=1
# uncomment to force a HDMI mode rather than DVI. This can make audio work in
# DMT (computer monitor) modes
hdmi_drive=2
# uncomment to increase signal to HDMI, if you have interference, blanking, or
# no display
#config_hdmi_boost=4
# uncomment for composite PAL
#sdtv_mode=2
#uncomment to overclock the arm. 700 MHz is the default.
#arm_freq=800
# Uncomment some or all of these to enable the optional hardware interfaces
#dtparam=i2c_arm=on
#dtparam=i2s=on
dtparam=spi=on
# Uncomment this to enable the lirc-rpi module
#dtoverlay=lirc-rpi
# Additional overlays and parameters are documented /boot/overlays/README
# Enable audio (loads snd_bcm2835)
dtparam=audio=on
[pi4]
# Enable DRM VC4 V3D driver on top of the dispmanx display stack
dtoverlay=vc4-fkms-v3d
max_framebuffers=2
[all]
#dtoverlay=vc4-fkms-v3d
# NOOBS Auto-generated Settings:
Versions software
pi@pi0alby:~ $
ssh -V
OpenSSH_7.9p1 Raspbian-10, OpenSSL 1.1.1c 28 May 2019
pi@pi0alby:~ $
gcc --version
gcc (Raspbian 8.3.0-6+rpi1) 8.3.0
pi@pi0alby:~ $
git --version
git version 2.20.1
pi@pi0alby:~ $
python --version
Python 2.7.16
sebas@pi0alby:~ $ python --version
Python 3.7.3
sebas@pi0alby:~ $ pip3 --version
pip 18.1 from /usr/lib/python3/dist-packages/pip (python 3.7)
pi@pi0alby:~ $
node -v
v10.15.2
sebas@pi0alby:~ $ npm -v ; sudo npm install -g npm@latest
6.14.6
$ sudo apt-get remove nodejs npm
$ sudo apt-get update
$ sudo apt-get upgrade
root@pi0alby:~# curl -sL https://deb.nodesource.com/setup_14.x | bash -
## Installing the NodeSource Node.js 14.x repo...
## You appear to be running on ARMv6 hardware.
Unfortunately this is not currently supported by the NodeSource Linux distributions.
Please use the 'linux-armv6l' binary tarballs available directly from nodejs.org for Node.js 4 and later.
>>> read
here
.
visit
https://nodejs.org/dist/ and see "armv6l" letest level
.
mirem per "armv6l architecture" : last is in
11.15 {20200913}
.
cd /home/sebas/soft
curl -o node-v11.15.0-linux-armv6l.tar.gz https://nodejs.org/dist/latest-v11.x/node-v11.15.0-linux-armv6l.tar.gz
tar -xzf node-v11.15.0-linux-armv6l.tar.gz # code is in /home/sebas/soft/node-v11.15.0-linux-armv6l/bin
sebas@pi0alby:~/soft $ sudo cp -r node-v11.15.0-linux-armv6l/* /usr/local/ # creates /usr/local/bin/node
sebas@pi0alby:~ $ which node
/usr/local/bin/node
sebas@pi0alby:~ $ node -v
v11.15.0
sebas@pi0alby:~ $ which npm
/usr/local/bin/npm
sebas@pi0alby:~/soft $ npm -v
6.7.0
actualitzacions Raspbian
Llista complerta aqui
$ sudo apt-get update # fer-ho sovint
$ sudo apt-get upgrade # fer-ho poques vegades
$ cat /var/log/apt/term.log
$ cat /var/log/dpkg.log
install MTA
To be able to send email, do :
- sudo apt-get update
- sudo apt-get install ssmtp
- edit "/etc/ssmtp/ssmtp.conf"
# host
hostname=pi0alby
# own
AuthUser=abel.pentina@gmail.com
AuthPass=theskull
useSTARTTLS=YES
- sudo apt-get install mailutils
- test it :
$ echo “hello my body” | mail –s “my test” campdefabes@gmail.com
mail: cannot send message: Process exited with a non-zero status
$ sudo cat /var/log/mail.err
Oct 1 18:57:31 pi0alby sSMTP[1787]: Unable to locate mail
Oct 1 18:57:31 pi0alby sSMTP[1787]: Cannot open mail:25
sebas@pi0alby:/etc/ssmtp $ sudo chmod 640 /etc/ssmtp/ssmtp.conf ???
sebas@pi0alby:/etc/ssmtp $ sudo chown root:mail /etc/ssmtp/ssmtp.conf ???
$ sudo adduser sebas mail
mailhub=smtp.gmail.com:587
sebas@pi0alby:~/eines $ sudo cat /var/log/mail.err
Oct 1 19:05:18 pi0alby sSMTP[1917]: Unable to locate mailhub
Oct 1 19:05:18 pi0alby sSMTP[1917]: Cannot open mailhub:25
syslog says "/etc/ssmtp/ssmtp.conf not found"
Correcte : {odin} /var/log/syslog
Oct 1 20:36:28 odin sSMTP[13706]: Creating SSL connection to host
Oct 1 20:36:28 odin sSMTP[13706]: SSL connection using RSA_AES_128_CBC_SHA1
Oct 1 20:36:30 odin sSMTP[13706]: Sent mail for pi@odin
(221 2.0.0 closing connection t203sm5386027wmf.42 - gsmtp) uid=1000 username=pi outbytes=386
pi@odin:~ $
pi@odin:~ $ ssh -V
OpenSSH_6.7p1 Raspbian-5+deb8u7, OpenSSL 1.0.1t 3 May 2016
Erroni : {pi0alby}
Oct 1 19:42:03 pi0alby sSMTP[2368]: Creating SSL connection to host
Oct 1 19:42:03 pi0alby sSMTP[2368]: SSL connection using ECDHE_RSA_AES_256_GCM_SHA384
Oct 1 19:42:04 pi0alby sSMTP[2368]: (pi0alby)
sebas@pi0alby:~ $ ssh -V
OpenSSH_7.9p1 Raspbian-10, OpenSSL 1.1.1c 28 May 2019
Posar "Debug=YES" al inici de /etc/ssmtp/ssmtp.conf
Posar "TLS_CA_File=/etc/ssl/certs/ca-certificates.crt" a /etc/ssmtp/ssmtp.conf
https://www.systutorials.com/docs/linux/man/5-ssmtp.conf/
{sag} https://raspberrypi.stackexchange.com/questions/104156/mail-to-gmal-does-not-work-with-ssl-connection-using-ecdhe-rsa-aes-256-gcm-sha3
root=postmaster line to root=YourGmailAddress@gmail.com {from AuthUser parameter}
>>> https://superuser.com/questions/1378705/ssmtp-cant-establish-a-startssl-connection-from-a-raspberry-pi
ssmtp is unmaintained software and has known TLS-related problems
Use msmtp instead
sudo apt-get install msmtp msmtp-mta
configuration file : /etc/msmtprc
details : man msmtp
Funciona :
echo -e "Subject: My Subject.\r\n\r\nMy BODY." | msmtp --debug --from=default -t campdefabes@gmail.com
$ echo ".hello my body." | mail -s ".my test." campdefabes@gmail.com
- go to gmail and enable "access" by insecure APPs :
- log into gmail account (abel.pentina)
- click "My Account"
- click "Security" on the left hand list
- scroll the page down until you see "Less secure app access" in the middle of the page
- turn access "on"
Improvement : use mutt
configure ETH0 and WLAN0 using static IPs
pi@pi0:~ $ cat /etc/dhcpcd.conf
interface eth0
static ip_address=192.168.1.10/24
static routers=192.168.1.1
static domain_name_servers=8.8.8.8 8.8.4.4
interface wlan0
static ip_address=192.168.1.222/24
static routers=192.168.1.1
static domain_name_servers=8.8.8.8 8.8.4.4
TCPIP cfg
R3,
R4,
PiZero.
configure headless wifi
Best way is to use sudo raspi-config, but on an empty machine ...
Pi zero W headless wifi setup :
- put Raspbian image in SSD
- create an empty file called ssh in the root of the boot SD
- create a file called wpa_supplican.conf in the root of the boot SD :
country=US
ctrl_interface=DIR=/var/run/wpa_supplicant GROUP=netdev
update_config=1
network={
ssid="NETWORK-NAME"
psk="NETWORK-PASSWORD"
}
nmap at pizero
pi@pi0:~ $ sudo apt update
Get:1 http://archive.raspberrypi.org/debian buster InRelease [32.6 kB]
Get:2 http://raspbian.raspberrypi.org/raspbian buster InRelease [15.0 kB]
Get:3 http://raspbian.raspberrypi.org/raspbian buster/main armhf Packages [13.0 MB]
Get:4 http://archive.raspberrypi.org/debian buster/main armhf Packages [392 kB]
Fetched 13.5 MB in 27s (507 kB/s)
Reading package lists... Done
Building dependency tree
Reading state information... Done
77 packages can be upgraded. Run 'apt list --upgradable' to see them.
A veure :
pi@pi0:~ $ apt list --upgradable
Mostra llista llarga
pi@pi0:~ $ sudo apt-get dist-upgrade {triga una bona estona}
Ara ja podem instalar lo nostre :
pi@pi0:~ $ sudo apt install -y nmap
I obtenim :
pi@pi0:~ $ nmap --version
Nmap version 7.70 ( https://nmap.org )
Platform: arm-unknown-linux-gnueabihf
Compiled with: liblua-5.3.3 openssl-1.1.1d libssh2-1.8.0 libz-1.2.11 libpcre-8.39 libpcap-1.8.1 nmap-libdnet-1.12 ipv6
Compiled without:
Available nsock engines: epoll poll select
pizero startup services
Lets use systemd and not /etc/rc.local.
service "pizero start"
Here we shall code all "user" startup commands
- create /home/sebas/eines/rpz_start.sh with the job to do on PiZero start :
sebas@pi0alby:~/eines $ cat rpz_start.sh
#!/bin/bash
# Versions
# 20200731 v 2.c - una sola versio, millors missatges al log
# 20200801 v 2.d - engegar LED duty cycle
myVersio="v 2.d"
myLog="/home/sebas/logs/rpz_start.log"
date_name=`date +"Y%y/M%m/D%d"`
time_name=`date +"h%H:m%M"`
szTs="$date_name - $time_name"
szId="+++ +++ +++ ($szTs) [$HOSTNAME] ($0) - versio $myVersio +++ +++ +++"
# timestamp system start at own log file
echo -e "\n$szId" >> $myLog
# trace in /var/log/syslog
logger -i -p user.info $szId
# send msg to TG
/home/sebas/python/telegram/msg_a_tg.sh >> $myLog 2>&1 &
rc=$?
echo "TG rc $rc" >> $myLog
# write some funny info
TEMP=`/opt/vc/bin/vcgencmd measure_temp | cut -d "=" -f 2`
DATE=`date`
GPU=`/opt/vc/bin/vcgencmd get_mem gpu | cut -d "=" -f 2`
ARM=`/opt/vc/bin/vcgencmd get_mem arm | cut -d "=" -f 2`
STATUS=`/opt/vc/bin/vcgencmd pm_get_status`
echo Current core temperature $TEMP >> $myLog
echo GPU RAM $GPU - CPU RAM $ARM >> $myLog
echo RPZ Status: $STATUS >> $myLog
szId="--- --- --- ($szTs) [$HOSTNAME] ($0) - versio $myVersio --- --- ---"
echo $szId >> $myLog
exit 0
After modifying it, run :
- sudo service rpz_start status
- sudo systemctl daemon-reload
- create /etc/systemd/system/rpz_start.service
pi@pi0:~ $ cat /etc/systemd/system/rpz_start.service
[Unit]
Description=Raspberry Zero startup code - /etc/systemd/system/rpz_start.service - (v1.n)
; v 1.n - "type=forking" : try retry to survive
; v 1.m - "type=simple" : try retry to survive
; v 1.l - TG parameter
; v 1.k - detalls versions
; v 1.j - oneshot
; v 1.i - location
; v 1.h - user sebas
Wants=network-online.target
After=network-online.target
[Service]
Type=forking
; simple - a long-running process that does not background itself and stays attached to the shell
; systemd considers the service to be started up immediately. The process must not fork.
; forking - a typical daemon that forks itself detaching it from the process that ran it, effectively backgrounding itself
; systemd considers the service started up once the process forks and the parent has exited.
; oneshot - a short-lived process that is expected to exit
; useful for scripts that do a single job and then exit.
Restart=no
WorkingDirectory=/home/pi/eines
ExecStart=/home/pi/eines/rpz_start.sh boot
StandardOutput=syslog
StandardError=syslog
SyslogIdentifier=rpz_start
User=pi
Environment=NODE_ENV=production
[Install]
WantedBy=multi-user.target
- make it executable : sebas@pi0alby:/etc/systemd/system $ sudo chmod u+rwx /etc/systemd/system/rpz_start.service
- disable it {just in case of previous start}
- enable it :
sudo systemctl enable rpz_start
Created symlink /etc/systemd/system/multi-user.target.wants/rpz_start.service → /etc/systemd/system/rpz_start.service.
- try it :
sebas@pi0alby:/etc/systemd/system $ sudo systemctl start rpz_start
Failed to start rpz_start.service: Unit rpz_start.service has a bad unit file setting.
See system logs and 'systemctl status rpz_start.service' for details.
Jul 12 10:57:37 pi0alby systemd[1]:
Configuration file /etc/systemd/system/rpz_start.service is marked executable.
Please remove executable permission bits. Proceeding anyway.
rpz_start.service: Service has no ExecStart=, ExecStop=, or SuccessAction=. Refusing.
sebas@pi0alby:/etc/systemd/system $ sudo journalctl -xe
-- The job identifier is 1173 and the job result is done.
Jul 12 11:09:26 pi0alby systemd[1]: rpz_start.service: Start request repeated too quickly.
Jul 12 11:09:26 pi0alby systemd[1]: rpz_start.service: Failed with result 'start-limit-hit'.
-- Subject: Unit failed
-- Defined-By: systemd
-- Support: https://www.debian.org/support
--
-- The unit rpz_start.service has entered the 'failed' state with result 'start-limit-hit'.
Jul 12 11:09:26 pi0alby systemd[1]: Failed to start rpz_start.service.
-- Subject: A start job for unit rpz_start.service has failed
-- Defined-By: systemd
-- Support: https://www.debian.org/support
--
-- A start job for unit rpz_start.service has finished with a failure.
sebas@pi0alby:/etc/systemd/system $ sudo cat /var/log/syslog
Jul 12 11:09:26 pi0alby systemd[1]: rpz_start.service: Start request repeated too quickly.
Jul 12 11:09:26 pi0alby systemd[1]: rpz_start.service: Failed with result 'start-limit-hit'.
Jul 12 11:09:26 pi0alby systemd[1]: Failed to start rpz_start.service.
Jul 12 11:10:01 pi0alby CRON[1575]: (sebas) CMD (/home/sebas/eines/wifi_wd.sh)
sebas@pi0alby:~ $ sudo service rpz_start status
Warning: The unit file, source configuration file or drop-ins of rpz_start.service changed on disk. Run 'systemctl daemon-reload' to reload units.
● rpz_start.service - Raspberry Zero startup code
Loaded: loaded (/etc/systemd/system/rpz_start.service; enabled; vendor preset: enabled)
Active: inactive (dead) since Fri 2020-07-24 00:19:47 CEST; 14h ago
Process: 314 ExecStart=/bin/bash /home/sebas/eines/rpz_start.sh (code=exited, status=0/SUCCESS)
Main PID: 314 (code=exited, status=0/SUCCESS)
Jul 24 00:19:44 pi0alby systemd[1]: Starting Raspberry Zero startup code...
Jul 24 00:19:47 pi0alby systemd[1]: rpz_start.service: Succeeded.
Jul 24 00:19:47 pi0alby systemd[1]: Started Raspberry Zero startup code.
sebas@pi0alby:~ $ sudo systemctl daemon-reload
sebas@pi0alby:~ $ sudo service rpz_start status
● rpz_start.service - Raspberry Zero startup code (v1.b - no /etc/rc.local)
Loaded: loaded (/etc/systemd/system/rpz_start.service; enabled; vendor preset: enabled)
Active: inactive (dead) since Fri 2020-07-24 00:19:47 CEST; 14h ago
Main PID: 314 (code=exited, status=0/SUCCESS)
Jul 24 00:19:44 pi0alby systemd[1]: Starting Raspberry Zero startup code...
Jul 24 00:19:47 pi0alby systemd[1]: rpz_start.service: Succeeded.
Jul 24 00:19:47 pi0alby systemd[1]: Started Raspberry Zero startup code.
(sudo journalctl)
Jul 24 15:17:57 pi0alby systemd[1]: Configuration file /etc/systemd/system/rpz_start.service is marked executable. Please remove executable permission bits. Proceeding anyway.
forum
Si volem que TG funcioni, ens cal que la xarxa estigui activa en engegar el nostre servei.
Solucio : wait for networking
service "pizero oled"
We want some text to be writen continously on the OLED display
We start with
sebas@pi0alby:~/eines $ cat /etc/systemd/system/my_oled.service
[Unit]
Description=My Oled Service, v1.a
After=network.target
[Service]
Type=simple
; simple - a long-running process that does not background itself and stays attached to the shell
; forking - a typical daemon that forks itself detaching it from the process that ran it, effectively backgrounding itself
; oneshot - a short-lived process that is expected to exit
WorkingDirectory=/home/sebas/eines
ExecStart=/home/sebas/python/i2c/oled/b_continous_2ip.py
Restart=always
RestartSec=3
User=sebas
Environment=My_IP=192.168.1.2
[Install]
WantedBy=multi-user.target
And we define the job in "/home/sebas/python/i2c/oled/a_continous_ip.py" (an infinite loop on "while True:")
service "pizero ping"
We want to run a "ping" command to help device discovery (pi0 is on wlan, mars is on eth0)
sebas@pi0alby:~/eines $ cat /etc/systemd/system/my_ping.service
[Unit]
Description=My Ping Service, v1.e (null out and err, /dev/null or syslog, no restart, better null)
After=network.target
[Service]
Type=simple
WorkingDirectory=/home/sebas/eines
ExecStart=/bin/ping 192.168.1.1
Restart=always
RestartSec=3
User=sebas
Environment=My_IP=192.168.1.2
StandardOutput=null
StandardError=null
; otherwise messages go to /var/log/syslog
[Install]
WantedBy=multi-user.target
Mind we dont want error messages into any log, as "no network"
service "pwm"
sebas@pi0alby:~/eines $ cat /home/sebas/.config/systemd/user/my_pwm.service
[Unit]
Description=Servei de PWM (v 1.e)
; 1.a - start
; 1-b - remove "user"
; 1.c - start python from here, no bash
; 1.d - prefix "nohup"
; 1.e - own log by python
Wants=network-online.target
After=network-online.target
[Service]
Type=simple
; simple - a long-running process that does not background itself and stays attached to the shell
; forking - a typical daemon that forks itself detaching it from the process that ran it, effectively backgrounding itself
; oneshot - a short-lived process that is expected to exit
WorkingDirectory=/home/sebas/eines
ExecStart=/home/sebas/python/leds/duty.py
Restart=always
RestartSec=3
SyslogIdentifier=pwm_start
User=sebas
Environment=NODE_ENV=production
[Install]
WantedBy=default.target
Despres de una serie de problemes - el servei engega amb login() i es tanca amb logof() -,
decideixo passar-ho a "system"
sebas@pi0alby:/etc/systemd/system $ sudo mv /home/sebas/.config/systemd/user/my_pwm.service .
sebas@pi0alby:/etc/systemd/system $
To make the service run on boot, you should not put it in your home folder.
Instead, put it under /etc/systemd/system/.
This is the folder meant to be used by the system administrator (i.e. you) to add new system-wide services.
comandes relacionades amb el servei
El servei es diu "rpz_start" o "my_oled" o "my_ping" - see "/etc/systemd/system/*.service"
Podem fer :
start manually : $ sudo systemctl start rpz_start.service
stop the service : $ sudo systemctl stop rpz_start
disable the service : $ sudo systemctl disable rpz_start
enable the service : $ sudo systemctl enable rpz_start
display service status : $ sudo systemctl status rpz_start
view logs : $ journalctl -u rpz_start
writing a systemd service
Els serveis "privats" del usuari es troben a ... /home/<usuari>/.config/systemd/ - read details
one-shot service or simple service ?
difference
systemd service links
Systemd is able to handle various different service types specifically one of the following
- simple - a long-running process that does not background itself and stays attached to the shell
- forking - a typical daemon that forks itself detaching from the process that ran it, effectively backgrounding itself
The service manager will consider the unit started when the parent process exits.
- oneshot - a short-lived process that is expected to exit
- dbus - like simple, but notification of processes startup finishing is sent over dbus
- notify - like simple, but notification of processes startup finishing is sent over inotify
- idle - like simple, but the binary is started after the job has been dispatched
Excellent documentation :
- if set to forking, it is expected that the process configured with ExecStart= will call fork() as part of its start-up.
The parent process is expected to exit when start-up is complete
- the ampersand operator in bash is equivalent to a fork and exec.
... mas del cielo los dos sé que estamos muy cerca, tú porque eres hermosa, yo porque soy muy viejo
crontab al Pi0
Pel usuari "pi" tenim {20220409} :
pi@pi0:~/eines $ crontab -l
##########################################################
# minute (0-59), #
# | hora (0-23), #
# | | dia del mes (1-31), #
# | | | mes (1-12), #
# | | | | dia de la semana (1-7 donde 1=Lunes) #
# | | | | | comandos #
##########################################################
# m h dom mon dow command
*/3 * * * * /home/pi/eines/wifi_wd.sh
2 2 * * * /home/pi/python/telegram/msg_a_tg.sh kron
0,30 * * * * cd /home/pi/python/tinet && /home/pi/python/tinet/enviar_html_a_tinet.py &>> /home/pi/logs/enviar_html_a_tinet.log
30 1 2 * * /home/pi/logs/1_netejar.sh
30 3 * * * cd /home/pi/eines/backup && /home/pi/eines/backup/fer_backup.sh
*/2 * * * * cd /home/pi/python/byet && /home/pi/python/byet/wd_a_byet.py &>> /home/pi/logs/wd_a_byet.log
A mes, al directori /etc tenim :
/etc $ ls -alR cron*
cron.daily:
0 lrwxrwxrwx 1 root root 38 Jan 27 16:57 envia_tgz_per_email -> /home/sebas/eines/backup/fer_backup.sh ? ho volem fer 2 cops al dia ?
cron.hourly:
0 lrwxrwxrwx 1 root root 29 Jan 27 18:24 envia_ip_per_email -> /home/sebas/eines/envia_ip.sh
Eines de monitoritzacio
Tenim :
- llegir el estat de la wifi cada 3 minuts
- enviar una pagina HTML a Tinet cada 30 minuts
wifi watchdog via cron
wifi feina
$ cat /home/sebas/eines/wifi_wd.sh
#!/bin/bash
# monitor wifi status and CPU temperature
# called every 3/15 minutes from cron
# v 1.1.a - 20201201 - try to determine time of wifi fail
# v 1.1.b - 20210315 - display CPU temperature
# v 1.1.c - 20210322 - do some "ping"
# v 1.1.d - 20210323 - "while" loop
# v 1.1.e - 20210323 - iwgetid inside "while" loop
# v 1.1.f - 20210324 - function generar_data
# v 1.1.g - 20220807 - a la 5-a, apagar wifi i engegar de nou
szVersio="v 1.1.g"
# 40 chars every entry
# entries / hour : 20 / 4
# entries / day : 480 / 96
# entries / month : 14.400 / 2.880
# size / month : 576 KB / 115 KB
# log filename :
myUser="/home/pi"
log_FN=$myUser"/logs/wifi_wd.log"
generar_data () {
myDate=`date +"Y%y/M%m/D%d"`
myTime=`date +"h%H:m%M"`
szDeit="("$myDate"-"$myTime")"
} # out : szDeit
iContaje=0 # contaje := 0 ;
bAcabado=0 # acabado := false ;
eIP='0.0.0.0'
szNet='---none---'
# 1 - do some ping, no output (goes to email)
# -c is count, -W is timeout
ping -c 2 -W 2 8.8.8.8 &> /dev/null &
rv=$?
# 2 - try to get IP
while [ $bAcabado -eq 0 ] # mientras no hayamos acabado ...
do
iContaje=$(( $iContaje + 1 )) # contamos un bucle mas
if [ $iContaje -gt 9 ] # si hemos sobrepasado el maximo
then
bAcabado=1 # entonces hemos acabado por alcanzar el numero maximo de bucles
else
if [ $iContaje -eq 5 ] # si es la 5a prueba .,..
then
sudo ip link set wlan0 down # ... stop the wifi
sleep 5 # ... wait a bit
sudo ip link set wlan0 up # ... start the wifi
else
eIP_read=$(curl -m 2 -s http://checkip.amazonaws.com)
rc2=$?
if [ $rc2 -eq 0 ] # if curl ended ok
then
eIP=$eIP_read
bAcabado=1 # entonces hemos acabado por tener la IP
szNet=$(/sbin/iwgetid) # 3 - get wifi ESSID
else
generar_data # out : $szDeit
echo -e "$szDeit --- ($iContaje) --- no IP" >> $log_FN
fi
fi
fi
done
# 4 - try to see if connected
wget -q --spider http://google.com
if [ $? -eq 0 ]; then
szQ="+++ Online, ("$eIP")"
else
szQ="--- Offline, ("$eIP")"
fi
# 5 - get GPU temperature
Temp=`/opt/vc/bin/vcgencmd measure_temp | cut -d "=" -f 2`
# 6 - write log message
generar_data # out : $szDeit
echo -e "$szDeit ($0) ($szVer) ($iContaje) {$szNet} $szQ - temp $Temp" >> $log_FN
exit 0
Dont forget "chmod 744 wifi_wd.sh"
Ens cal "touch /home/sebas/logs/wifi_wd.log"
wifi programacio
sebas@pi0alby:~/eines $ cat cron_wd.txt
# m h dom mon dow command
*/3 * * * * /home/sebas/eines/wifi_wd.sh
wifi activacio
sebas@pi0alby:~/eines $ crontab -u sebas cron_wd.txt
wifi verificacio
sebas@pi0alby:~/eines $ crontab -l
# m h dom mon dow command
*/3 * * * * /home/sebas/eines/wifi_wd.sh
Also "tail -f /home/sebas/logs/wifi_wd.log"
Si no hi ha res, mirem el log del sistema :
$ sudo cat /var/log/syslog
(CRON) info (No MTA installed, discarding output)
O el log del MTA :
$ cat /home/sebas/.msmtp.log
Hi ha "exitcode=EX_OK" o "exitcode=EX_DATAERR"
Generem una pàgina HTML i la enviem a Tinet cada 30 minuts
Volem enviar una pàgina HTML a Tinet cada període, amb informacio diversa.
Generacio de la pagina
El codi q hi tenim es aquest :
$ cat /home/sebas/python/tinet/enviar_html_a_tinet.py
#!/usr/bin/env python3
# this program :
# 0) start using crontab, every 30 minutes
# m h dom mon dow command
# 0,30 * * * * /home/sebas/python/tinet/enviar_html_a_tinet.py
# 1) reads external IP using http://ipv4.icanhazip.com/ or http://checkip.amazonaws.com
# and gets local wifi SSID
# 2) creates a HTML page named IP_PI0.HTM
# 3) sends IP_PI0.HTM and TEMP.HTM to tinet using FTP
# pendent :
# mostrar versio Raspbian, python, pip, node, npm, git,
# URLs
# https://gist.github.com/jefftriplett/9748036
# http://api.hostip.info/get_json.php
# http://ifconfig.me/ip
# https://docs.python.org/3/library/ftplib.html
# https://stackabuse.com/introduction-to-python-ftp/
# https://pubs.opengroup.org/onlinepubs/009695399/basedefs/xbd_chap08.html - HOSTNAME is NOT an envir var !
# https://pythontic.com/modules/socket/gethostname
# https://www.kite.com/python/answers/how-to-remove-a-trailing-newline-in-python
# https://stackoverflow.com/questions/16511337/correct-way-to-try-except-using-python-requests-module
# https://urllib3.readthedocs.io/en/latest/reference/ - urllib3 - Sanity-friendly HTTP client
# https://www.geeksforgeeks.org/global-local-variables-python/ - global variable
# Resultat :
# http://usuaris.tinet.cat/jpmiguez/IP_PI0.HTM
# Debug : python -m pdb enviar_html_a_tinet.py
# Versions :
# v 1.1 - 20200612 - posem timestamp, hostname, ...
# v 1.2 - 20200613 - millorar format de sortida
# v 1.2.b - 20200620 - millorar format de sortida - ordre natural
# v 2.1.a - 20200620 - posar ESSID
# v 2.1.b - 20200620 - posar link a fitxer temperatura
# v 2.2.a - 20200621 - diferent nom local i remot del fitxer HTML
# v 2.3.a - 20200621 - dom_timestamp.js
# v 2.3.b - 20200621 - http refresh()
# v 2.3.c - 20200711 - display program name
# v 2.3.d - 20200711 - node version
# v 2.3.e - 20200722 - make node accessible, better error treatment
# v 2.3.f - 20200723 - display free disk
# v 2.3.g - 20200724 - print free disk at own log
# v 2.3.h - 20200818 - send last boot time from file
# v 2.3.i - 20200819 - fopen errors accepted
# v 2.3.j - 20200819 - status IP Jordi
# v 2.3.k - 20200820 - ConnectTimeout
# v 2.3.l - 20200820 - red msg has initial time, green msg has actual time
# v 2.3.m - 20200821 - 2x variables globals
# v 2.3.n - 20200821 - detectar paso a OK
# v 2.3.o - 20200823 - string identificador de cada linia
# v 2.3.p - 20200830 - al missatge "verd" enviar la hora que va començar la anterior caiguda
# v 2.3.q - 20200830 - save "fail start" and "fail end" timestamps
# v 2.3.r - 20200929 - renumber items and include local IP
# v 2.3.s - 20201103 - canviem nom
# some imported modules
import datetime
import ftplib
import json
import os
import psutil
import requests
import socket
import subprocess
import sys
from urllib.request import urlopen
import urllib
# some constants
my_Versio = 'v 2.3.s'
lastBootFN = "/home/sebas/logs/last_boot_time.log" # one line
sz_IP_Jordi = "10.139.130.113"
fn_JBjson = "jb_json.txt"
my_tinet_host = 'usuaris.fut.es' # tinet host
my_tinet_user = os.environ.get('SAG_TUSR') # using get will return 'None' if a key is not present rather than raise a 'KeyError'
my_tinet_pwd = os.environ.get('SAG_TPWD')
my_tinet_file = 'IP_PI0.HTM' # tinet file
my_remote_file = 'TEMP.HTM'
my_temp_file = '/home/sebas/python/tinet/' + my_remote_file # temperature file
my_link_start = '<a href="./'
my_temp_link = my_link_start + my_remote_file + '">' + my_remote_file + ''
# some messages
msg_head = """<!DOCTYPE html>\n<html lang="en">
<head>
<meta charset="utf-8">
<title> *** Mon IP Pi0 *** </title>
<meta http-equiv="refresh" content="30">
<STYLE TYPE="text/CSS">
<!--
.prematrix {
font-family: Lucida Console, Courier New, monospace ;
white-space: pre ;
background-color: #000000 ;
color: #00FF00 ;
}
body {
background-color: #F0F0F0 ;
color: white ;
}
-->
</STYLE>
</head>
<body>\n"""
msg_trail = """
<script src="https://code.jquery.com/jquery-2.1.1.min.js"></script>
<script src="dom_timestamp.js"></script>
</body>
</html>
"""
msg_fmt_start = '<hr>\n<div class="prematrix">\n'
msg_fmt_end = "</div>\n<hr>\n"
msg_host = '<p> #01# Host : {%s}.</p>\n'
msg_ip_ext = '<p> #02# La meva IP pública avui és : {%s}.</p>\n'
msg_essid = '<p> #05# La meva wifi és : {%s}.</p>\n'
msg_node = '<p> #10# El node es versio : {%s}.</p>\n'
msg_disk = '<p> #11# Disk use : total {%d} GB, free {%d} GB.</p>\n'
msg_boot = '<p> #12# Last boot timestamp {%s}.</p>\n'
msg_temp = '<p> Grafica temperatura : { %s }.</p>\n'
msg_time = "<p> #90# Aquesta pàgina es genera cada 1/2 hora. Darrera generacio : {%s}.</p>\n"
msg_versio = '<p> #91# Generador {%s} versió : {%s}.</p>\n'
msg_vermell = '<div style="color:red"> #50# --- JB ip {%s} esta caiguda --- la caiguda ha començat a les {%s} --- </div>\n'
msg_verd = '<div style="color:green"> #50# +++ JB ip {%s} esta ok +++ darrera caiguda : inici {%s}, final {%s} +++ </div>\n'
msg_result_url = 'http://usuaris.tinet.cat/jpmiguez/IP_PI0.HTM'
# some functions
# ---- ---- ---- ---- ---- ---- ---- ---- ---- ---- ---- ---- ---- ---- ---- ---- ---- ---- ---- ----
def Fer_pagina_html( my_Fitxer, my_ip_ext, my_essid, my_node, my_temp, my_disk_total, my_disk_free, my_boot_time, my_iq_jordi ):
global qq_JB
global szCaiguda
global szFinal_Caiguda
szHost = socket.gethostname()
f = open( my_Fitxer, "w")
f.write( msg_head )
f.write( msg_fmt_start )
txt_host = msg_host % szHost
f.write( txt_host )
txt_ip_ext = msg_ip_ext % my_ip_ext
f.write( txt_ip_ext )
txt_essid = msg_essid % my_essid
f.write( txt_essid )
txt_node = msg_node % my_node
f.write( txt_node )
txt_disk = msg_disk % ( my_disk_total, my_disk_free )
f.write( txt_disk )
txt_boot = msg_boot % my_boot_time
f.write( txt_boot )
# estat de la antena den JB
if ( my_iq_jordi == 0 ): # 0 means "ip ok", other indicate error number
if ( qq_JB == 0 ): # if it was disconnected, then now is the moment of the "disconnection end"
szFinal_Caiguda = szAra # save it
qq_JB = 1 # set the new status
txt_iq_jordi = msg_verd % ( sz_IP_Jordi, szCaiguda, szFinal_Caiguda ) # ara es OK, enviem la hora de inici/final de la caiguda anterior
else: # ip is down
if ( qq_JB == 1 ): # if it was connected,
txt_iq_jordi = msg_vermell % ( sz_IP_Jordi, szAra ) # then it has failed right now so we send actual time
qq_JB = 0 # set the new status
szCaiguda = szAra # and save actual timestamp
else: # if it was not connected,
txt_iq_jordi = msg_vermell % ( sz_IP_Jordi, szCaiguda ) # then we send old time, when fail started
f.write( txt_iq_jordi )
# +++ external items
txt_temp = msg_temp % my_temp
f.write( txt_temp )
# --- external items
txt_time = msg_time % szAra
f.write( txt_time )
txt_versio = msg_versio % ( sys.argv[0], my_Versio )
f.write( txt_versio )
f.write( msg_fmt_end )
f.write( msg_trail )
f.close()
return my_Fitxer
# ---- ---- ---- ---- ---- ---- ---- ---- ---- ---- ---- ---- ---- ---- ---- ---- ---- ---- ---- ----
def Enviar_a_Tinet( nom_fitxer_html, nom_fitxer_remot ):
my_RC = 0
ftp = ftplib.FTP( my_tinet_host ) # set a connection
try:
ftp.login( my_tinet_user, my_tinet_pwd ) # provide credentials
ftp.cwd( 'html' ) # go to html directory
with open( nom_fitxer_html, 'rb' ) as fp: # use BINARY to transfer UNICODE
res = ftp.storlines( 'STOR ' + nom_fitxer_remot, fp ) # upload an ASCII file - for binary use "STORBINARY"
if not res.startswith('226 Transfer complete'):
my_RC = 1 # upload failed
except ftplib.all_errors as e:
my_RC = e # ftp error
ftp.quit() # terminate the FTP connection
return my_RC
# ---- ---- ---- ---- ---- ---- ---- ---- ---- ---- ---- ---- ---- ---- ---- ---- ---- ---- ---- ----
def get_timestamp_from_file( nom_fitxer_timestamp ):
try:
fileBoot = open( nom_fitxer_timestamp, 'r' )
my_Boot_Time = fileBoot.readline()
fileBoot.close()
my_timestamp = my_Boot_Time.rstrip( "\n" ) # remove trailing new line char
except FileNotFoundError:
my_timestamp = "00:00:00 00/00/0000"
return my_timestamp
# ---- ---- ---- ---- ---- ---- ---- ---- ---- ---- ---- ---- ---- ---- ---- ---- ---- ---- ---- ----
def detectar_IP( sz_IP ):
# see
requests.readthedocs.io
print( '+++ detectar [', sz_IP, '], qq [', qq_JB, '].' )
my_iQ = 1
try:
req = requests.get( 'http://'+sz_IP, timeout=3 )
req.raise_for_status()
my_iQ = 0 # indicate "OK"
except requests.exceptions.ConnectTimeout as errCT:
print ( "--- connect timeout:", errCT )
my_iQ = -2
except requests.exceptions.ConnectionError as errCE:
print ( "--- Error Connecting:", errCE )
my_iQ = -3
except requests.exceptions.HTTPError as errHE: #
python 3 only
print ( "--- HTTP error:", errHE )
my_iQ = -4
except requests.exceptions.RequestException as errRE: #
python 3 only
print ( "--- Request error:", errRE )
my_iQ = -5
except requests.exceptions.Timeout as errTO:
print ( "--- Timeout Error:", errTO )
my_iQ = -6
except:
print( "--- Unexpected error: ", sys.exc_info() )
my_iQ = -1
return my_iQ
# ---- ---- ---- ---- ---- ---- ---- ---- ---- ---- ---- ---- ---- ---- ---- ---- ---- ---- ---- ----
def My_Main():
try:
# (1) obtenir dades : IP externa, nom wifi, node version, disk usage, boot timestamp, JB ip status
my_URL = 'http://ipv4.icanhazip.com'
my_URL = 'http://checkip.amazonaws.com'
my_IP_ext = urlopen( my_URL ).read().decode(encoding='UTF-8').strip() # convert bytes to string and remove trailing \n
print( '+++ my ext IP [', my_IP_ext, ']' )
my_cmd = ['/sbin/iwgetid']
proc = subprocess.Popen( my_cmd, stdout=subprocess.PIPE, stderr=subprocess.PIPE )
o, e = proc.communicate()
my_ESSID = o.decode('ascii').strip()
print( '+++ my wifi name [', my_ESSID, ']' )
my_cmd = '/usr/local/bin/node -v'
my_node_version = '*** no se ***'
proc = subprocess.Popen( my_cmd, stdout=subprocess.PIPE, shell=True )
(out, err) = proc.communicate()
if out:
my_node_version = out.decode('ascii').strip()
if err:
my_node_version = '--- err ---'
print( '+++ my node version [', my_node_version, ']' )
obj_Disk = psutil.disk_usage('/')
my_disk_total = obj_Disk.total / (1024.0 ** 3)
my_disk_free = obj_Disk.free / (1024.0 ** 3)
print( '+++ my disk total/free [%d/%d]' % (my_disk_total,my_disk_free) )
my_Boot_Time = get_timestamp_from_file( lastBootFN )
print( '*** last boot time [', my_Boot_Time, '].' )
iQ_Jordi = detectar_IP( sz_IP_Jordi ) # out : 0 = ok, others error
print( '*** detectar [', sz_IP_Jordi, '], rc [', iQ_Jordi, '].' )
# (2) fer pagina HTML
my_html_file = Fer_pagina_html( my_tinet_file, my_IP_ext, my_ESSID, my_node_version, my_temp_link, my_disk_total, my_disk_free, my_Boot_Time, iQ_Jordi )
# (3) enviar a Tinet via FTP
my_rc = 0
my_rc = Enviar_a_Tinet( my_html_file, my_html_file )
if ( my_rc == 0 ) :
print( '+++ RC ', my_rc, '+++ enviat', my_html_file )
else :
print( '--- RC ', my_rc, '--- no hem enviat', my_html_file )
my_rc = Enviar_a_Tinet( my_temp_file, my_remote_file )
if ( my_rc == 0 ) :
print( '+++ RC ', my_rc, '+++ enviat', my_remote_file )
else :
print( '--- RC ', my_rc, '--- no hem enviat', my_remote_file )
except ConnectionResetError:
print("--- ConnectionResetError")
except urllib.error.URLError as err_u:
ResponseData = err_u.reason
print( "--- URL error (", ResponseData, ")." )
except NameError as err_n:
print( "--- Name error: ", err_n ) # Output expected NameErrors
except:
print( "--- Unexpected error: ", sys.exc_info()[0] )
# ---- ---- ---- ---- ---- ---- ---- ---- ---- ---- ---- ---- ---- ---- ---- ---- ---- ---- ---- ----
if __name__ == '__main__':
now = datetime.datetime.now()
szAra = now.strftime("%Y-%m-%d %H:%M:%S") # get timestamp to be used in this execution
try:
pjf = open( fn_JBjson, 'r' ) # open json file to read
my_json = json.load( pjf ) # read json data from file
pjf.close() # close the "memory" file
qq_JB = my_json['qq'] # connected by default, so both green and red are sent
szCaiguda = my_json['ts_ini'] # get fail-start timestamp from file
szFinal_Caiguda = my_json['ts_fin'] # get fail-end timestamp from file
print( '\n>>> ', szAra, ' - generar i enviar {', my_tinet_file, '} a Tinet, versio {', my_Versio, '}' )
print( '>>> at start, JB ip status is {', qq_JB, '}, fail start/end {', szCaiguda, '/', szFinal_Caiguda, '}' )
My_Main()
print( '*** Resultat ', msg_result_url, '} ***' )
pjf = open( fn_JBjson, 'w' ) # open json file to write
my_json['qq'] = qq_JB # connected by default, so both green and red are sent
my_json['ts_ini'] = szCaiguda # get fail-start timestamp from file
my_json['ts_fin'] = szFinal_Caiguda # get fail-end timestamp from file
json.dump( my_json, pjf ) # write json to file
pjf.close() # close the "memory" file
print( '>>> at end, JB ip status is {', qq_JB, '}, fail start/end {', szCaiguda, '/', szFinal_Caiguda, '}' )
except:
print( "--- Unexpected error: ", sys.exc_info()[0] )
sys.exit() # bye
crontab
Quan s'executa del cron, la pagina s'escriu a /home/sebas i aixo no es correcte del tot
En un principi posem el canvi de directori al crontab :
0,30 * * * * cd /home/sebas/python/tinet && /home/sebas/python/tinet/enviar_ip_a_tinet.py >> /home/sebas/logs/enviar_ip_a_tinet.log 2>&1;
En un principi s'enviaba cada hora (com R3), pero el codi pel Jordi requereix que s'envii cada 1/2 hora.
Per comprovar que les dades son correctes, ens cal un client senzil :
$ sudo apt-get install ftp
Pi0 amb webcam
Si conecto una webcam LogiTech al USB, al syslog tenim :
May 5 10:39:54 pi0alby kernel: [ 754.719250] Indeed it is in host mode hprt0 = 00021501
May 5 10:39:54 pi0alby kernel: [ 754.929132] usb 1-1: new full-speed USB device number 2 using dwc_otg
May 5 10:39:54 pi0alby kernel: [ 754.929445] Indeed it is in host mode hprt0 = 00021501
May 5 10:39:54 pi0alby kernel: [ 755.170527] usb 1-1: New USB device found, idVendor=046d, idProduct=08da, bcdDevice= 1.00
May 5 10:39:54 pi0alby kernel: [ 755.170553] usb 1-1: New USB device strings: Mfr=0, Product=0, SerialNumber=0
May 5 10:39:54 pi0alby mtp-probe: checking bus 1, device 2: "/sys/devices/platform/soc/20980000.usb/usb1/1-1"
May 5 10:39:54 pi0alby mtp-probe: bus: 1, device: 2 was not an MTP device
May 5 10:39:54 pi0alby kernel: [ 755.433800] gspca_main: v2.14.0 registered
May 5 10:39:54 pi0alby kernel: [ 755.448778] gspca_main: gspca_zc3xx-2.14.0 probing 046d:08da
May 5 10:39:56 pi0alby kernel: [ 756.861859] input: gspca_zc3xx as /devices/platform/soc/20980000.usb/usb1/1-1/input/input0
May 5 10:39:56 pi0alby kernel: [ 756.875986] usbcore: registered new interface driver gspca_zc3xx
May 5 10:39:56 pi0alby kernel: [ 757.009408] usbcore: registered new interface driver snd-usb-audio
May 5 10:39:56 pi0alby mtp-probe: checking bus 1, device 2: "/sys/devices/platform/soc/20980000.usb/usb1/1-1"
May 5 10:39:56 pi0alby mtp-probe: bus: 1, device: 2 was not an MTP device
May 5 10:39:56 pi0alby systemd-udevd[1148]: Process '/usr/sbin/alsactl -E HOME=/run/alsa restore 1' failed with exit code 99.
May 5 10:39:56 pi0alby systemd-udevd[1150]: Process '/usr/sbin/th-cmd --socket /var/run/thd.socket --passfd --udev' failed with exit code 1.
Python
Version :
sebas@pi0alby:~ $ python --version
Python 2.7.16
OpenCV install and fer_photo.py
- sebas@pi0alby:~/webcam $ ./8_fer_foto.sh
ImportError: No module named cv2
- fem
- sudo apt-get update
- sudo apt-get install libhighgui2.4 libopencv-imgproc2.4 libopencv-core2.4 {fatal}
- sudo apt-get install python-opencv
- sudo apt autoremove
- sudo apt-get install python-numpy
- sudo apt list --installed
- sudo apt autoremove
- sudo apt-get upgrade
- sebas@pi0alby:~/webcam $ ./8_fer_foto.sh
sebas@pi0alby:~/webcam $ ./4_foto_verbose.py
### NUMPY version I have is 1.16.2
### OPENCV version I have is 3.2.0
>>> do VideoCapture()
>>> do VideoCapture::open()
+++ open() bRC is (False).
reinstall OpenCV
DON'T ! We have v 3.2
wget -O test.sh https://www.hackster.io/code_files/162334/download
sudo apt-get install dos2unix
dos2unix test.sh
sudo bast test.sh
sudo apt autoremove
url
One more try
After "upgrade", we see :
sebas@pi0alby:~ $ sudo v4l2-ctl -V
[sudo] password for sebas:
Format Video Capture:
Width/Height : 640/480
Pixel Format : 'JPEG' (JFIF JPEG)
Field : None
Bytes per Line : 640
Size Image : 115790
Colorspace : JPEG
Transfer Function : Default (maps to sRGB)
YCbCr/HSV Encoding: Default (maps to ITU-R 601)
Quantization : Default (maps to Full Range)
Flags :
sebas@pi0alby:~/webcam $ vcgencmd ; vcgencmd only refers to the videocore connected cameras - for USB use v4l
VCHI initialization failed ; what is VCHI ? used by vcgencmd tool
pi@pi0alby:/home/sebas/webcam $ sudo vcgencmd get_camera
supported=1 detected=0
"sudo apt-get install motion"
Test the camera from command line
- raspistill -o testshot.jpg
- sudo raspi-config : go "Interfacing options" + "P1 camera" + "enable"
No luck :
pi@pi0alby:/home/sebas/webcam $ sudo raspistill -o testshot.jpg
mmal: Cannot read camera info, keeping the defaults for OV5647
mmal: mmal_vc_component_create: failed to create component 'vc.ril.camera' (1:ENOMEM)
mmal: mmal_component_create_core: could not create component 'vc.ril.camera' (1)
mmal: Failed to create camera component
mmal: main: Failed to create camera component
mmal: Camera is not detected. Please check carefully the camera module is installed correctly
More details :
sebas@pi0alby:~/webcam $ ls -al /dev/vide*
crw-rw----+ 1 root video 81, 3 May 7 21:40 /dev/video0
crw-rw----+ 1 root video 81, 0 May 7 21:40 /dev/video10
crw-rw----+ 1 root video 81, 1 May 7 21:40 /dev/video11
crw-rw----+ 1 root video 81, 2 May 7 21:40 /dev/video12
sebas@pi0alby:~/webcam $ dmesg | grep video
[ 12.719838] videodev: Linux video capture interface: v2.00
[ 13.582334] bcm2835-codec bcm2835-codec: Device registered as /dev/video10
[ 13.612894] bcm2835-codec bcm2835-codec: Device registered as /dev/video11
[ 13.652225] bcm2835-codec bcm2835-codec: Device registered as /dev/video12
raspistill is the command line tool for capturing still photographs with the camera module
Next try :
sudo apt-get install fswebcam
sudo fswebcam /dev/video0 ./image.jpg
More items :
- "sudo usermod -a -G video sebas" ; add ownuser to "video" group - see "ls -al /dev/video*"
- "cv2.VideoCapture(-1)"
Conclusion : run python code from "sudo" !
super configuration command : raspi-config
Our operating system is (20200708) :
sebas@pi0alby:~ $ lsb_release -a
No LSB modules are available.
Distributor ID: Raspbian
Description: Raspbian GNU/Linux 10 (buster)
Release: 10
Codename: buster
The most internal configuration can be reached by :
$ sudo raspi-config
┌───────────────────────────────────────────┤ Raspberry Pi Software Configuration Tool (raspi-config) ├────────────────────────────────────────────────┐
│ │
│ 1 Change User Password Change password for the 'pi' user │
│ 2 Network Options Configure network settings │
│ 3 Boot Options Configure options for start-up │
│ 4 Localisation Options Set up language and regional settings to match your location │
│ 5 Interfacing Options Configure connections to peripherals │
│ 6 Overclock Configure overclocking for your Pi │
│ 7 Advanced Options Configure advanced settings │
│ 8 Update Update this tool to the latest version │
│ 9 About raspi-config Information about this configuration tool │
│ │
If we use option "5 Interfacing Options" we get
┌────────────────────────────┤ Raspberry Pi Software Configuration Tool (raspi-config) ├──────────────────────────────────────┐
│ │
│ P1 Camera Enable/Disable connection to the Raspberry Pi Camera │
│ P2 SSH Enable/Disable remote command line access to your Pi using SSH │
│ P3 VNC Enable/Disable graphical remote access to your Pi using RealVNC │
│ P4 SPI Enable/Disable automatic loading of SPI kernel module │
│ P5 I2C Enable/Disable automatic loading of I2C kernel module │
│ P6 Serial Enable/Disable shell and kernel messages on the serial connection │
│ P7 1-Wire Enable/Disable one-wire interface │
│ P8 Remote GPIO Enable/Disable remote access to GPIO pins │
Here we enable i2c and sound, which gets reflected into /boot/config.txt file
raspi-config Rev 1.1
$ sudo raspi-config
Raspberry Pi Zero W Rev 1.1
┌───────────────────────────────────┤ Raspberry Pi Software Configuration Tool (raspi-config) ├────────────────────────────────────┐
│ │
│ 1 System Options Configure system settings │
│ 2 Display Options Configure display settings │
│ 3 Interface Options Configure connections to peripherals │
│ 4 Performance Options Configure performance settings │
│ 5 Localisation Options Configure language and regional settings │
│ 6 Advanced Options Configure advanced settings │
│ 8 Update Update this tool to the latest version │
│ 9 About raspi-config Information about this configuration tool │
│ │
│ <Select> <Finish>
Using "1" we get to :
┌───────────────────────────────────┤ Raspberry Pi Software Configuration Tool (raspi-config) ├────────────────────────────────────┐
│ │
│ S1 Wireless LAN Enter SSID and passphrase │
│ S2 Audio Select audio out through HDMI or 3.5mm jack │
│ S3 Password Change password for the 'pi' user │
│ S4 Hostname Set name for this computer on a network │
│ S5 Boot / Auto Login Select boot into desktop or to command line │
│ S6 Network at Boot Select wait for network connection on boot │
│ S7 Splash Screen Choose graphical splash screen or text boot │
│ S8 Power LED Set behaviour of power LED │
│ │
Using "5" we get
┌───────────────────────────────────┤ Raspberry Pi Software Configuration Tool (raspi-config) ├────────────────────────────────────┐
│ │
│ B1 Console Text console, requiring user to login │
│ B2 Console Autologin Text console, automatically logged in as 'pi' user │
│ B3 Desktop Desktop GUI, requiring user to login │
│ B4 Desktop Autologin Desktop GUI, automatically logged in as 'pi' user │
│ │
Guess now we have configured "B1" ...
The default desktop manager in Raspbian is LXDE.
OLED display I2C 128x32 pixels
Per les influencies de'n Miquel em compro una pantalla OLED de 128x32 pixels de 0,9", tamany 26 x 9,5 mm
AZDelivery 0.91 pulgadas pantalla OLED display I2C 128 x 32 pixeles
comparativa
homepage +
user manual (amb codi) +
ssd1306 datsheet
Controlador de pantalla SSD1306 - módulo adafruit-circuitpython-ssd1306
SSD1306 links
- ssd 1306 install using pip
sebas@pi0alby:/tmp $ sudo pip3 install ssd1306
Looking in indexes: https://pypi.org/simple, https://www.piwheels.org/simple
Collecting ssd1306
Could not install packages due to an EnvironmentError: 404 Client Error: Not Found for url: https://pypi.org/simple/ssd1306/
- github -
DisplayIO driver for SSD1306 monochrome OLED displays, driver for displayio support
This driver depends on:
Adafruit CircuitPython Version 5+
Please ensure all dependencies are available on the CircuitPython filesystem.
This is easily achieved by downloading
the Adafruit library and driver bundle
To install system-wide:
$ sudo pip3 install adafruit-circuitpython-displayio-ssd1306
Could not install packages due to an EnvironmentError: 404 Client Error: Not Found for url:
https://pypi.org/simple/adafruit-circuitpython-displayio-ssd1306/
- github -
Adafruit_framebuf driver for SSD1306 or SSD1305 OLED displays. Not for use with displayio.
This driver depends on:
- Adafruit CircuitPython
- Bus Device
To install system-wide (this may be required in some cases):
sebas@pi0alby:~/python/i2c/oled $ sudo pip3 install adafruit-circuitpython-busdevice
[sudo] password for sebas:
Looking in indexes: https://pypi.org/simple, https://www.piwheels.org/simple
Requirement already satisfied: adafruit-circuitpython-busdevice in /usr/local/lib/python3.7/dist-packages (4.3.1)
Requirement already satisfied: Adafruit-Blinka in /usr/local/lib/python3.7/dist-packages
(from adafruit-circuitpython-busdevice) (5.0.1)
Requirement already satisfied: rpi-ws281x>=4.0.0 in /usr/local/lib/python3.7/dist-packages
(from Adafruit-Blinka->adafruit-circuitpython-busdevice) (4.2.4)
Requirement already satisfied: Adafruit-PureIO>=1.1.5 in /usr/local/lib/python3.7/dist-packages
(from Adafruit-Blinka->adafruit-circuitpython-busdevice) (1.1.5)
Requirement already satisfied: sysv-ipc; platform_system != "Windows" and platform_machine != "mips" in /usr/local/lib/python3.7/dist-packages
(from Adafruit-Blinka->adafruit-circuitpython-busdevice) (1.0.1)
Requirement already satisfied: pyftdi>=0.40.0 in /usr/local/lib/python3.7/dist-packages
(from Adafruit-Blinka->adafruit-circuitpython-busdevice) (0.51.2)
Requirement already satisfied: Adafruit-PlatformDetect>=2.11.1 in /usr/local/lib/python3.7/dist-packages
(from Adafruit-Blinka->adafruit-circuitpython-busdevice) (2.14.0)
Requirement already satisfied: RPi.GPIO in /usr/lib/python3/dist-packages
(from Adafruit-Blinka->adafruit-circuitpython-busdevice) (0.7.0)
Requirement already satisfied: pyusb>=1.0.0 in /usr/local/lib/python3.7/dist-packages
(from pyftdi>=0.40.0->Adafruit-Blinka->adafruit-circuitpython-busdevice) (1.0.2)
Requirement already satisfied: pyserial>=3.0 in /usr/lib/python3/dist-packages
(from pyftdi>=0.40.0->Adafruit-Blinka->adafruit-circuitpython-busdevice) (3.4)
Code sample :
read i2c register
- Adafruit framebuf -
To install system-wide (this may be required in some cases):
sebas@pi0alby:~/python/i2c/oled $ sudo pip3 install adafruit-circuitpython-framebuf
Looking in indexes: https://pypi.org/simple, https://www.piwheels.org/simple
Requirement already satisfied: adafruit-circuitpython-framebuf in /usr/local/lib/python3.7/dist-packages (1.3.2)
Requirement already satisfied: Adafruit-Blinka in /usr/local/lib/python3.7/dist-packages
(from adafruit-circuitpython-framebuf) (5.0.1)
Requirement already satisfied: pyftdi>=0.40.0 in /usr/local/lib/python3.7/dist-packages
(from Adafruit-Blinka->adafruit-circuitpython-framebuf) (0.51.2)
Requirement already satisfied: RPi.GPIO in /usr/lib/python3/dist-packages
(from Adafruit-Blinka->adafruit-circuitpython-framebuf) (0.7.0)
Requirement already satisfied: Adafruit-PlatformDetect>=2.11.1 in /usr/local/lib/python3.7/dist-packages
(from Adafruit-Blinka->adafruit-circuitpython-framebuf) (2.14.0)
Requirement already satisfied: rpi-ws281x>=4.0.0 in /usr/local/lib/python3.7/dist-packages
(from Adafruit-Blinka->adafruit-circuitpython-framebuf) (4.2.4)
Requirement already satisfied: Adafruit-PureIO>=1.1.5 in /usr/local/lib/python3.7/dist-packages
(from Adafruit-Blinka->adafruit-circuitpython-framebuf) (1.1.5)
Requirement already satisfied: sysv-ipc; platform_system != "Windows" and platform_machine != "mips" in /usr/local/lib/python3.7/dist-packages
(from Adafruit-Blinka->adafruit-circuitpython-framebuf) (1.0.1)
Requirement already satisfied: pyserial>=3.0 in /usr/lib/python3/dist-packages
(from pyftdi>=0.40.0->Adafruit-Blinka->adafruit-circuitpython-framebuf) (3.4)
Requirement already satisfied: pyusb>=1.0.0 in /usr/local/lib/python3.7/dist-packages
(from pyftdi>=0.40.0->Adafruit-Blinka->adafruit-circuitpython-framebuf) (1.0.2)
Please ensure all dependencies are available on the CircuitPython filesystem.
This is easily achieved by downloading the Adafruit library and driver bundle.
To install system-wide: (saw https://pypi.org/simple/adafruit-circuitpython-ssd1306/ )
sebas@pi0alby:~ $ sudo pip3 install adafruit-circuitpython-ssd1306
Looking in indexes: https://pypi.org/simple, https://www.piwheels.org/simple
Collecting adafruit-circuitpython-ssd1306
Downloading https://www.piwheels.org/simple/adafruit-circuitpython-ssd1306/adafruit_circuitpython_ssd1306-2.8.3-py3-none-any.whl
Collecting adafruit-circuitpython-framebuf (from adafruit-circuitpython-ssd1306)
Downloading https://www.piwheels.org/simple/adafruit-circuitpython-framebuf/adafruit_circuitpython_framebuf-1.3.2-py3-none-any.whl
Collecting Adafruit-Blinka (from adafruit-circuitpython-ssd1306)
Downloading https://www.piwheels.org/simple/adafruit-blinka/Adafruit_Blinka-5.0.1-py3-none-any.whl (124kB)
100% |████████████████████████████████| 133kB 347kB/s
Collecting adafruit-circuitpython-busdevice (from adafruit-circuitpython-ssd1306)
Downloading https://www.piwheels.org/simple/adafruit-circuitpython-busdevice/adafruit_circuitpython_busdevice-4.3.1-py3-none-any.whl
Requirement already satisfied: RPi.GPIO in /usr/lib/python3/dist-packages (from Adafruit-Blinka->adafruit-circuitpython-ssd1306) (0.7.0)
Collecting sysv-ipc; platform_system != "Windows" and platform_machine != "mips" (from Adafruit-Blinka->adafruit-circuitpython-ssd1306)
Downloading https://www.piwheels.org/simple/sysv-ipc/sysv_ipc-1.0.1-cp37-cp37m-linux_armv6l.whl (68kB)
100% |████████████████████████████████| 71kB 318kB/s
Collecting Adafruit-PlatformDetect>=2.11.1 (from Adafruit-Blinka->adafruit-circuitpython-ssd1306)
Downloading https://files.pythonhosted.org/packages/4f/a7/c1ef0f336c4d302e1d1888db30eb46f393515fe36696d48e89d8ff2b484d/Adafruit-PlatformDetect-2.14.0.tar.gz
Collecting Adafruit-PureIO>=1.1.5 (from Adafruit-Blinka->adafruit-circuitpython-ssd1306)
Downloading https://www.piwheels.org/simple/adafruit-pureio/Adafruit_PureIO-1.1.5-py3-none-any.whl
Collecting rpi-ws281x>=4.0.0 (from Adafruit-Blinka->adafruit-circuitpython-ssd1306)
Downloading https://www.piwheels.org/simple/rpi-ws281x/rpi_ws281x-4.2.4-cp37-cp37m-linux_armv6l.whl (115kB)
100% |████████████████████████████████| 122kB 384kB/s
Collecting pyftdi>=0.40.0 (from Adafruit-Blinka->adafruit-circuitpython-ssd1306)
Downloading https://files.pythonhosted.org/packages/80/9e/0893cd66e60946b881651012bbbb673a6bac1ceddf71d196fa17fb09dffa/pyftdi-0.51.2-py3-none-any.whl (150kB)
100% |████████████████████████████████| 153kB 342kB/s
Requirement already satisfied: pyserial>=3.0 in /usr/lib/python3/dist-packages (from pyftdi>=0.40.0->Adafruit-Blinka->adafruit-circuitpython-ssd1306) (3.4)
Collecting pyusb>=1.0.0 (from pyftdi>=0.40.0->Adafruit-Blinka->adafruit-circuitpython-ssd1306)
Downloading https://www.piwheels.org/simple/pyusb/pyusb-1.0.2-py3-none-any.whl (57kB)
100% |████████████████████████████████| 61kB 356kB/s
Building wheels for collected packages: Adafruit-PlatformDetect
Running setup.py bdist_wheel for Adafruit-PlatformDetect ... done
Stored in directory: /root/.cache/pip/wheels/34/d4/06/ec20c4ac373698e605133a0514bb0a2aef6851eaa692acafac
Successfully built Adafruit-PlatformDetect
Installing collected packages: sysv-ipc, Adafruit-PlatformDetect, Adafruit-PureIO, rpi-ws281x, pyusb, pyftdi,
Adafruit-Blinka, adafruit-circuitpython-framebuf, adafruit-circuitpython-busdevice, adafruit-circuitpython-ssd1306
Successfully installed Adafruit-Blinka-5.0.1 Adafruit-PlatformDetect-2.14.0 Adafruit-PureIO-1.1.5
adafruit-circuitpython-busdevice-4.3.1 adafruit-circuitpython-framebuf-1.3.2 adafruit-circuitpython-ssd1306-2.8.3
pyftdi-0.51.2 pyusb-1.0.2 rpi-ws281x-4.2.4 sysv-ipc-1.0.1
framebuf samples :
install already done ...
simple_test.py
examples ,
CircuitPython framebuf module ,
based on the Python framebuf module
conexio
SDA - pin 3 + 10 K pull-up resistor
SCK - pin 5 + 10 K pull-up resistor
VCC - pin 2, +5v
GND - pin 39
sebas@pi0alby:~/python/i2c/oled $ i2cdetect -l
i2c-1 unknown bcm2835 I2C adapter N/A
sebas@pi0alby:~/python/i2c/oled $ sudo i2cdetect -y 1
0 1 2 3 4 5 6 7 8 9 a b c d e f
00: -- -- -- -- -- -- -- -- -- -- -- -- --
10: -- -- -- -- -- -- -- -- -- -- -- -- -- -- -- --
20: -- -- -- -- -- -- -- -- -- -- -- -- -- -- -- --
30: -- -- -- -- -- -- -- -- -- -- -- -- 3c -- -- --
40: -- -- -- -- -- -- -- -- -- -- -- -- -- -- -- --
50: -- -- -- -- -- -- -- -- -- -- -- -- -- -- -- --
60: -- -- -- -- -- -- -- -- -- -- -- -- -- -- -- --
70: -- -- -- -- -- -- -- --
OLED library details
#!/usr/bin/env python3
# https://github.com/adafruit/Adafruit_CircuitPython_SSD1306/blob/master/examples/ssd1306_bouncing_ball.py
#
examples
import board
import busio
import adafruit_ssd1306
# Create the I2C interface.
i2c = busio.I2C( board.SCL, board.SDA )
# Create the SSD1306 OLED class.
# The first two parameters are the pixel width and pixel height. Change these to the right size for your display!
# 3rd parameter is the I2C address of the device
oled = adafruit_ssd1306.SSD1306_I2C( 128, 32, i2c, addr=0x3c )
iAmple = oled.width
iAlt = oled.height
print( "Amplada", iAmple )
print( "Alçada", iAlt )
# start with a blank screen
oled.fill(0) # blank the framebuffer
oled.show() # push the framebuffer onto the display
First OLED code
Code :
sebas@pi0alby:~/python/i2c/oled $ ./simple_test.py
FileNotFoundError: [Errno 2] No such file or directory: 'font5x8.bin'
Get it here ,
and place it ... ?
You'll want to copy this file into the location of rfm9x_check.py : into "/home/sebas/python/i2c/oled/"
Use this command
wget -O font5x8.bin https://github.com/adafruit/Adafruit_CircuitPython_framebuf/blob/master/examples/font5x8.bin?raw=true
Test the font :
sebas@pi0alby:~/python/i2c/oled $ sudo ./oled_test.py
ValueError: No I2C device at address: 3d
I fix it, and ...
OLED links
- usage -
set I2C to run at 1 MHz !
+ nice code !
PICkitTM Serial I2C Demo Board
User's Guide
The PICkitTM Serial I2C Demo Board demonstrates I2C serial communications and operation of the following devices:
- 24LC02B - 2Kbit Serial EEPROM
- MCP9801 - High-Accuracy Temperature Sensor
- MCP3221 - Low-Power 12-Bit A/D Converter
- TC1321 - 10-Bit Digital-to-Analog Converter
- MCP23008 - 8-Bit I/O Expander
Startup
(1) fem "enable" del bus "i2c", rebotem i verifiquem :
sebas@pi0alby:~ $ cat /boot/config.txt | grep i2c
dtparam=i2c_arm=on
Optionally, to improve performance, increase the I2C baudrate from the default of 100KHz to 400KHz by altering /boot/config.txt to include:
dtparam=i2c_arm=on,i2c_baudrate=400000
Then reboot.
(2) add your user "pi" to the i2c group and install i2c-tools:
$ sebas@pi0alby:~/python/i2c/oled $ sudo usermod -a -G i2c sebas
$ sudo apt-get install i2c-tools
(3) conectem la tarja al PiZero.
-
+V pin 2 (+5 v), amb 0,1 uF decoupling capacitor to GND
GND pin 39 (GND)
SDA pin 3 (SDA), amb 4k7 pull up resistor
SCL pin 5 (SCL), amb 4k7 pull up resistor
-
(4) mirem quins devices hi ha al bus I2C :
sebas@pi0alby:~ $ i2cdetect -l
i2c-1 unknown bcm2835 I2C adapter N/A
sebas@pi0alby:~ $ sudo i2cdetect -y 1
0 1 2 3 4 5 6 7 8 9 a b c d e f
00: -- -- -- -- -- -- -- -- -- -- -- -- --
10: -- -- -- -- -- -- -- -- -- -- -- -- -- -- -- --
20: 20 -- -- -- -- -- -- -- -- -- -- -- -- -- -- --
30: -- -- -- -- -- -- -- -- -- -- -- -- -- -- -- --
40: -- -- -- -- -- -- -- -- 48 49 -- -- -- 4d -- --
50: 50 51 52 53 54 55 56 57 -- -- -- -- -- -- -- --
60: -- -- -- -- -- -- -- -- -- -- -- -- -- -- -- --
70: -- -- -- -- -- -- -- --
24LC02B - seil EEPROM
uTic address 0xAX, shift right, i2c address 0x5X
De moment no fem res amb la EEPROM
Aqui hi ha unes utilitats
MCP 9800 - sensor de temperatura
uTic address 0x92, shift right, i2c address 0x49
Nomes fem que lectura i mostrem la temperatura
sebas@pi0alby:~ $ sudo i2cget -y 1 0x49
0x1c
MCP 3221 - A2D converter
uTic address 0x9A, shift right, i2c address 0x4D
Cal fer una escriptura per a que comenci a fer conversio
Toquem el potenciometre i veiem que la mesura analogica va canviant.
sebas@pi0alby:~ $ sudo i2cset -y 1 0x4d 0x00
sebas@pi0alby:~ $ sudo i2cget -y 1 0x4d 0x00 w
0x4201
TC 1321 - DAC 10 bits
uTic address 0x90, shift right, i2c address 0x48
Escrivim diferents valors i mesurem que la sortida analogica va canviant.
sebas@pi0alby:~ $ sudo i2cset -y 1 0x48 0x00 0x0000 w 0,00
sebas@pi0alby:~ $ sudo i2cset -y 1 0x48 0x00 0x0010 w 0,26
sebas@pi0alby:~ $ sudo i2cset -y 1 0x48 0x00 0x0020 w 0,53
sebas@pi0alby:~ $ sudo i2cset -y 1 0x48 0x00 0x0040 w 1,06
sebas@pi0alby:~ $ sudo i2cset -y 1 0x48 0x00 0x0050 w 1,33
sebas@pi0alby:~ $ sudo i2cset -y 1 0x48 0x00 0x0060 w 1,60
sebas@pi0alby:~ $ sudo i2cset -y 1 0x48 0x00 0x0080 w 2,13
sebas@pi0alby:~ $ sudo i2cset -y 1 0x48 0x00 0x00C0 w 3,14
sebas@pi0alby:~ $ sudo i2cset -y 1 0x48 0x00 0x00F0 w 3,98
MCP 23008 - I/O expander
A les 8 sortides té 8 leds !
Primer fem 4 proves - compta amb el "jumper" per activar els leds !
sebas@pi0alby:~ $ sudo i2cset -y 1 0x20 0x00 0x00 ; force output
sebas@pi0alby:~ $ sudo i2cset -y 1 0x20 0x05 0x20 ;
sebas@pi0alby:~ $ sudo i2cset -y 1 0x20 0x09 0x00 ; write data into ouput
sebas@pi0alby:~ $ sudo i2cset -y 1 0x20 0x09 0x01 ; ... change to next LED
sebas@pi0alby:~ $ sudo i2cset -y 1 0x20 0x09 0x02 ; ... change to next LED
sebas@pi0alby:~ $ sudo i2cset -y 1 0x20 0x09 0x04
sebas@pi0alby:~ $ sudo i2cset -y 1 0x20 0x09 0x08
sebas@pi0alby:~ $ sudo i2cset -y 1 0x20 0x09 0x10
sebas@pi0alby:~ $ sudo i2cset -y 1 0x20 0x09 0x20
sebas@pi0alby:~ $ sudo i2cset -y 1 0x20 0x09 0x40
sebas@pi0alby:~ $ sudo i2cset -y 1 0x20 0x09 0x80
En bash :
sebas@pi0alby:~/python/i2c $ cat shift.sh
#!/bin/bash -x
while true
do
sudo i2cset -y 1 0x20 0x09 0x01
/bin/sleep 1
sudo i2cset -y 1 0x20 0x09 0x02
/bin/sleep 1
sudo i2cset -y 1 0x20 0x09 0x04
/bin/sleep 1
sudo i2cset -y 1 0x20 0x09 0x08
/bin/sleep 1
sudo i2cset -y 1 0x20 0x09 0x10
/bin/sleep 1
sudo i2cset -y 1 0x20 0x09 0x20
/bin/sleep 1
sudo i2cset -y 1 0x20 0x09 0x40
/bin/sleep 1
sudo i2cset -y 1 0x20 0x09 0x80
/bin/sleep 1
done
En python :
sebas@pi0alby:~/python/i2c $ cat MCP23008_flash.py
#!/usr/bin/python3
# MCP23008 address, 0x20(32)
import smbus
import time
# Get I2C bus
bus = smbus.SMBus(1)
bus.write_byte_data(0x20, 0x00, 0x00) # all 8 pins are configured as outputs
while True:
bus.write_byte_data(0x20, 0x09, 0x00) # apaguem tots els leds
time.sleep(0.5)
bus.write_byte_data(0x20, 0x09, 0xFF) # encenem tots els leds
time.sleep(0.5)
TC74A2 - serially accessible, digital temperature sensor
We have a page about a
TC74 specs and pinout.
Here and now (20200705) we have it on our I2C bus, connecting :
pin 1 - NC
pin 2 - SDA - pin 3 del Raspberry
pin 3 - GND
pin 4 - SCLK - pin 5
pin 5 - VDD (+5 V)
The uTic address is 0x94, we shift it right, and get i2c address 0x4A
Before :
sebas@pi0alby:~ $ sudo i2cdetect -y 1
0 1 2 3 4 5 6 7 8 9 a b c d e f
00: -- -- -- -- -- -- -- -- -- -- -- -- --
10: -- -- -- -- -- -- -- -- -- -- -- -- -- -- -- --
20: 20 -- -- -- -- -- -- -- -- -- -- -- -- -- -- --
30: -- -- -- -- -- -- -- -- -- -- -- -- 3c -- -- --
40: -- -- -- -- -- -- -- -- 48 49 -- -- -- 4d -- --
50: 50 51 52 53 54 55 56 57 -- -- -- -- -- -- -- --
60: -- -- -- -- -- -- -- -- -- -- -- -- -- -- -- --
70: -- -- -- -- -- -- -- --
We connect the TC74A2 and now we have :
sebas@pi0alby:~ $ sudo i2cdetect -y 1
0 1 2 3 4 5 6 7 8 9 a b c d e f
00: -- -- -- -- -- -- -- -- -- -- -- -- --
10: -- -- -- -- -- -- -- -- -- -- -- -- -- -- -- --
20: 20 -- -- -- -- -- -- -- -- -- -- -- -- -- -- --
30: -- -- -- -- -- -- -- -- -- -- -- -- 3c -- -- --
40: -- -- -- -- -- -- -- -- 48 49 4a -- -- 4d -- --
50: 50 51 52 53 54 55 56 57 -- -- -- -- -- -- -- --
60: -- -- -- -- -- -- -- -- -- -- -- -- -- -- -- --
70: -- -- -- -- -- -- -- --
Temperature Register (TEMP), 8 Bits, READ ONLY
The binary value (2’s complement format) in this register represents temperature of the onboard sensor
following a conversion cycle.
So, we code :
sebas@pi0alby:~/python/i2c $ cat tc74_read.py
#!/usr/bin/env python3
# https://www.microchip.com/wwwproducts/en/TC74
# http://ww1.microchip.com/downloads/en/DeviceDoc/21462D.pdf
# https://pypi.org/project/smbus2/
# pip3 install smbus2
# sudo i2cget -y 1 0x49
import time
from smbus2 import SMBus
import datetime
# i2c channel
i2c_ch = 1
# TC74A2 address on the I2C bus is 0x4A
i2c_tc74 = 0x4A
# Register addresses
reg_temp = 0x00
reg_config = 0x01
# Calculate the 2's complement of a number
def twos_comp(val, bits):
if (val & (1 << (bits - 1))) != 0:
val = val - (1 << bits)
return val
# Initialize I2C (SMBus)
bus = SMBus( i2c_ch )
while True:
b = bus.read_byte_data( i2c_tc74, 0) # read one byte from xip, offset 0
c = twos_comp( b, 8 )
now = datetime.datetime.now()
szNow = now.strftime("%Y-%m-%d %H:%M:%S")
print( szNow, "- Temp is", c, 'ºC' )
time.sleep(1)
bus.close()
And we get :
sebas@pi0alby:~/python/i2c $ ./tc74_read.py
2020-07-10 12:46:22 - Temp is 30 ºC
2020-07-10 12:46:23 - Temp is 30 ºC
2020-07-10 12:46:24 - Temp is 30 ºC
2020-07-10 12:46:25 - Temp is 30 ºC
2020-07-10 12:46:26 - Temp is 30 ºC
2020-07-10 12:46:27 - Temp is 30 ºC
PICkitTM Serial SPI Demo Board
User's Guide
The PICkitTM Serial SPI Demo Board demonstrates SPI serial communications and operation of the following devices:
- 25LC020A - 2K SPI Bus Serial EEPROM
- TC77-5.0 - Thermal Sensor with SPI Interface
- MCP3201 - 2.7V 12-Bit A/D Converter with SPI Serial Interface
- MCP4822 - 12-Bit DAC with Internal V REF and SPI Interface
- MCP41010 - Single/Dual Digital Potentiometer with SPI Interface
- MCP6S92 - Single-Ended, Rail-to-Rail I/O, Low-Gain PGA
- MCP23S08 - 8-Bit I/O Expander with Serial Interface
Startup
(1) fem "enable" del bus "SPI", rebotem i comprovem :
sebas@pi0alby:~ $ cat /boot/config.txt | grep spi
dtparam=spi=on
Comprovem que tenim el driver del kernel :
sebas@pi0alby:~ $ lsmod | grep spi
spidev 16384 0
spi_bcm2835 20480 0
(2) add your user "pi" to the spi and gpio groups:
$ sudo usermod -a G spi pi
$ sudo usermod -a G gpio pi
(3) conectem aquestos pins de la Raspberry :
- pin 39 (GND)
- pin 2 (+5 v)
- pin 23 (clk)
- pin 21 (miso)
- pin 19 (mosi)
- pin 24 (cs)
25LC020A - 2K SPI Bus Serial EEPROM
No volem jugar amb la EEPROM
TC 77 - Thermal Sensor with SPI Interface
TC77 specs ,
data sheet
spidev.h
sebas@pi0alby:~/python/spi $ sudo ./spidev_test -D /dev/spidev0.0 ; modificat per enviar 32 0x00's !
spi mode: 0
bits per word: 8
max speed: 500000 Hz (500 KHz)
0D 3C 00 00 0D 3C 00 00
0D 3C 00 00 0D 3C 00 00
0D 3C 00 00 0D 3C 00 00
0D 3C 00 00 0D 3C 00 00
dd
En python el codi es :
sebas@pi0alby:~/python/spi $ cat 1_envio_spi_tc77_temp_sensor.py
#!/usr/bin/python3
# https://pypi.org/project/spidev/
# mode - SPI mode as two bit pattern of clock polarity and phase [CPOL|CPHA], min: 0b00 = 0, max: 0b11 = 3
# https://www.raspberrypi.org/documentation/hardware/raspberrypi/spi/README.md
# https://python-periphery.readthedocs.io/en/latest/spi.html
import spidev
import time
spi = spidev.SpiDev()
spi.open(0, 0) # open SPI port 0, device CS0
# Settings
spi.max_speed_hz = 5000 # mandatory !
# spi.mode = 0b11
# to_send = [0x00]
# spi.xfer( to_send )
try:
while True:
dades = [0x00,0x00,0x00,0x00,0x00,0x00,0x00,0x00]
print( 'enviem', dades )
resp = spi.xfer2( dades )
print( 'resp', resp )
time.sleep(1)
except (KeyboardInterrupt, SystemExit):
spi.close()
raise
spi.close()
I el resultat de l'execucio
sebas@pi0alby:~/python/spi $ sudo ./1_envio_spi_tc77.py
enviem [0, 0, 0, 0, 0, 0, 0, 0]
resp [13, 92, 0, 0, 13, 92, 0, 0]
enviem [0, 0, 0, 0, 0, 0, 0, 0]
resp [13, 60, 0, 0, 13, 60, 0, 0]
MCP 3201 2.7V 12-Bit A/D Converter
Mostrem que llegim una dada variable amb el potenciometre :
sebas@pi0alby:~/python/spi $ cat 2_envio_spi_mcp3201_adc12bits.py
#!/usr/bin/python3
# https://pypi.org/project/spidev/
# https://www.raspberrypi.org/documentation/hardware/raspberrypi/spi/README.md
# https://python-periphery.readthedocs.io/en/latest/spi.html
#
# https://www.microchip.com/wwwproducts/en/MCP3201
# MCP3201 12-bit Analog-to-Digital Converter (ADC)
# aquest xip NO VOL DADES, nomes CLK
# si desconectem MOSI (master), la conversio va OK
# si el R0 dona MOSI, el xip torna la dada que reb (?)
import spidev
import time
spi = spidev.SpiDev()
spi.open(0, 0) # open SPI port 0, device CS0
spi.max_speed_hz = 1000000
spi.mode = 0b00
dades = [0x00,0x00] # enviem "dummy" per rebre el resultat de la conversio
try:
while True:
# print( '>>> snd ', hex(dades[0]), hex(dades[1]) )
resp = spi.xfer2( dades )
print( '<<< rcv ', hex(resp[0]), hex(resp[1]) )
time.sleep(1)
except (KeyboardInterrupt, SystemExit):
spi.close()
raise
spi.close()
MCP 4822 - 12-Bit DAC with Internal V REF
Dual channel 12-bit Digital-to-Analog converter (DAC) with internal voltage reference.
datasheet
pdf
Fem servir aquest codi :
sebas@pi0alby:~/python/spi $ cat 3_envio_spi_mcp4822_dac12bits.py
#!/usr/bin/python3
# https://pypi.org/project/spidev/
# https://www.raspberrypi.org/documentation/hardware/raspberrypi/spi/README.md
# https://python-periphery.readthedocs.io/en/latest/spi.html
# https://www.microchip.com/wwwproducts/en/MCP4822
# MCP4822 is a dual channel 12-bit Digital-to-Analog converter (DAC) with internal voltage reference.
import spidev
import time
spi = spidev.SpiDev()
spi.open(0, 0) # open SPI port 0, device CS0
spi.max_speed_hz = 5000 # imprescindible !
Num = 0
dades = [0x00,0x00]
try:
while True:
# DAC A
dades[0] = 0x30 # 0b0011.0000 - we use 8 bits only !
dades[1] = Num
szOut = '0X{:02x}'.format(dades [0]), '0X{:02x}'.format(dades [1])
print( szOut )
resp = spi.xfer2( dades )
szOut = '0X{:02x}'.format(resp [0]), '0X{:02x}'.format(resp [1])
print( szOut )
# DAC B
dades[0] = 0xB0 # select DAC "B"
dades[1] = 256 - Num
print( '>>> snd ', hex(dades[0]), hex(dades[1]) )
resp = spi.xfer2( dades )
print( '<<< rcv ', hex(resp[0]), hex(resp[1]) )
time.sleep(1)
Num = Num + 1
except (KeyboardInterrupt, SystemExit):
spi.close()
raise
spi.close()
Comprovem que la tensio de sortida es comporta correctament
MCP 41010 - digital potentiometer
single-channel, 8-bit digital potentiometer, 10kΩ end-to-end resistance value with an SPI serial interface.
datasheet ,
pdf
Fem servir aquest codi :
sebas@pi0alby:~/python/spi $ cat 4_envio_spi_mcp41010_digipot.py
#!/usr/bin/python3
# https://pypi.org/project/spidev/
# https://www.raspberrypi.org/documentation/hardware/raspberrypi/spi/README.md
# https://python-periphery.readthedocs.io/en/latest/spi.html
# https://www.microchip.com/wwwproducts/en/MCP41010
# The MCP41010 is a single-channel, 8-bit digital potentiometer features 10kΩ end-to-end resistance value with an SPI serial interface.
import spidev
import time
spi = spidev.SpiDev()
spi.open(0, 0) # open SPI port 0, device CS0
spi.max_speed_hz = 5000
Num = 0
dades = [0x11,0x00]
try:
while True:
dades[1] = Num
print( 'enviem', dades )
resp = spi.xfer2( dades )
print( 'resp', resp )
time.sleep(1)
Num = Num + 1
except (KeyboardInterrupt, SystemExit):
spi.close()
raise
spi.close()
I veiem que estem regulant la resistencia
MCP6S92 - Single-Ended, Rail-to-Rail I/O, Low-Gain PGA
We are not interested in PGA by now
MCP23S08 - 8-Bit I/O Expander
This xip was not present in our card (!?)
version PiZero 2 W - RASPBERRY PI ZERO 2W - 2WH
- CPU : Broadcom BCM2710A1, SOC de cuatro núcleos y 64 bits (Arm Cortex-A53 a 1 GHz)
- RAM : 512 MB LPDDR2
- net : LAN inalámbrica 802.11 b/g/n de 2,4 GHz y Bluetooth® 4.2
- USB : USB 2.0 On-The-Go (OTG)
- salida video : puerto mini HDMI
- alimentacion : 5 Vcc, 2,5 A
digikey,
specs pdf raspberry pi zero 2 w
Problemes al Pi0
Anem documentant ...
/var/log/syslog
Al fitxer syslog apareix (en color blau cel)
sebas@pi0alby:~/python/spi $ cat 4_envio_spi_mcp41010_digipot.py
Aug 6 03:17:02 pi0alby systemd[1]: Started My Oled Service, v1.a.
^@^@^@^@^@^@^@^@^@^@^@^@^@^@^@^@^@^@^@^@^@^@^@^@^@^@^@^@^@^@^@^@^@^@^@^@^@^@^@^@^@^@^@^@^@^@^@^@^@^@
^@^@^@^@^@^@^@^@^@^@^@^@^@^@^@^@^@^@^@^@^@^@^@^@^@^@^@^@^@^@^@^@^@^@^@^@^@^@^@^@^@^@^@^@^@^@^@^@^@^@
^@^@^@^@^@^@^@^@^@^@^@^@^@^@^@^@^@^@^@^@^@^@^@^@^@^@^@^@^@^@^@^@^@^@^@^@^@^@^@^@^@^@^@^@^@^@^@^@^@^@
^@^@^@^@^@^@^@^@^@^@^@^@^@^@^@^@^@^@^@^@^@^@^@^@^@^@^@^@^@^@^@^@^@^@^@^@^@^@^@^@^@^@^@^@^@^@^@^@^@^@
Aug 6 03:17:26 pi0alby fake-hwclock[67]: Thu 06 Aug 2020 01:17:05 AM UTC
Aug 6 03:17:26 pi0alby systemd-fsck[94]: e2fsck 1.44.5 (15-Dec-2018)
Aug 6 03:17:26 pi0alby systemd-fsck[94]: root: clean, 230947/3661824 files, 2373611/14622720 blocks
Aug 6 03:17:26 pi0alby systemd[1]: Started File System Check on Root Device.
Aug 6 03:17:26 pi0alby kernel: [ 0.000000] Booting Linux on physical CPU 0x0
... i el Pi0 es penja
Again :
Aug 10 08:33:02 pi0alby CRON[4069]: (sebas) CMD (/home/sebas/python/tinet/enviar_ip_a_tinet.py >> /home/sebas/logs/enviar_ip_a_tinet.log 2>&1;)
Aug 10 08:45:01 pi0alby CRON[4087]: (sebas) CMD (/home/sebas/eines/wifi_wd.sh)
Aug 10 09:00:02 pi0alby CRON[4106]: (sebas) CMD (/home/sebas/eines/wifi_wd.sh)
^@^@^@^@^@^@^@^@^@^@^@^@^@^@^@^@^@^@^@^@^@^@^@^@^@^@^@^@^@^@^@^@^@^@^@^@^@^@^@^@^@^@^@^@^@^@^@^@^@^@^@^@^@^@^@^@^@
^@^@^@^@^@^@^@^@^@^@^@^@^@^@^@^@^@^@^@^@^@^@^@^@^@^@^@^@^@^@^@^@^@^@^@^@^@^@^@^@^@^@^@^@^@^@^@^@^@^@^@^@^@^@^@^@^@
^@^@^@^@^@^@^@^@^@^@^@^@^@^@^@^@^@^@^@^@^@^@^@^@^@^@^@^@^@^@^@^@^@^@^@^@^@^@^@^@^@^@^@^@^@^@^@^@^@^@^@^@^@^@^@^@^@
Aug 10 08:51:42 pi0alby fake-hwclock[67]: Mon 10 Aug 2020 06:17:03 AM UTC
Aug 10 08:51:42 pi0alby systemd-fsck[94]: e2fsck 1.44.5 (15-Dec-2018)
Aug 10 08:51:42 pi0alby systemd-fsck[94]: Superblock last mount time is in the future.
Aug 10 08:51:42 pi0alby systemd-fsck[94]: #011(by less than a day, probably due to the hardware clock being incorrectly set)
Aug 10 08:51:42 pi0alby systemd-fsck[94]: root: clean, 232776/3661824 files, 2381841/14622720 blocks
Aug 10 08:51:42 pi0alby systemd[1]: Started File System Check on Root Device.
Intentem Superblock last mount time is in the future
sebas@pi0alby:~ $ sudo hwclock
[sudo] password for sebas:
hwclock: Cannot access the Hardware Clock via any known method.
hwclock: Use the --verbose option to see the details of our search for an access method.
sebas@pi0alby:~ $ sudo hwclock --verbose
hwclock from util-linux 2.33.1
System Time: 1597081962.644198
Trying to open: /dev/rtc0
Trying to open: /dev/rtc
Trying to open: /dev/misc/rtc
No usable clock interface found.
hwclock: Cannot access the Hardware Clock via any known method.
Ara provem fsck :
sebas@pi0alby:~ $ sudo touch /forcefsck; sudo reboot
O millor Add the following to /boot/cmdline.txt:
fsck.mode=force
Make sure that file remains all one line
Provem
how to run fsck at boot
I obtenim ( despres de buscar la particio linux amb sebas@pi0alby:~ $ sudo fdisk -l ) :
sebas@pi0alby:~ $ sudo tune2fs -l /dev/mmcblk0p5
tune2fs 1.44.5 (15-Dec-2018)
Filesystem volume name: SETTINGS
Last mounted on: /settings
Filesystem UUID: 166eac16-ca52-4f33-9fc6-d6fc0e3af9c4
Filesystem magic number: 0xEF53
Filesystem revision #: 1 (dynamic)
Filesystem features: has_journal ext_attr resize_inode dir_index filetype extent flex_bg sparse_super huge_file uninit_bg dir_nlink extra_isize
Filesystem flags: unsigned_directory_hash
Default mount options: user_xattr acl
Filesystem state: clean
Errors behavior: Continue
Filesystem OS type: Linux
Inode count: 8192
Block count: 32764
Reserved block count: 1638
Free blocks: 30243
Free inodes: 8150
First block: 1
Block size: 1024
Fragment size: 1024
Reserved GDT blocks: 127
Blocks per group: 8192
Fragments per group: 8192
Inodes per group: 2048
Inode blocks per group: 256
Flex block group size: 16
Filesystem created: Thu Jan 1 01:00:11 1970
Last mount time: Fri Sep 27 20:05:06 2019
Last write time: Fri Sep 27 18:01:35 2019
Mount count: 3
Maximum mount count: -1
Last checked: Thu Jan 1 01:00:11 1970
Check interval: 0 ()
Lifetime writes: 2542 kB
Reserved blocks uid: 0 (user root)
Reserved blocks gid: 0 (group root)
First inode: 11
Inode size: 128
Journal inode: 8
Default directory hash: half_md4
Directory Hash Seed: d4998bcf-5003-4db9-8cd8-2d2c84e25b8f
Journal backup: inode blocks
Mes idees :
- log to RAM -
url :
zram config ;
log2zram ,
log2ram github
- log to remote site,
url :
syslog (the daemon taking care of filling the log files) has a built-in feature to write logs to a second machine over the network.
In order to do this you just need to change the /etc/syslog.conf in order to write the logs on a network machine.
e.g. :
*.* @192.168.1.10:<port>
... will log all log facilities to the remote machine with the IP 192.168.1.10 on port <port>
- disable all logging - url :
Another way is to disable the service :
sudo systemctl stop rsyslog.service
sudo systemctl disable rsyslog
To restore it, just sudo systemctl enable rsyslog
20200817 - disable logging - a veure com acaba ...
20200821 - 2 reinicis aquesta nit -> engego logging pero el poso a RAM
log2ram at PiZero
log2ram script creates a /var/log mount point in RAM
log2ram at github
- install "manually" : instruccions :
curl -Lo log2ram.tar.gz https://github.com/azlux/log2ram/archive/master.tar.gz
tar xf log2ram.tar.gz
cd log2ram-master
chmod +x install.sh && sudo ./install.sh
cd ..
rm -r log2ram-master
- edit /etc/log2ram.conf to configure options
$ cat /etc/log2ram.conf
# Size for the ram folder, it defines the size the log folder will reserve into the RAM.
SIZE=100M
# Variable for folders to put in RAM.
# example : PATH_DISK="/var/log;/home/test/FolderInRam"
PATH_DISK="/var/log;/home/pi/logs"
- reboot to activate log2ram
Is it working ?
sebas@pi0alby:~ $ df -h
Filesystem Size Used Avail Use% Mounted on
/dev/root 55G 8.1G 44G 16% /
/dev/mmcblk0p6 253M 53M 200M 21% /boot
log2ram 40M 5.1M 35M 13% /var/log
sebas@pi0alby:~ $ mount
/dev/mmcblk0p7 on / type ext4 (rw,noatime)
/dev/mmcblk0p6 on /boot type vfat (rw,relatime,fmask=0022,dmask=0022,codepage=437,iocharset=ascii,shortname=mixed,errors=remount-ro)
/dev/mmcblk0p7 on /var/hdd.log type ext4 (rw,noatime)
log2ram on /var/log type tmpfs (rw,nosuid,nodev,noexec,noatime,size=40960k,mode=755)
Remove :
sebas@pi0alby: $ sudo apt remove log2ram
Reading package lists... Done
Building dependency tree
Reading state information... Done
E: Unable to locate package log2ram
sebas@pi0alby:~/soft $ sudo service log2ram stop
sebas@pi0alby:/usr/local/bin $ sudo chmod +x ./uninstall-log2ram.sh
sebas@pi0alby:/usr/local/bin $ sudo ./uninstall-log2ram.sh
Not apt installed. Remove will continue with this script...
Removed /etc/systemd/system/timers.target.wants/log2ram-daily.timer.
Removed /etc/systemd/system/sysinit.target.wants/log2ram.service.
Log2Ram is uninstalled, removing the uninstaller in progress
##### Reboot isn't needed #####
Compte : no es pot executar cap shell, com "esborrar.sh" dins de "/home/user/logs", si el directori el controla log2ram.
invalid variable name
In /var/log/syslog I find :
Sep 14 19:18:38 pi0alby systemd[526]: /usr/lib/environment.d/99-environment.conf:2: invalid variable name "export SAG_tg_tkn", ignoring.
This comes from "/etc/environment" !
lightdm message loop
Every 5 seconds we get this message in system log :
sebas@pi0alby:/var/log $ sudo cat messages | grep lightdm
Oct 15 13:45:23 pi0alby lightdm[24034]:
Error getting user list from org.freedesktop.Accounts:
GDBus.Error:org.freedesktop.DBus.Error.ServiceUnknown:
The name org.freedesktop.Accounts was not provided by any .service files
Adding "services.accounts-daemon.enable=true" fixes the issue
The accountsservice project provides a set of D-Bus interfaces
for querying and manipulating user account information and an implementation of these interfaces,
based on the useradd, usermod and userdel commands.
Configuring base services can be accomplished by editing the /etc/login.defs file
org.freedesktop.Accounts : Missing accountsservice package
sebas@pi0alby:~ $ sudo apt-get install accountsservice
X11 crash
sebas@pi0alby~ $ cat /var/log/Xorg.0.log
[ 8023.795] (II) config/udev: Adding input device Lenovo ThinkPad Compact USB Keyboard with TrackPoint (/dev/input/event0)
[ 8023.795] (**) Lenovo ThinkPad Compact USB Keyboard with TrackPoint: Applying InputClass "libinput keyboard catchall"
[ 8023.795] (II) LoadModule: "libinput"
[ 8023.796] (II) Loading /usr/lib/xorg/modules/input/libinput_drv.so
[ 8023.935] (II) Module libinput: vendor="X.Org Foundation"
[ 8023.935] compiled for 1.20.3, module version = 0.28.2
[ 8023.935] Module class: X.Org XInput Driver
[ 8023.935] ABI class: X.Org XInput driver, version 24.1
[ 8023.935] (II) Using input driver 'libinput' for 'Lenovo ThinkPad Compact USB Keyboard with TrackPoint'
[ 8023.936] (**) Lenovo ThinkPad Compact USB Keyboard with TrackPoint: always reports core events
[ 8023.936] (**) Option "Device" "/dev/input/event0"
[ 8023.936] (**) Option "_source" "server/udev"
[ 8023.938] (EE)
[ 8023.939] (EE) Backtrace:
[ 8023.939] (EE)
[ 8023.950] (EE) Illegal instruction at address 0xb0c0c058
[ 8023.950] (EE)
Fatal server error:
[ 8023.950] (EE) Caught signal 4 (Illegal instruction). Server aborting
After installing "accountsservice" it becomes :
sebas@pi0alby~ $ cat /var/log/Xorg.0.log
[ 2078.424] (**) Option "_source" "server/udev"
[ 2078.434] (EE)
[ 2078.439] (EE) Backtrace:
[ 2078.444] (EE)
[ 2078.448] (EE) Segmentation fault at address 0xb0be934c
[ 2078.452] (EE)
Fatal server error:
[ 2078.455] (EE) Caught signal 11 (Segmentation fault). Server aborting
[ 2078.457] (EE)
backup del PiZero de N maneres
backup del PiZero via email
- update
sebas@pi0alby:~ $ sudo apt-get update
- clean up
sebas@pi0alby:~ $ sudo apt autoremove
- install and configure mutt
sebas@pi0alby:~ $ sudo apt-get install mutt
sebas@pi0alby:~ $ mkdir -p ~/.mutt/cache/headers
sebas@pi0alby:~ $ mkdir ~/.mutt/cache/bodies
sebas@pi0alby:~ $ touch ~/.mutt/certificates
sebas@pi0alby:~ $ sudo vi /etc/Muttrc
# See /usr/share/doc/mutt/README.Debian for details.
source /usr/lib/mutt/source-muttrc.d|
Configuracio : /etc/Muttrc
# sag 20210315 - do backup using email
set from = "cdet@tinet.org"
set realname = "QPatPi0"
set imap_user = "cdet@tinet.org"
set imap_pass = "clau"
set smtp_url = "smtps://cdet@smtp.tinet.cat:465/"
set smtp_pass = "clau"
set folder = "imaps://imap.tinet.cat:993"
set spoolfile = "+INBOX"
set header_cache = "/home/my_linux_user/.mutt/cache/headers"
set message_cachedir = "/home/my_linux_user/.mutt/cache/bodies"
set certificate_file = "/home/my_linux_user/.mutt/certificates"
set ssl_verify_host = no
set ssl_verify_dates = no
set mail_check = 120
set move = no
set imap_keepalive = 900
set sort = threads
set editor = "vi"
# +++ sebas - no posar lo q enviem al fitxer "sent"
set copy = no
- verifiquem la instalacio enviant un correu minim :
sebas@pi0alby:~ $ echo "my BODY" | mutt -s "my SUBJECT" -- destinations@gmail.com
- adaptem llista_fitxers.txt
- provem de enviar i verifiquem que arriba a destinacio
- baixem el fitxer i verifiquem que te bon format i contingut
- posem a frequencia setmanal (o diaria)
sebas@pi0alby:/etc/cron.weekly $ sudo ln -s /home/sebas/eines/backup/fer_backup.sh envia_tgz_per_email
backup del PiZero per copia directa
En un altre ordinador, as MARS, ens movem all directori de destinacio, que pot ser al USB, i donem la comanda
nicolau@mars:/carpeta/destinacio $ scp -r sebas@r0:/home/sebas/* .
PiZero reinstall + restores
N'he hagut de fes uns quants
Shut down and check the file system on reboot:
sebas@pi0alby:~ $ sudo shutdown -F -r now
after the RasPI is up and running again, check the results in /var/log/fsck/
reinstalació del PiZero
Aixi que :
- conectem la tele i el teclat amb mouse
- engeguem amb "Shift" i entra el NOOBS
- instalem "full" Raspbian, amb Desktop - unes 3-4 hores : "OS installed successfully"
- usr = "pi", pwd = "raspberry"
- tenim el meu codi del SCP al USB
- tenim els fitxers "repartits pel Linux" al GMX
reconfiguració del PiZero
- wifi : el conectem a GAS2
- IP : DHCP 192.168.1.70 - configurem IP fixe = 192.168.1.222 al fitxer /etc/dhcpcd.conf -
detalls - see "man dhcpcd.conf"
interface wlan0
static ip_address=192.168.1.222/24
static routers=192.168.1.1
static domain_name_servers=8.8.8.8 8.8.4.4
- configurem SSH per accedir-hi via wifi -
detalls :
$ sudo systemctl enable ssh
$ sudo systemctl start ssh
- ja podem fer \\mars $ ssh pi@192.168.1.70
- filesystem :
pi@raspberrypi:~ $ df -h
Filesystem Size Used Avail Use% Mounted on
/dev/root 55G 8.2G 44G 16% /
- personalitzem el missatge inicial del SSH : edit /etc/ssh/sshd_banner.txt &
use it in /etc/ssh/sshd_config
detalls
- using sudo raspi-config we do
- instalem WebMin per administrar via port 10000 :
detalls,
URL
$ sudo apt install ./webmin_1.930_all.deb (16.908.762)
$ netstat -plnt | grep 10000
- crear un usuari "sebas" i fer-lo supervisor
sudo adduser sebas crear usuari amb directori i grup
sudo adduser sebas sudo afegir usuari al super grup
sudo usermod -aG video sebas used by vcgencmd tool
sudo adduser sebas mail allow user to use mail
- match ECDSA keys :
nicolau@mars:~$ ssh sebas@r0
@@@@@@@@@@@@@@@@@@@@@@@@@@@@@@@@@@@@@@@@@@@@@@@@@@@@@@@@@@@
@ WARNING: REMOTE HOST IDENTIFICATION HAS CHANGED! @
@@@@@@@@@@@@@@@@@@@@@@@@@@@@@@@@@@@@@@@@@@@@@@@@@@@@@@@@@@@
IT IS POSSIBLE THAT SOMEONE IS DOING SOMETHING NASTY!
Someone could be eavesdropping on you right now (man-in-the-middle attack)!
It is also possible that a host key has just been changed.
The fingerprint for the ECDSA key sent by the remote host is
SHA256:axqEKCWIx1VBwcWfBeHNOQj/uJ7FWJDc6kIp+jQmbaU.
Please contact your system administrator.
Add correct host key in /home/nicolau/.ssh/known_hosts to get rid of this message.
Offending ECDSA key in /home/nicolau/.ssh/known_hosts:14
remove with:
ssh-keygen -f "/home/nicolau/.ssh/known_hosts" -R "r0"
ECDSA host key for r0 has changed and you have requested strict checking.
Host key verification failed.
nicolau@mars:~$ ssh-keygen -f "/home/nicolau/.ssh/known_hosts" -R "r0"
# Host r0 found: line 14
/home/nicolau/.ssh/known_hosts updated.
Original contents retained as /home/nicolau/.ssh/known_hosts.old
- posar al dia el software :
$ sudo apt-get update
$ sudo apt-get upgrade
$ sudo apt autoremove
$ sudo apt-get dist-upgrade (2 hores)
We trust you have received the usual lecture from the local System Administrator.
It usually boils down to these three things:
#1) Respect the privacy of others.
#2) Think before you type.
#3) With great power comes great responsibility.
- fem quatre directoris :
sebas@pi0alby:~ $ mkdir eines
sebas@pi0alby:~ $ mkdir logs
sebas@pi0alby:~ $ cd logs && mkdir oldies
sebas@pi0alby:~ $ mkdir python
- copiem quatre fitxers :
sebas@pi0alby:~ $ sudo scp nicolau@mars:/home/nicolau/sebas/rspi/backups/R0/20201023_pi0alby_email/etc/motd /etc/motd
sebas@pi0alby:~ $ sudo scp nicolau@mars:/home/nicolau/sebas/rspi/backups/R0/20201023_pi0alby_email/etc/Muttrc /etc/Muttrc
sebas@pi0alby:~ $ sudo scp nicolau@mars:/home/nicolau/sebas/rspi/backups/R0/20201023_pi0alby_email/etc/ssh/* /etc/ssh/.
sebas@pi0alby:~ $ sudo scp nicolau@mars:/home/nicolau/sebas/rspi/backups/R0/20201023_pi0alby_email/etc/systemd/system/* /etc/systemd/system/.
sebas@pi0alby:~ $ sudo scp nicolau@mars:/home/nicolau/sebas/rspi/backups/R0/20201023_pi0alby_email/home/sebas/.bash_aliases /home/sebas/.
sebas@pi0alby:~ $ sudo scp -r nicolau@mars:/home/nicolau/sebas/rspi/backups/R0/20201023_pi0alby_email/home/sebas/eines/* /home/sebas/eines/.
sebas@pi0alby:~ $ sudo scp nicolau@mars:/home/nicolau/sebas/rspi/backups/R0/20201023_pi0alby_email/home/sebas/logs/1_netejar.sh /home/sebas/logs/.
sebas@pi0alby:~ $ sudo scp -r nicolau@mars:/home/nicolau/sebas/rspi/backups/R0/20201018_scp/home/sebas/python/* /home/sebas/python/.
sebas@pi0alby:~ $ sudo scp nicolau@mars:/home/nicolau/sebas/rspi/backups/R0/20201023_pi0alby_email/usr/local/bin/* /usr/local/bin/.
- ajustem els permisos i els propietaris :
sebas@pi0alby:~/eines $ sudo chown -R sebas.sebas *
sebas@pi0alby:~/python $ sudo chown -R sebas.sebas *
- enviem la IP externa per email :
sebas@pi0alby:/etc/cron.hourly $ sudo ln -s /home/sebas/eines/envia_ip.sh envia_ip_per_email
- engeguem tasca inicial :
$ sudo systemctl status rpz_start
$ sudo systemctl enable rpz_start
$ sudo systemctl start rpz_start
$ nd logs
$ touch /home/sebas/logs/rpz_start.log
VCHI initialization failed -> sudo usermod -aG video sebas - used by vcgencmd tool
Eixa tasca envia un missatge al bot de Telegram
- fem que tambe s'envii un missatge a Telegram per crontab :
sebas $ crontab -e
#
# m h dom mon dow command
02 02 * * * /home/sebas/python/telegram/msg_a_tg.sh
Be, hi ha mes feines pel crontab
- engeguem tasca ping :
$ sudo systemctl status my_ping
$ sudo systemctl enable my_ping
$ sudo systemctl start my_ping
$ sudo systemctl status my_ping
Comprovem que funciona :
sebas@pi0alby:~/logs $ ps -ef | grep -v grep | grep ping
sebas 859 1 0 14:46 ? 00:00:00 /bin/ping 192.168.1.1
- engeguem tasca bot :
sebas@pi0alby:~ $ sudo systemctl status my_bot
sebas@pi0alby:~ $ sudo systemctl enable my_bot
sebas@pi0alby:~ $ sudo systemctl start my_bot
sebas@pi0alby:~ $ sudo systemctl status my_bot
sebas@pi0alby:~ $ sudo pip3 install pyTelegramBotAPI
- hem de posar el python 3 :
sebas@pi0alby:~/python/bot $ python -V
Python 2.7.16
Instalació : url
Fem servir la versio 3 explicitament
- backup via email :
sebas@pi0alby:~ $ sudo apt-get install mutt
sebas@pi0alby:~ $ mkdir -p ~/.mutt/cache/headers
sebas@pi0alby:~ $ mkdir ~/.mutt/cache/bodies
sebas@pi0alby:~ $ touch ~/.mutt/certificates
sebas@pi0alby:~ $ echo "my BODY" | mutt -d 5 -s "my SUBJECT" -- destinations@gmail.com # see ~/.muttdebug0
Programem un backup setmanal per crontab :
sebas@pi0alby:/etc/cron.weekly $ sudo ln -s /home/sebas/eines/backup/fer_backup.sh envia_tgz_per_email
- volem llegir els correus per si hi ha errors al crontab :
sebas@pi0alby:~ $ mail
-bash: mail: command not found
sebas@pi0alby:~ $ sudo apt-get install mailutils // large output
sebas@pi0alby:~ $ mail
Cannot open mailbox /var/mail/sebas: Permission denied
No mail for sebas
sebas@pi0alby:~ $ mail -s "Test Subject" sebas@localhost < /dev/null // ja podem fer servir "mail"
sebas@pi0alby:~ $ sudo adduser sebas mail
Adding user `sebas' to group `mail' ...
Adding user sebas to group mail
Done.
sebas@pi0alby:~ $ ls -al /var/mail
total 8
drwxrwsr-x 2 root mail 4096 Jul 10 2019 .
drwxr-xr-x 11 root root 4096 Jul 10 2019 ..
var/mail/sebas won't exist until it receives its first email
sebas@pi0alby:~ $ mail sebas@localhost
Cc:
Subject: my new subject
1st line
2nd line
Control-D
sebas@pi0alby:~ $ mail
"/var/mail/sebas": 1 message 1 new
>N 1 Sebastia Tue Nov 3 22:14 16/477 my new subject
? q
Held 1 message in /var/mail/sebas
PiZero amb Raspbian Lite
Torna a fallar la tarja de 64 GB, aixi que agafo una de 2 GB.
We shall use Linux documentation :
- run lsblk -p to see which devices are currently connected to your machine to determine "sdX" : supose it is "sdb"
nicolau@mars:~$ lsblk -p | grep /dev/sd
/dev/sda 8:0 0 232.9G 0 disk
└─/dev/sda1 8:1 0 232.9G 0 part /
/dev/sdb 8:16 1 1.9G 0 disk
├─/dev/sdb1 8:17 1 256M 0 part /media/nicolau/boot
└─/dev/sdb2 8:18 1 1.5G 0 part
- delete the existing exFAT partition and create and format a new FAT32 (4GB file size limit) primary partition
nicolau@mars:~$ sudo fdisk /dev/sdb
+ "p" (display partition table)
+ "d" (delete, maybe 2 times)
+ "n" (new)
+ "p" (primary)
+ "w" (write and exit)
- run lsblk -p again
nicolau@mars:~$ lsblk -p | grep /dev/sdb
/dev/sdb 8:16 1 1.9G 0 disk
└─/dev/sdb1 8:17 1 1.9G 0 part
- see mounted volumes
nicolau@mars:~$ mount | grep /dev/sd
/dev/sda1 on / type ext4 (rw,relatime,errors=remount-ro)
/dev/sdb1 on /media/nicolau/boot type vfat
- desmuntar disc(s) muntat(s)
nicolau@mars:~$ umount /media/nicolau/boot
nicolau@mars:~$ sudo umount /dev/sdb2
nicolau@mars:~$ sudo umount /dev/sdb1
- crear FAT32
nicolau@mars:~$ sudo mkfs.vfat -F 32 /dev/sdb1
mkfs.fat 4.1 (2017-01-24)
Device Boot Start End Sectors Size Id Type {fdisk}
/dev/sdb1 2048 3842047 3840000 1.9G 83 Linux
- crear punt de muntatge
nicolau@mars:/media/nicolau$ sudo mkdir sd2gb
- muntar device al filesystem
nicolau@mars:~$ sudo mount /dev/sdb1 /media/nicolau/sd2gb
- get image
2021-01-11-raspios-buster-armhf-lite.zip into "Downloads" {mind it's "lite"}
Compte : "buster" was 1,2 GB but expands into 3.963.617.280 bytes !
- unzip into own directory :
nicolau@mars:~/sebas/rspi/op_sys$ unzip /home/nicolau/Downloads/2021-01-11-raspios-buster-armhf-lite.zip
Archive: /home/nicolau/Downloads/2021-01-11-raspios-buster-armhf-lite.zip
inflating: 2021-01-11-raspios-buster-armhf-lite.img
- write image on SD card :
lite raspbian, ok :
nicolau@mars:~/sebas/rspi/op_sys$ sudo dd bs=4M if=./2021-01-11-raspios-buster-armhf-lite.img of=/dev/sdb conv=fsync status=progress
1862270976 bytes (1.9 GB, 1.7 GiB) copied, 15 s, 123 MB/s
444+0 records in
444+0 records out
1862270976 bytes (1.9 GB, 1.7 GiB) copied, 184.009 s, 10.1 MB/s
- desmuntar la SD :
nicolau@mars:~$ umount /dev/sdb1
nicolau@mars:~$ umount /dev/sdb2
- boot the new image - the default user name is pi, with password raspberry, and keyboard layout is UK
Resized root filesystem. Rebooting in 5 sec.
Raspbian GNU/Linux 10 raspberrypi tty1
raspberrypi login:
- here are the release notes
- configure :
$ vi /boot/config.txt
> max_usb_current=1
$ sudo raspi-config
> set hostname to "Pi0"
> change "pi" user password
> wifi Region := "ES" + ESSID + pwd {self-reboot ?}
> wifi ESSID i pass phrase
> (no cal) start wifi : $ sudo wpa_supplicant -B -i wlan0 -c /etc/wpa_supplicant/wpa_supplicant.conf
> "rfkill list"
> "rfkill unblock 0" - enable wifi
> localization - Madrid
$ df -h
size used use mount
/dev/root 1,6 G 1,2 GB 82 % /
$ sudo systemctl enable ssh
$ sudo systemctl start ssh
$ sudo apt install moreutils
$ ping 8.8.4.4 | ts
Do NOT
$ sudo raspi-config
> boot to GUI
> do "sudo apt-get install lightdm" to allow configuration of boot to desktop - no space left on device
> dpkg interrupted, so run "sudo dpkg --configure -a"
> sudo apt-get purge lightdm
- instalem :
- pip
$ sudo apt install python3-pip
- ifaddr
pi@pi0:~ $ python3 -m pip install ifaddr
- psutil
pi@pi0:~/python/tinet $ python3 -m pip install psutil
- dubtes :
- where is "wpa_supplicant.conf" file located ? Crec que "/etc/wpa_supplicant/wpa_supplicant.conf"
que fem amb el PiZero ?
Volem tenir :
- motd
- engegades.log
- missatge a TG (amb la IP externa)
- backup per email
- HTML a Tinet
- watchdog del wifi
- enviar la IP externa per email
- llegir la temperatura, el voltatge i el current del dia del Fronius i guardar en fitxer JSON -> /home/pi/python/fronius
- nodejs http://sebas-r0.duckdns.org:2000 per mostrar
- potencies vistes pel SmartMeter : produida, consumida, diferencial
- temperatura, tensio i corrent actual
- grafica de temperatura de una data determinada
serveis al PiZero
Els poso de "usuari", es a dir, a "~/.config/systemd/user/"
serveis de engegada
Definim el entorn del servei :
pi@raspberrypi:~/.config/systemd/user $ cat pizero_start.service
[Unit]
Description=Servei de engegada del PiZero (v 1.a)
Wants=network-online.target
After=network-online.target
[Service]
Type=simple
Restart=no
WorkingDirectory=/home/pi/eines
ExecStart=/home/pi/eines/pizero_start_job.sh
StandardOutput=syslog
StandardError=syslog
SyslogIdentifier=pizero_start
# User=pi --- "user service" requires not to have this sentence
Environment=NODE_ENV=production
[Install]
WantedBy=default.target
Implementem el servei :
pi@raspberrypi:~/eines $ cat pizero_start_job.sh
#!/bin/bash
myLog="/home/pi/logs/engegades.log"
date_name=`date +"Y%y/M%m/D%d"`
time_name=`date +"h%H:m%M"`
szTs="[$HOSTNAME] $date_name - $time_name"
szId="+++ +++ +++ ($szTs) ($0) from /home/pi/eines/pizero_start_job.sh"
# timestamp system start at own log file
echo "$szId" >> $myLog
# trace in /var/log/syslog
logger -i -p user.info $szId
exit 0
Quatre comandes mes
pi@raspberrypi:~/eines $ touch /home/pi/logs/engegades.log # crear el fitxer buid
pi@raspberrypi:~/eines $ systemctl --user enable pizero_start.service # activar el servei
pi@raspberrypi:~/eines $ systemctl --user start pizero_start.service # engegar el servei
pi@raspberrypi:~/eines $ systemctl --user cat pizero_start.service # llistar el contingut del servei
pi@raspberrypi:~/eines $ systemctl --user daemon-reload # despres de canviar el servei cal recarregar
pi@raspberrypi:~/eines $ systemctl --user status pizero_start.service # veure el estat del servei
PiZero - command line only
Deixem el Pi_0 sense GUI (com es fa aixo ?)
Si volem configurar el wifi (as Belkin or b22 or Masmovil), fem servir sudo raspi-config :
- 1 - System Options
- S1 - Wireless LAN
- enter SSID
- enter passphrase
PiZero - nodeJS per PKW
See
NodeSource GitHub page to find latest version (18.0 at 20220626)
pi@pi0:~ $ curl -fsSL https://deb.nodesource.com/setup_18.x | bash -
## Installing the NodeSource Node.js 18.x repo...
## You appear to be running on ARMv6 hardware.
Unfortunately this is not currently supported by the NodeSource Linux distributions.
Please use the 'linux-armv6l' binary tarballs
available directly from nodejs.org for Node.js 4 and later.
Ho fem a ma, com abans :
pi@pi0:~/soft $ curl -o node-v11.15.0-linux-armv6l.tar.gz https://nodejs.org/dist/latest-v11.x/node-v11.15.0-linux-armv6l.tar.gz
pi@pi0:~/soft $ tar -xzf node-v11.15.0-linux-armv6l.tar.gz
pi@pi0:~/soft $ sudo cp -r node-v11.15.0-linux-armv6l/* /usr/local/
pi@pi0:~/soft $ which node
/usr/local/bin/node
pi@pi0:~/soft $ node -v
v11.15.0
PiZero Javier
Enviar mensaje SMS a un movil indicando geolocalizacion
Esquema :
Power requirements
- Model B+ : current consumption = 300 mA ; daily power consumption (Amps x 5 V x 24 hrs) = 36 Wh
A weather station in itself does not consumes too much power.
However, if a Wi-Fi or 3G module is needed, the majority of the power is consumed by these devices.
With a simple script running on the Raspberry, the connection could be disconnected and used only when needed based on the power level information provided by PiSolMan.
- Juanmi Taboada :
SIMCOM SIM7600 GSM/GRPS/GPS/Bluetooth Modules will consume a peak current of 2 A when communicating with the network.
how to send a SMS - 4G HAT
HAT expansion boards = Hardware Attached on Top
SIM7600 vs SIM868
By support@waveshare.com
- SIM7600E-H 4G HAT:
- 4G Connectivity:
The SIM7600E-H HAT provides 4G LTE connectivity, which offers faster data transfer rates compared to traditional 2G or 3G networks.
This is useful for applications that require higher bandwidth, such as video streaming, large data uploads/downloads, and real-time communication.
- LTE Bands:
The module supports various LTE bands, which determine its compatibility with different cellular networks around the world.
Make sure to check whether the bands supported by the module match those used by your cellular carrier.
- Additional Features:
Depending on the specific model of the SIM7600E-H HAT, it may include features like GNSS (Global Navigation Satellite System) for location tracking,
which can be useful for applications that require geolocation services.
- GSM/GPRS/GNSS SIM868 HAT:
- 2G Connectivity:
The SIM868 HAT provides 2G GSM/GPRS connectivity.
GSM/GPRS is an older cellular technology with slower data rates compared to 3G or 4G.
It's still used in some regions where 2G networks are available or as a backup option.
- GNSS:
Similar to the SIM7600E-H, the SIM868 HAT also includes GNSS capabilities for location tracking using satellites like GPS, GLONASS, and BeiDou.
- Power Efficiency:
Since 2G technology is less power-hungry compared to 3G or 4G, devices using the SIM868 module might be more power-efficient,
which can be important for battery-powered IoT devices.
Conclusion : use SIM7600 to access a 4G mobile network, not SIM868 as it is 2G
Lletres al SIM7600
For different regions, we provide multiple LTE Cat-4/Cat-1 HATs to choose from:
- SIM7600A-H 4G HAT: mainly applicable in North America (US, CA)
- SIM7600E-H 4G HAT, SIM7600E LTE Cat-1 HAT, A7600C1 Cat-1/GSM/GPRS HAT: mainly applicable in Europe, Southeast Asia, West Asia, Africa, China, North Korea
- SIM7600SA-H 4G HAT: mainly applicable in Australia, New Zealand, Taiwan, Latin America
- SIM7600CE 4G HAT, SIM7600CE-CNSE 4G HAT, A7600C1 Cat-1/GSM/GPRS HAT: mainly applicable in China, and some Southeast Asia countries
- SIM7600G-H 4G HAT: the global version
Please check the supported bands according to your local service provider, select the proper one when placing order.
The biggest difference between LTE CAT1 and CAT4 is the data rate.
While CAT1 offers a maximum of 10 Mbps downlink and 5 Mbps uplink, the LTE CAT4 offers a maximum of 150 Mbps downlink and 50 Mbps uplink.
3g dongle
If we have a router near enough, we can connect to it using a 3G modem
modem GSM "ZTE MF190" 3G en
Amazon : 48 €
enviar SMS usando ZTE MF190 :
hristo borisov
Solar charge controller
FV input < 50 V
dimensionament de la bateria
Condicions ;
- voltatge = 12 volts
- carrega = 1 Ampere durant 1 hora : 12 Wh o 1000 mAh
postes ja existents i empreses
Test bed
Tinc :
- panel solar 18 V 10 W
- regulador 20124 - 20 A
- bateria
PowerSafe 12V92F 92 Ah www.enersys.com Gener 2018 27 Kg
Poste version 1
Esquema :
.---------. .-------------. .--------.
| | | | .------------. | |
| panel | ----- | | ----- | pulsador | ----- | llum |
| solar | ----- | regulador | .------------. | i |
| | | | | so |
| | | | -------------------------- | |
.---------. .-------------. .--------.
| |
| |
.-------------.
| |
| bateria |
| |
.-------------.
Components :
[ caixa ] -
Legrand 0 921 96 ; plexo IP55 ; 31 x 24 x 13 cm {85 €} - també a
Diotronic
[ panel solar ] -
Enjoy Solar 10 W, 18 V ; 30,4 x 27 x 1,8 centímetros ; 1 Kg {25 €}
|
[ regulador ] -
Thlevel 30 A ; 13,8 x 8,1 x 4,2 cm ; 150 gr {20 €}
|
[ bateria ] -
Master U-Power UP - batería plomo AGM 7 Ah 12 V ; 15,1 x 6,5 x 9,9 cm ; 1,88 kilogramos {14 €}
-
LifePo4 - bateria fosfato de hierro y litio BMS, 12 V 6 Ah, más de 10000 ciclos profundos {30 €}
|
[ pulsador ] -
Eaton 216522 - IP67/IP69K {29 €}
|
[ luz y sonido ] -
Tangxi hgt1soa6x7 - sirena estroboscópica, 110 dB, 12 V, 300 mA {14 €}
Roberee 9w0cgom4q8 - sirena estroboscópica, 120 dB, 12 V, 500 mA, 15 W {13 €}
luz estroboscopica :
220 v,
12 v
[ cable ] -
La energía se refiere a la capacidad de un sistema para realizar trabajo,
mientras que la potencia se refiere a la rapidez con la que se realiza dicho trabajo.
La energía se mide en julios (J), mientras que la potencia se mide en vatios (W).
Fem 4 números ...
Misc URLs
- raspberrypi.dk, 92 €
4G HAT for Raspberry Pi – SIM7600-GH – 4G/3G/2G
In the box: SIM7600G-H 4G HAT x1, LTE Antenna x1, GPS External Antenna (B) x1, USB type A plug to micro plug cable x2, RPi screws pack (2pcs) x1
- 4G HAT, LTE Cat-4 4G/3G/2G Communication & GNSS Positioning, 90 €
SIM7600E-H based
- Raspberry Pi GSM/GPRS/GNSS Bluetooth HAT Expansion Board GPS Module, 38 €
SIM868 based
GSM/GPRS/GNSS HAT,
user manual
GSM - (Global System for Mobile communication) is a digital mobile network
GPRS - General Packet Radio Services (GPRS) is a best-effort packet-switching protocol
for wireless and cellular network communication services
GNSS - global navigation satellite system
Global Navigation Satellite System refers to a constellation of satellites providing signals from space that transmit positioning and timing data to GNSS receivers
- using
PiJuice solar kit
- run Raspberry on solar power video +
Adafruit components
panel + charger + 3,7 v 4400 mAh battery
- dongle
Aliexpress SIM7600E-H 4G con antena, comunicación 4G de grado industrial y posicionamiento GNSS periférico,
92 € - cal una SIM i no la porta
- comprar
Raspberry 4 en Amazon : 140 €
- enviar SMS desde Raspberry
usando SIM7600
- comprar
HAT 4G "SIM7600" en Amazon : 90 €
- antena 4G/GPS ?
- tienda : Sueprat, c Consell de Cent, 245