|
home / nuvol
(navigation links)
|
gnóthi seautón -> temet nosce
|
La ferralla xerra amb el núvol - IoT
go 2 top
IoT cloud services :
Best cloud computing services March 2021 :
- Microsoft Azure
- Amazon Web Services
- Google Cloud
- IBM Cloud
- Oracle Cloud Infrastructure
- CloudLinux
Forester report, Q1 2021
Forbes on Forester :
{molt interessant}
“IBM and Oracle will retreat to familiar territory, and Alibaba will threaten Google …
In 2020, IBM and Oracle will no longer try to win on the general-purpose, hyperscale, global public cloud platform battleground
now dominated by AWS, Azure, Google and Alibaba.
IBM will focus on helping enterprises use the OpenShift development platform, on any cloud, to modernize core business apps.
Oracle will focus on its SaaS and autonomous database products, recommending Azure for general-purpose cloud development services
like AI/ML, Kubernetes/containers, internet of things (IoT), and other emerging innovations.”
Market share May 2021 :
- AWS 32 %
- Azure 19 %
- Google 7 %
“AWS had the unusual advantage of a seven-year head start before facing like-minded competition.
As a result, the AWS services are by far the most evolved and most functionality-rich.”
Read the Forester report :
As a result of these trends, cloud data warehouse customers should look for providers that offer:
- A solution that simplifies a data warehouse deployment.
Finding new insights from data is an iterative, continuous, laborious process that requires a stable data warehouse.
Look for solutions with expanded automation capabilities to automate data ingestion, query tuning, data processing,
and data integration to accelerate various business use cases.
- A solution that can deliver the performance and scale requirements you need.
As you start to store and process large amounts of data, performance and scale become critical.
Look for solutions that support thousands of concurrent users and queries per second and offer the ability to scale up and down based on business requirements.
Ask the vendor for customer references when storing and processing
more than 100 terabytes of data or dealing with more than 100 concurrent users.
- A roadmap that is as bold as your cloud ambitions.
Most providers continue to simplify their solutions by enabling nontechnical users to access data directly.
Look at vendors' roadmaps that focus on integration with data lakes and object stores, enable AI and ML automation capabilities,
expand integration with various cloud software-as-a-service (SaaS) sources, and support enhanced analytics capabilities natively.
Leaders
- Google gains strong momentum across various industry verticals.
Google BigQuery is a fully managed, serverless cloud data warehouse that utilizes columnar storage and can scale to hundreds of petabytes leveraging standard SQL.
BigQuery integrates with Cloud BigTable, Google Cloud Storage, Cloud AI Notebooks, and Google Sheets, giving users the ability to join data across various systems.
Data engineers can access BigQuery's storage layer with Spark, Dataflow, and other processing tools, further uniting Google's data ecosystem.
BigQuery has built-in machine learning capabilities, which allows the creation and execution of ML models using SQL queries.
You can access BigQuery using Cloud Console, the command-line tool, or REST APIs using various client libraries such as Java, .Net, or Python.
Customers like Google's frequency of new data warehouse releases, business value, future-proof architecture, high-end scale, geospatial capabilities,
strong AI/ML capabilities, good security capabilities, and broad analytical use cases.
Top use cases include business intelligence (BI) acceleration, internet-of-things (IoT) analytics, customer intelligence, AI/ML-based analytics,
data science, data collaboration, and data services.
- Amazon Web Services' Amazon Redshift continues to have strong adoption.
Amazon Redshift is a mature cloud data warehouse with broad capabilities and an expanding ecosystem.
It is a fully managed, petabyte-scaled data warehouse that's part of AWS Analytics Services,
including Amazon Kinesis, Amazon Elasticsearch Service, Amazon CloudSearch, Amazon EMR, Amazon Athena, Amazon SageMaker, and AWS Glue.
Amazon Redshift can save results back to an S3 data lake that can be leveraged by other analytical services such as Amazon EMR, Amazon Athena, and Amazon SageMaker.
Amazon Redshift's federated query unifies analytics across data warehouses, data lakes, and databases.
Customers like AWS's data lake integration, Postgres compatibility, performance at scale, serverless architecture, security and compliance,
and high availability and disaster recovery capabilities.
Top use cases include BI, data services, AI/ML-based analytics, data science, and customer intelligence.
local API : open or closed ?
Open Local API (The "Gold Standard")
- Shelly
Every Shelly device has a built-in web server and a fully documented HTTP/MQTT API.
You can control them via a simple web browser command like http://[device-ip]/relay/0?turn=on
- Meross: via the Meross LAN integration (e.g. in Home Assistant) you can control Meross plugs locally using HTTP or MQTT.
- Athom / Kauf / CloudFree
pre-flashed with Tasmota or ESPHome (open-source firmware). They are "born" open.
- Espressif-based / ESP8266 Plugs: some smart plugs built on ESP chips support local control
- ROWI Smart Plug has an open REST API and works locally, especially with ESPHome integration
- myStrom offers documented local REST API capabilities.
The "New" Open (Matter over Wi-Fi)
- TP-Link Kasa / Tapo - look for models like KP125M or P125M.
If you buy the non-Matter versions of these same plugs, the local API is often restricted or proprietary.
If you buy the Matter version, it is locally open to any Matter controller (Apple Home, Home Assistant, Google Home).
- Meross - kook for models like MSS115.
Closed :
- Tapo after firmware version 1.4
- Wyze - aggressively cloud-dependent.
- Amazon Smart Plug - locked exclusively to the Alexa ecosystem.
There is no way to send a command to this plug without going through Amazon's servers.
- Tuya / Smart Life (Standard Wi-Fi Models)
Millions of generic "Smart Life" plugs use Tuya chips. Out of the box, they are cloud-only.
Gemini "what smart plug have open local api and what ones have it closed"
Matter over Wi-Fi
It is a standardized way for smart devices to talk to each other over your existing Wi-Fi network.
The device you buy has to have the "manual pairing code" from the device printed on the plug ! Sample : "3497-211-2365"
can i send matter commands using python
There are Python implementations and libraries that support the Matter protocol
- CircuitMatter is a pure Python implementation of the Matter IoT protocol. It allows you to create and control Matter devices directly with Python,
github -> ? AdaFruit ?
- there are also Python bindings and SDK components from the official Matter (Connected Home over IP) project,
allowing you to write Python scripts that simulate Matter devices and respond to commands. E
Example scripts exist to handle on/off commands using Python callbacks.
- the python-matter-server project implements a Matter controller server in Python, communicating over WebSockets.
Perplexity "can i send matter commands using python"
Amazon AWS
Amazon Web Services (AWS) is the world’s most comprehensive and broadly adopted cloud platform
AWS Services for Mobile App Data Management -
AWS provides multiple ways to store and manage your data so you can choose the right services to fit your needs for your mobile application.
- cloud storage - Amazon S3
- user data sync and identity management - Amazon Cognito
- NoSQL database - Amazon DynamoDB
Amazon Simple Storage Service (Amazon S3) is an object storage service that offers scalability, data availability, security, and performance.
This section demonstrates how to use the AWS SDK for Python to access Amazon S3 services :
examples
Boto is the Amazon Web Services (AWS) SDK for Python.
documentation
Alexa Voice Service Integration for AWS IoT Core
Alexa Voice Service (AVS) Integration is a new feature of AWS IoT Core
that enables device makers to make any connected device an Alexa Built-in device.
AVS iOT,
docs aws amazon index
Alexa Smart Home skill
Smart home skills provide a simple way for you to enable Alexa voice interaction
to control and check the status of cloud-connected devices.
steps to build a Smart Home skill
The code for your smart home skill is hosted as a Lambda function on AWS.
AWS Lambda is a service that lets you run code in the cloud without managing servers.
Alexa sends your skill requests and your code inspects the request,
takes any necessary actions such as communicating with the device cloud for that customer, and then sends back a response.
- to configure a new smart home skill, you need an account on the Amazon Developer Console.
If you don't already have an account,
go to https://developer.amazon.com/alexa/console/ask
and create an account.
done (20200520) - dashboard
- open the Amazon
Developer Console in a browser
- click the "Create Skill" button and enter the skill name
- under "choose a model", select "Smart Home" and click "create skill"
- select "Payload Version" as "v3" and click "save"
- copy "your skill id" to clipboard - amzn1.ask.skill.db6b2313-dfdf-4e51-a7b9-ba0fcad361ee
- "default endpoint" required - provide the Amazon Resource Name (ARN) for your Lambda function -> {later}
- sign in to your AWS Account
- create an IAM Role for Lambda - if you haven't worked with Lambda before,
you will need to create an Identity and Access Management (IAM) role that enables basic execution.
- to create an IAM role, Navigate to the IAM console
- choose Roles and click ""Create a new role"
- select AWS Lambda under AWS Service Role
- name = "sebas_lambda_role"
- create a Lambda function and add code :
- on the
AWS Console ,
region N. Virginia (top left), under Compute, select
Lambda
- select
region , then
- click "create a Lambda function"
- select "Author from scratch" and fill
- name = "first_lambda" -> "lambda_1"
- runtime "nodejs 12.x"
- role = sebas_lambda_role
"Successfully created the function first_lambda" / "Successfully created the function lambda_1"
- we are placed in "Configuration" of "first_lambda"
- in the Configuration designer, under "Add triggers" select the "Alexa Smart Home trigger"
No el trobo (first_lambda) -> depen de la "region"
El trobo amb North Virginia !
- in "Application ID", write de Application ID from the Developer Console,
as "amzn1.ask.skill.db6b2313-dfdf-4e51-a7b9-ba0fcad361ee"
- leave "Enable trigger" checked
- click "Add" -> "The trigger db6b2313-dfdf-4e51-a7b9-ba0fcad361ee was successfully added to function lambda_1. The function is now receiving events from the trigger"
steps {*** brutal ***},
manage skills in the developer console,
We have "n" consoles
accedim a AWS des python
To access AWS from python we go :
- install boto : "sudo pip install -U boto"
- access AWS console and get Access Keys and store then into /etc/boto.cfg
getting started
coneixements de AWS
TP-Link cloud
TP-Link Arquitecture
There are basically 3 components involved here:
- a web service from TP-Link
- the Kasa app that runs on your Smartphone, connected to Internet. It does (at least) two things:
- periodically get the status of the plug (is it turned on/off), and show the status in the app (green icon if the plug is switched on).
This happens every two seconds, when the app is in foreground and visible.
- when the user toggles the switch from the app, it will send the new relay state change request to the TP-Link web service.
- the plug, connected to Internet via your wifi network.
It will periodically contact the TP-Link web service for any status change, like a request to turn on/off.
tplink cloud api,
how to control HS100 from internet
Kasa
Kasa Smart is an Android app that lets you add, configure, monitor, and control
your connected TP-LINK Smart Home devices from anywhere in the world.
Device Setup - the Smart Plug has two physical buttons:
an on/off relay switch and a device reset button that resets the device if pushed for five seconds or longer.
When plugged in, an unconfigured or freshly reset Smart Plug will start an unsecured open access point
with the SSID “TP-LINK_Smart Plug_XXXX” where XXXX are four hexadecimal numbers.
TP-Link’s Smart Home app “Kasa” makes the smartphone connect to this access point,
sends UDP broadcast packets to 255.255.255.255 to find the Smart Plug IP and proceeds to configure it
with the SSID and password that the user entered into the app.
The Smart Plug then turns off the Access Point and connects to the configured WiFi as a client.
-
Lubomir Stroetmann reverse engineering
Compte :
Storming the Kasa?
Security analysis of TP-Link Kasa smart home devices devices by Andrew Halterman
TP-Link ports
Port 9999 TCP is used for controlling the Smart Plug on the local network via the Kasa app
and is described in the
TP-Link Smart Home Protocol section
Port 1040 UDP is described in the
TP-Link Device Debug Protocol section
9999/tcp TP-Link Smart Home Protocol
1040/udp TP-Link Device Debug Protocol (TDDP)
TP-Link communications in detail
There are 3 steps in managing a TP-Link Smart Plug using CURL,
from here :
- authenticate and get a token -
url
- get device list and URL -
url
- manage the device -
url
TP-Link communications code
Run it at MARS/sebas/tpcloud/tpc.sh
(0) get UUID4
# (0) get UUID v4 - use https://www.uuidgenerator.net/version4
myUUIDv4="d36c43f8-1094-4847-be26-bc5d1b7b025e"
(1) get token
echo -e "\n>>> (1) get token"
R1=$(curl --request POST "https://wap.tplinkcloud.com" \
--data '{"method": "login", "params": { "appType": "Kasa_Android", "cloudUserName": "'$myUSER'", "cloudPassword": "'$myPWD'",
"terminalUUID": "'$myUUIDv4'" } }' \
--header "Content-Type: application/json")
# the answer (in $R1) has the form
# R1='{"error_code":0,"result":{"accountId":"13936217","regTime":"2020-04-28 14:44:54",
"email":"myemail@gmail.com","token":"d26ab4bc-B1d9iPB3oEi6RVgByfFk5NJ"}}'
(2) get device list
echo -e "\n>>> (2) get device and URL"
R2=$(curl --request POST "https://wap.tplinkcloud.com?token=$myTOK" \
--data '{"method":"getDeviceList"}' \
--header "Content-Type: application/json")
# the answer (in $R2) has the form
# R2='{"error_code":0,"result":{"deviceList":[]}}'
# there is no device in the list as I have no TP-Link device registered
TP-Link communications sample
var express = require('express');
var bodyParser = require('body-parser');
var TPLink = require("tplink-cloud-api")
var app = express();
const TPLINK_USER = process.env.TPLINK_USER;
const TPLINK_PASS = process.env.TPLINK_PASS;
const TPLINK_TERM = process.env.TPLINK_TERM
app.use(express.static('public'));
app.use(bodyParser.json());
app.get("/", function (request, response) {
response.sendFile(__dirname + '/views/index.html');
});
app.post('/', async function(request, response){
console.log(request.body); // your JSON payload
var myTPLink = await TPLink.login(TPLINK_USER, TPLINK_PASS,TPLINK_TERM);
await myTPLink.getDeviceList();
// Customize below this line:
await myTPLink.getHS100("My Smart Plug").toggle();
// await myTPLink.getHS100("My Smart Plug 2").powerOn();
// await myTPLink.getHS100("My Smart Plug 3").powerOff();
// await myTPLink.getHS100("My Smart Plug 4").powerOff();
// For LB100, LB110 & LB120
// on_off: 1 on, 0 on_off
// brightness: 0-100
// await myTPLink.getLB100("Bedroom LB120").transition_light_state(1, 90);
// For LB130:
// on_off: 1 on, 0 on_off
// brightness: 0-100
// hue: 0-360 See HSB in http://colorizer.org/
// saturation: 0-100
// await myTPLink.getLB130("Kitchen LB130").transition_light_state(1, 90, 150, 80);
response.send("done"); // echo the result back
});
var listener = app.listen(process.env.PORT, function () {
console.log('This app is listening on port ' + listener.address().port);
});
glitch nodejs code
Tuya cloud
There are a lot of companies offering low cost devices, e.g. Sonoff, Tuya, Jinvoo, Teckin etc.
Most of these solutions are based on
ESP32 or
ESP8266 , both system on a chip microcontrollers
See How to set up ESP8266 as a WiFi Access Point (AP Mode)
ITEAD’s Sonoff line is a range of Internet-of-Things devices based around the ESP8266 - hackaday
Which app is better Smart Life or Tuya ?
Tuya Smart App and Smart Life App are both official Tuya App.
The only difference between the two is that the Tuya Smart App uses the Tuya logo and elements,
while the Smart Life App removes all Tuya logo and elements.
Tuya pairing
To pair the device to the local network, we have 3 options :
- EZ mode pairing (fast blinking, 2 times per second)
- AP (access point) pairing (slow blinking, 1 time every 2 seconds)
- Bluetooth (dual-mode product)
WiFi + Bluetooth dual-mode
- power on the device first.
- then, enable Bluetooth on your mobile phone
- open the app.
- Bluetooth and Wi-Fi+Bluetooth dual-mode devices that are ready for pairing will be displayed.
EZ mode pairing
- You set the IoT device into a promiscuous listening mode
- From a mobile device connected to a WiFi Access Point, you start SmartConfig pairing using the relevant app
- Your mobile device encodes your WiFi credentials into sequences of data length values
- Your mobile device sends the sequences of broadcast UDP packets to your WiFi AP
- The IoT device sniffs the sequences and decodes the data lengths to retrieve the WiFi credentials
- The IoT device joins the WiFi network using the credentials and continues communication from there
The mobile App sends a UDP broadcast packet or a multicast packet containing the SSID/Password into the air.
The Wi-Fi module of the device will receive the UDP packet as long as the UDP organization form is recognizable.
SSID/Password will be decrypted in the received UDP packet and sent to join the Wi-Fi router.
AP mode pairing
In this mode, the IoT device creates its own Wi-Fi network (hotspot, named "SmartLife-XXXX").
AP (Access Point) pairing works as you expect, similar to Google Chromecast and similar devices.
The device will start it’s own AP, you connect to it and share your WiFi credentials,
Then the device closes the AP and joins into your local network.
How to enter AP mode
- with a plug, with only one blue button :
- plug the plug
- push the blue button for 5 seconds
- LED will start fast blinking (EZ mode)
- push the blue button again for 5 seconds
- LED will start slow blinking (AP mode)
- with a bulb, with no buttons at all :
- plug the bulb
- on the swith, go ON-OFF-ON-OFF-ON-OFF in a slow pace (1 change per second)
- bulb will start fast blinking (EZ mode)
- again, go ON-OFF-ON-OFF-ON-OFF in a slow pace (1 change per second)
- bulb will start slow blinking (AP mode)
Pairing links
Tuya access using python
Tuya devices can be controlled via both MQTT and HTTPS API - see
tuyapi
Tuya devices use
port 6668 ( lemariva ),
while TP-Link devices use
port 9999 ( softscheck )
when a device sends a broadcast to port 6666/6667 (UDP), that’s when we connect
Based on python-tuya,
python 3.6.1 interface to ESP8266MOD WiFi smart devices from Shenzhen Xenon
and tuyapi -
a library for communicating with devices that use the Tuya cloud network
See how to get device id and local key
device detection
I have a
Teckin SmartPlug SP21 at IP = 192.168.1.87 {some time ago}
So we try :
nicolau@mars:~$ sudo nmap 192.168.1.87 -p 6668
Starting Nmap 7.60 ( https://nmap.org ) at 2020-12-04 15:15 CET
Nmap scan report for 192.168.1.87
Host is up (0.18s latency).
PORT STATE SERVICE
6668/tcp open irc
Nmap done: 1 IP address (1 host up) scanned in 0.27 seconds
nicolau@mars:~$ sudo nmap 192.168.1.87 -p 6660-6669
Starting Nmap 7.60 ( https://nmap.org ) at 2020-12-21 20:53 CET
Nmap scan report for sp (192.168.1.87)
Host is up (0.017s latency).
PORT STATE SERVICE
6660/tcp closed unknown
6661/tcp closed unknown
6662/tcp closed radmind
6663/tcp closed unknown
6664/tcp closed unknown
6665/tcp closed irc
6666/tcp closed irc
6667/tcp closed irc
6668/tcp open irc
6669/tcp closed irc
Nmap done: 1 IP address (1 host up) scanned in 0.08 seconds
Looks like we have a "Tuya-like" device at home.
Detect TP-Link devices
tp-kasa
Lets try kasa :
nicolau@mars:~$ pip3 install python-kasa --pre
Lets discover the "TP-Link" devices around MARS :
nicolau@mars:~$ kasa
No host name given, trying discovery..
Discovering devices on 255.255.255.255 for 3 seconds
There is nothing, as tp-kasa is
a Python library to control TPLink smart home devices, and my device is Teckin, not TPLink
Direct access to Tuya-like device using python
First we read lemariva :
This only works with devices known as "Tuya-like", as Teckin outlets.
If your power outlets are compatible, they should have the port 6668 opened
description ,
github
To access a Tuya device from python we need :
- (a) device IP
- (b) device ID
- (c) "version"
- (d) LOCAL_KEY
We get "device IP" from DHCP or by Wireshark.
get Tuya device ID
Then, we need "device ID" :
inside the "Smart Life" app, select the plug you wish to monitor, select the edit pencil icon in the top right
and then "Device Information".
Virtual ID : 35680858b4e62d74d557
IP : 2.138.15.40 {es la IP externa del router}
Or you can use tuya-cli :
nicolau@mars:~/sebas/python/smart_devices$ DEBUG=* tuya-cli wizard
? Do you want to use these saved API credentials? kska5drqa54nec0vpte3 f73dd40109aa440292ee22d3540a02ad eu Yes
? Provide a 'virtual ID' of a device currently registered in the app: 35680858b4e62d74d557
[
{ name: 'llum', id: '74853874e09806b5a3fd', key: '843624b39f4a0fb1' },
{
name: 'endoll',
id: '35680858b4e62d74d557',
key: '3c36029ba8b711e4'
}
]
Without "Smart Life", we can access tuya-like devices using python libraries :
pytuya
or
tinytuya {***}
or
tuyapi
pytuya
nicolau@mars:~$ sudo pip3 install pytuya
Collecting pytuya
Downloading https://files.pythonhosted.org/packages/35/82/a10d977c4a0879c37275e2793d983a8b7ac0f6738e937cdc159d4f3a15c1/pytuya-7.0.6.zip
Complete output from command python setup.py egg_info:
Traceback (most recent call last):
File "/tmp/pip-build-2hvoy6rp/pytuya/pytuya/__init__.py", line 25, in <module>
from Crypto.Cipher import AES # PyCrypto
File "/usr/lib/python3/dist-packages/Crypto/Cipher/AES.py", line 50, in <module>
from Crypto.Cipher import _AES
ImportError: cannot import name '_AES' from 'Crypto.Cipher' (/usr/lib/python3/dist-packages/Crypto/Cipher/__init__.py)
During handling of the above exception, another exception occurred:
Traceback (most recent call last):
File "<string>", line 1, in <module>
File "/tmp/pip-build-2hvoy6rp/pytuya/setup.py", line 9, in <module>
from pytuya.const import __author__, __version__
File "/tmp/pip-build-2hvoy6rp/pytuya/pytuya/__init__.py", line 28, in <module>
import pyaes # https://github.com/ricmoo/pyaes
ModuleNotFoundError: No module named 'pyaes'
----------------------------------------
Command "python setup.py egg_info" failed with error code 1 in /tmp/pip-build-2hvoy6rp/pytuya/
Ens falta "pycrypto" :
nicolau@mars:~$ pip3 install pycrypto
#include "Python.h"
^~~~~~~~~~
compilation terminated.
error: command 'x86_64-linux-gnu-gcc' failed with exit status 1
nicolau@mars:~$ sudo apt-get install python-dev python3-dev
De fet ens faltava "pyaes" :
nicolau@mars:~/sebas/python/smart_plug$ pip3 install pyaes
Collecting pyaes
Downloading https://files.pythonhosted.org/packages/44/66/2c17bae31c906613795711fc78045c285048168919ace2220daa372c7d72/pyaes-1.6.1.tar.gz
Building wheels for collected packages: pyaes
Running setup.py bdist_wheel for pyaes ... done
Stored in directory: /home/nicolau/.cache/pip/wheels/bd/cf/7b/ced9e8f28c50ed666728e8ab178ffedeb9d06f6a10f85d6432
Successfully built pyaes
Installing collected packages: pyaes
Successfully installed pyaes-1.6.1
nicolau@mars:~/sebas/python/smart_plug$ sudo pip3 install pytuya {"sudo" installs global}
Collecting pytuya
Using cached https://files.pythonhosted.org/packages/35/82/a10d977c4a0879c37275e2793d983a8b7ac0f6738e937cdc159d4f3a15c1/pytuya-7.0.6.zip
Collecting pyaes (from pytuya)
Building wheels for collected packages: pytuya
Running setup.py bdist_wheel for pytuya ... done
Stored in directory: /home/nicolau/.cache/pip/wheels/e7/fc/7e/31bede9a0399d18d5df9367666ee2b17caacfef93833d8de1c
Successfully built pytuya
Installing collected packages: pyaes, pytuya
Successfully installed pyaes-1.6.1 pytuya-7.0.6
github powermonitor +
plugpower.py
extract Tuya local keys video {***},
a helpful video walk-through of getting the LOCAL_KEYs, by great Tech With Eddie
tinytuya python module by Jason Cox
Lets use *** tinytuya ***, (good docu !)
a python module to interface with Tuya WiFi smart devices
using the local area network (LAN) or the cloud (TuyaCloud API).
Here is
configuring and programming instructions -
tinytuya at github
And here is Jason A. Cox's
code
read descr -
Note: Devices need to be activated by Smart Life App
Starting with v1.3.0, TinyTuya can also connect to the Tuya Cloud to poll status and issue commands to Tuya devices.
This is a compatible replacement for the
pytuya PyPi module.
Magnificent command :
python -m tinytuya scan -force
# or with debug
python -m tinytuya scan -force -d
tinytuya error message
If we get this error message :
Device status: {'Error': 'Unexpected Payload from Device', 'Err': '904', 'Payload': None}
... it is probable you have to use :
d = tinytuya.OutletDevice( PLUGID, PLUGIP, PLUGKEY )
d.set_version(3.4)
On the opposite situation, you can get this message :
Reading test: response {{'Error': 'Check device key or version', 'Err': '914', 'Payload': None}}.
Dictionary {{'Error': 'Check device key or version', 'Err': '914', 'Payload': None}}.
... and you have to use version 3.3 instead of 3.4
Tuya Data Points - DPS Table
The Tuya devices send back data points (DPS) also called device function points, in a json string.
The DPS attributes define the state of the device.
Each key in the DPS dictionary refers to key value pair, the key is the DP ID and its value is the dpValue.
You can refer to the Tuya developer platform
for definition of function points for the products.
How to get a DPS dump :
$ cd /home/sebas/dades/python/smart_devices/dump/tuyadebug
$ ./test.py <deviceID> <IPaddress> <localKey>
Tuya Data Cloud
From here :
setregion(apiRegion)
cloudrequest(url, action=[POST if post else GET], post={}, query={})
getdevices(verbose=False)
getstatus(deviceid)
getfunctions(deviceid)
getproperties(deviceid)
getdps(deviceid)
sendcommand(deviceid, commands)
getconnectstatus(deviceid)
getdevicelog(deviceid, start=[now - 1 day], end=[now], evtype="1,2,3,4,5,6,7,8,9,10", size=100, params={})
Install or update tinytuya
nicolau@mars:~$ python3.7 -m pip install --upgrade tinytuya
Posem al darrer nivell :
nicolau@mars:~/sebas/python/smart_devices$ python -m pip install tinytuya
WARNING: There was an error checking the latest version of pip.
nicolau@mars:~/sebas/python/smart_devices$ python -m pip install --upgrade pip
First we verify
nicolau@mars:~$ python3.7 -m tinytuya wizard
/usr/bin/python3.7: No module named tinytuya
nicolau@mars:~$ python3.7 -m pip install tinytuya
nicolau@mars:~$ python3 -m tinytuya
TinyTuya (Tuya device scanner) [1.1.1]
Scanning on UDP ports 6666 and 6667 for devices (15 retries)...
3.3 Device Found [Valid payload]: 192.168.1.87
ID = 35680858b4e62d74d557, Product ID = r15JnoGqWPM4PPtl, Version = 3.3
No Stats - Device Key required to poll for status
Scan Complete! Found 1 devices.
Display tinytuya actual version
nicolau@mars:~/sebas/python/smart_devices$ python -m tinytuya version
TinyTuya [1.8.0]
Usage:
python -m tinytuya [command] [<ax_retry>] [-nocolor] [-h]
wizard Launch Setup Wizard to get Tuya Local KEYs.
scan Scan local network for Tuya devices.
devices Scan all devices listed in devices.json file.
snapshot Scan devices listed in snapshot.json file.
json Scan devices listed in snapshot.json file [JSON].
<max_retry> Maximum number of retries to find Tuya devices [Default=15]
-nocolor Disable color text output.
-force Force network scan for device IP addresses.
-h Show usage.
Devices running the latest protocol version 3.3 (e.g. Firmware 1.0.5 or above) will require a device LOCAL_KEY to read the status.
Both 3.1 and 3.3 devices will require a device LOCAL_KEY to control the device.
Follow these instructions to get the LOCAL_KEY:
- create a Tuya Developer account on iot.tuya.com and log in.
- go to Cloud Development -> Create a project (note the Authorization Key: API ID and Secret for below)
Authorization KeyAccess ID/Client ID: kska5drqa54nec0vpte3 API ID Key
Access Secret/Client Secret: f73dd40109aa440292ee22d3540a02ad API Secret
- go to Cloud Development -> select your project -> Project Overview -> Linked Device -> Link devices by App Account (tab)
- click 'Add App Account' and it will display a QR code.
Scan the QR code with the Smart Life app on your Phone
by going to the "Me" tab in the Smart Life app and clicking on the QR code button [-] in the upper right hand corner of the app.
When you scan the QR code, it will link all of the devices registered in your Smart Life app into your Tuya IoT project.
- verify under Cloud Development -> select your project -> API Setting / API Group
that the following API groups have status "Open":
- Authorization management
- User management
- Device Management
- Network Management
- and Device Control
tuyapi document
Lets run "wizard" - see data from "Cloud" + "Device List" in https://iot.tuya.com/ :
nicolau@mars:~/sebas/python/smart_plug$ python3 -m tinytuya wizard
TinyTuya Setup Wizard [1.1.1]
Enter API Key from tuya.com: k5drqa54nec0vpte3
Enter API Secret from tuya.com: fd40109aa440292ee22d3540a02ad
Enter any Device ID currently registered in Tuya App (used to pull full list): 30858b4e62d74d557
Enter Your Region (Options: us, eu, cn or in): eu
>> Configuration Data Saved to tinytuya.json
{
"apiKey": "kska5drqa54nec0vpte3",
"apiSecret": "f73dd40109aa440292ee22d3540a02ad",
"apiRegion": "eu",
"apiDeviceID": "35680858b4e62d74d557"
}
Use existing credentials (Y/n):
Traceback (most recent call last):
File "/usr/lib/python3.7/runpy.py", line 193, in _run_module_as_main
"__main__", mod_spec)
File "/usr/lib/python3.7/runpy.py", line 85, in _run_code
exec(code, run_globals)
File "/home/nicolau/.local/lib/python3.7/site-packages/tinytuya/__main__.py", line 48, in &module>
tinytuya.wizard(color)
File "/home/nicolau/.local/lib/python3.7/site-packages/tinytuya/__init__.py", line 1447, in wizard
uid = response_dict['result']['uid']
KeyError: 'result'
tinytuya debug
import tinytuya # === see https://github.com/jasonacox/tuyapower/issues/17
tinytuya.set_debug(True) # turn on Debug - for non-ANSI color use tinytuya.set_debug(True, False)
Display internals :
sebas@minie:~$ python3
Python 3.10.12 (main, Aug 15 2025, 14:32:43) [GCC 11.4.0] on linux
Type "help", "copyright", "credits" or "license" for more information.
>>> import tinytuya
>>> print(tinytuya)
<module 'tinytuya' from '/home/sebas/.local/lib/python3.10/site-packages/tinytuya/__init__.py'>
>>> print(dir(tinytuya))
['ACTIVE', 'AES', 'AESCipher', 'AP_CONFIG', 'AP_CONFIG_NEW', 'BOARDCAST_LPV34', 'BulbDevice',
'CONFIGFILE', 'CONTROL', 'CONTROL_NEW', 'CRYPTOLIB', 'Cloud', 'CoverDevice', 'Crypto', 'Crypto_modes', 'Crypto_version',
'DEFAULT_NETWORK', 'DEVICEFILE', 'DEVICEFILE_SAVE_VALUES', 'DP_QUERY', 'DP_QUERY_NEW', 'DecodeError', 'Device',
'ENABLE_WIFI', 'ERR_CLOUD', 'ERR_CLOUDKEY', 'ERR_CLOUDRESP', 'ERR_CLOUDTOKEN', 'ERR_CONNECT', 'ERR_DEVTYPE',
'ERR_FUNCTION', 'ERR_JSON', 'ERR_KEY_OR_VER', 'ERR_OFFLINE', 'ERR_PARAMS', 'ERR_PAYLOAD', 'ERR_RANGE', 'ERR_STATE', 'ERR_TIMEOUT',
'HEART_BEAT', 'IS_PY2', 'LAN_EXT_STREAM', 'MAXCOUNT', 'MESSAGE_END_FMT', 'MESSAGE_END_FMT_55AA', 'MESSAGE_END_FMT_6699',
'MESSAGE_END_FMT_HMAC', 'MESSAGE_HEADER_FMT', 'MESSAGE_HEADER_FMT_55AA', 'MESSAGE_HEADER_FMT_6699', 'MESSAGE_RETCODE_FMT',
'MessagePayload', 'NO_PROTOCOL_HEADER_CMDS', 'OutletDevice',
'PREFIX_55AA_BIN', 'PREFIX_55AA_VALUE', 'PREFIX_6699_BIN', 'PREFIX_6699_VALUE', 'PREFIX_BIN', 'PREFIX_VALUE',
'PROTOCOL_33_HEADER', 'PROTOCOL_34_HEADER', 'PROTOCOL_35_HEADER', 'PROTOCOL_3x_HEADER',
'PROTOCOL_VERSION_BYTES_31', 'PROTOCOL_VERSION_BYTES_33', 'PROTOCOL_VERSION_BYTES_34', 'PROTOCOL_VERSION_BYTES_35',
'QUERY_WIFI', 'RAWFILE', 'REQ_DEVINFO', 'SCANTIME', 'SCENE_EXECUTE',
'SESS_KEY_NEG_FINISH', 'SESS_KEY_NEG_RESP', 'SESS_KEY_NEG_START',
'SNAPSHOTFILE', 'STATUS', 'SUFFIX_55AA_BIN', 'SUFFIX_55AA_VALUE', 'SUFFIX_6699_BIN', 'SUFFIX_6699_VALUE',
'SUFFIX_BIN', 'SUFFIX_VALUE', 'TCPPORT', 'TCPTIMEOUT', 'TIMEOUT', 'TOKEN_BIND',
'TuyaHeader', 'TuyaMessage', 'UDPPORT', 'UDPPORTAPP', 'UDPPORTS', 'UDP_NEW', 'UNBIND', 'UPDATEDPS',
'WIFI_INFO', 'XenonDevice', '__author__', '__builtins__', '__cached__', '__doc__', '__file__', '__loader__',
'__name__', '__package__', '__path__', '__spec__', '__version__',
'appenddevice', 'assign_dp_mappings', 'base64', 'bin2hex', 'binascii', 'clib', 'core', 'decrypt', 'decrypt_udp',
'deviceScan', 'device_info', 'encrypt', 'error_codes', 'error_json', 'find_device', 'has_suffix', 'hex2bin', 'hmac',
'init', 'json', 'log', 'logging', 'md5', 'namedtuple', 'pack_message', 'pad', 'parse_header', 'payload_dict',
'print_function', 'scan', 'select', 'set_debug', 'sha256', 'socket', 'struct', 'sys', 'termcolor', 'time',
'udpkey', 'unpack_message', 'unpad', 'version', 'version_tuple']
>>>
>>> print(dir(tinytuya.__version__))
['__add__', '__class__', '__contains__', '__delattr__', '__dir__', '__doc__', '__eq__', '__format__',
'__ge__', '__getattribute__', '__getitem__', '__getnewargs__', '__gt__', '__hash__',
'__init__', '__init_subclass__', '__iter__', '__le__', '__len__', '__lt__', '__mod__', '__mul__',
'__ne__', '__new__', '__reduce__', '__reduce_ex__', '__repr__', '__rmod__', '__rmul__',
'__setattr__', '__sizeof__', '__str__', '__subclasshook__',
'capitalize', 'casefold', 'center', 'count', 'encode', 'endswith', 'expandtabs', 'find',
'format', 'format_map', 'index',
'isalnum', 'isalpha', 'isascii', 'isdecimal', 'isdigit', 'isidentifier', 'islower', 'isnumeric',
'isprintable', 'isspace', 'istitle', 'isupper',
'join', 'ljust', 'lower', 'lstrip', 'maketrans', 'partition', 'removeprefix', 'removesuffix',
'replace', 'rfind', 'rindex', 'rjust', 'rpartition', 'rsplit', 'rstrip', 'split', 'splitlines',
'startswith', 'strip', 'swapcase', 'title', 'translate', 'upper', 'zfill']
>>>
tinytuya code
Lets manage my calefa :
pi@R4:~/python/calefa $ cat calefa.py
#!/usr/bin/env python3
# -*- coding: UTF-8 -*-
import sys
import json
in_FN = "dades_calefa.json" # fitxer amb les dades
my_dict = {} # create empty dictionary
import tinytuya # sudo python3 -m pip install tinytuya
# ==============================
def Llegir_Dades ( nom_fitxer, dict ):
print( " >>> llegir dades de (%s)." % (nom_fitxer) )
fd = open( nom_fitxer ) # open JSON file
dict = json.load(fd) # get JSON object as a dictionary
fd.close() # close file
return( dict )
# ==============================
if __name__ == "__main__":
print( "TinyTuya (Tuya Interface) version [%s]\n" % tinytuya.__version__ )
my_dict = Llegir_Dades ( in_FN, my_dict )
for key, value in my_dict.items(): # display JSON data
print( key, ":", value )
sys.exit()
tuya-cli module
The TinyTuya Wizard was inspired by the TuyAPI CLI which is an alternative way to fetch the LOCAL_KEYs.
Install with "npm i @tuyapi/cli -g" and run "tuya-cli wizard" :
nicolau@mars:~/sebas/python/smart_plug$ npm i @tuyapi/cli -g
▐ ╢░░░░░░░░░░░░░░░░░░░░░░░░░░░░░░░░░░░░░░░░░░░░░░░░░░░░░░░░░░░░░░░░░░░░░░░░░░░░░░░░░░░░░░░░░░░░░░░░░░░░░░░░░░░░░░░░░░░░░░░░░░╟
WARN engine @tuyapi/cli@1.13.5: wanted: {"node":">=10"} (current: {"node":"8.10.0","npm":"3.5.2"})
loadDep:update-notifier → ▄ ╢████████████████████░░░░░░░░░░░░░░░░░░░░░░░░░░░░░░░░░░░░░░░░░░░░░░░░░░░░░░░░░░░░░░░░░░░░░░░░░░░░╟
loadDep:got → get ▀ ╢████████████████████░░░░░░░░░░░░░░░░░░░░░░░░░░░░░░░░░░░░░░░░░░░░░░░░░░░░░░░░░░░░░░░░░░░░░░░░░░░░╟
loadDep:type-fest → reque ▌ ╢████████████████████░░░░░░░░░░░░░░░░░░░░░░░░░░░░░░░░░░░░░░░░░░░░░░░░░░░░░░░░░░░░░░░░░░░░░░░░░░░░╟
loadDep:type-fest → addNa ▀ ╢████████████████████░░░░░░░░░░░░░░░░░░░░░░░░░░░░░░░░░░░░░░░░░░░░░░░░░░░░░░░░░░░░░░░░░░░░░░░░░░░░╟
WARN engine decompress-response@5.0.0: wanted: {"node":">=10"} (current: {"node":"8.10.0","npm":"3.5.2"})
loadDep:type-fest → resol ▐ ╢████████████████████░░░░░░░░░░░░░░░░░░░░░░░░░░░░░░░░░░░░░░░░░░░░░░░░░░░░░░░░░░░░░░░░░░░░░░░░░░░░╟
loadDep:defer-to-connect ▌ ╢████████████████████░░░░░░░░░░░░░░░░░░░░░░░░░░░░░░░░░░░░░░░░░░░░░░░░░░░░░░░░░░░░░░░░░░░░░░░░░░░░╟
npm WARN deprecated debug@4.1.1: Debug versions >=3.2.0 <3.2.7 || >=4 <4.3.1 have a low-severity ReDos regression when used in a Node.js environment.
It is recommended you upgrade to 3.2.7 or 4.3.1. (https://github.com/visionmedia/debug/issues/797)
loadDep:through → request ▀ ╢█████████████████████████████░░░░░░░░░░░░░░░░░░░░░░░░░░░░░░░░░░░░░░░░░░░░░░░░░░░░░░░░░░░░░░░░░░░╟
loadDep:through → resolve ▀ ╢█████████████████████████████░░░░░░░░░░░░░░░░░░░░░░░░░░░░░░░░░░░░░░░░░░░░░░░░░░░░░░░░░░░░░░░░░░░╟
npm ERR! Linux 5.4.0-56-generic
npm ERR! argv "/usr/bin/node" "/usr/bin/npm" "i" "@tuyapi/cli" "-g"
npm ERR! node v8.10.0
npm ERR! npm v3.5.2
npm ERR! code EMISSINGARG
npm ERR! typeerror Error: Missing required argument #1
npm ERR! typeerror at andLogAndFinish (/usr/share/npm/lib/fetch-package-metadata.js:31:3)
npm ERR! typeerror at fetchPackageMetadata (/usr/share/npm/lib/fetch-package-metadata.js:51:22)
npm ERR! typeerror at resolveWithNewModule (/usr/share/npm/lib/install/deps.js:456:12)
npm ERR! typeerror at /usr/share/npm/lib/install/deps.js:457:7
npm ERR! typeerror at /usr/share/npm/node_modules/iferr/index.js:13:50
npm ERR! typeerror at /usr/share/npm/lib/fetch-package-metadata.js:37:12
npm ERR! typeerror at addRequestedAndFinish (/usr/share/npm/lib/fetch-package-metadata.js:82:5)
npm ERR! typeerror at returnAndAddMetadata (/usr/share/npm/lib/fetch-package-metadata.js:117:7)
npm ERR! typeerror at pickVersionFromRegistryDocument (/usr/share/npm/lib/fetch-package-metadata.js:134:20)
npm ERR! typeerror at /usr/share/npm/node_modules/iferr/index.js:13:50
npm ERR! typeerror This is an error with npm itself. Please report this error at:
npm ERR! typeerror &http://github.com/npm/npm/issues>
Mirem i adaptem :
nicolau@mars:~$ npm -version
6.14.9
nicolau@mars:~$ node --version
v12.20.0
Ara (20201204) que som al darrer nivell, instalem tuya-cli correctament :
nicolau@mars:~$ sudo npm i @tuyapi/cli -g
I ara busquem
nicolau@mars:~$ tuya-cli wizard
(node:21034) UnhandledPromiseRejectionWarning: Error: EACCES: permission denied, open '/home/nicolau/.config/configstore/@tuyapi/cli.json'
You don't have access to this file.
nicolau@mars:~$ sudo tuya-cli wizard
? The API key from tuya.com: k5drqa54nec0vpte3
? The API secret from tuya.com fd40109aa440292ee22d3540a02ad
? Provide a 'virtual ID' of a device currently registered in the app: 30858b4e62d74d557
There was an issue fetching that device. Make sure your account is linked and the ID is correct.
Interesting message
nicolau@mars:~/sebas/python/smart_plug$ tuya-cli -V
1.13.5
┌───────────────────────────────────────────────────────────┐
│ @tuyapi/cli update check failed │
│ Try running with sudo or get access │
│ to the local update config store via │
│ sudo chown -R $USER:$(id -gn $USER) /home/nicolau/.config │
└───────────────────────────────────────────────────────────┘
Lets debug tuya-cli :
github
nicolau@mars:~/sebas/python/smart_plug$ DEBUG=* tuya-cli wizard
(node:21265) UnhandledPromiseRejectionWarning: Error: EACCES: permission denied, open '/home/nicolau/.config/configstore/@tuyapi/cli.json'
You don't have access to this file. {in fact it is "/home/nicolau/.config/configstore/update-notifier-@tuyapi/cli.json"}
nicolau@mars:~/sebas/python/smart_plug$ sudo DEBUG=* tuya-cli wizard
? The API key from tuya.com: k5drqa54nec0vpte3
? The API secret from tuya.com fd40109aa440292ee22d3540a02ad
? Provide a 'virtual ID' of a device currently registered in the app: 30858b4e62d74d557
[
Error: you don't have access to this API
at OpenAPI._client.got_1.default.extend.hooks.afterResponse (/usr/local/lib/node_modules/@tuyapi/cli/node_modules/@tuyapi/openapi/dist/api.js:73:31)
at EventEmitter.<anonymous> (/usr/local/lib/node_modules/@tuyapi/cli/node_modules/got/dist/source/as-promise.js:87:38)
at processTicksAndRejections (internal/process/task_queues.js:97:5),
Error: you don't have access to this API
at OpenAPI._client.got_1.default.extend.hooks.afterResponse (/usr/local/lib/node_modules/@tuyapi/cli/node_modules/@tuyapi/openapi/dist/api.js:73:31)
at EventEmitter.<anonymous> (/usr/local/lib/node_modules/@tuyapi/cli/node_modules/got/dist/source/as-promise.js:87:38)
at processTicksAndRejections (internal/process/task_queues.js:97:5)
]
There was an issue fetching that device. Make sure your account is linked and the ID is correct.
Lets "open" the API : docu
- go to iot.tuya.com and login
- select "Cloud" on the left pane
- click on your project "elmeu endoll"
- click "API Group" on the left
- change the status to "Open" for the following three API Groups by clicking "Apply" for each line,
entering any reason, and clicking "OK":
- Authorization Management
- User Management
- Device Management
- Network Management
- Device Control
- Data Service
- Device Statistics
Finalment triunfem :
nicolau@mars:~/sebas/python/smart_plug$ DEBUG=* tuya-cli wizard
? The API key from tuya.com: k5drqa54nec0vpte3
? The API secret from tuya.com fd40109aa440292ee22d3540a02ad
? Provide a 'virtual ID' of a device currently registered in the app: 30858b4e62d74d557
[
{ name: 'endoll', id: '35680858b4e62d74d557', key: 'a406776a30b28d00' },
{ name: 'Menjador', id: '12564452bcddc22230a2', key: '732620377d5a19c6' },
{ name: 'TV', id: 'bf8024bdf46e41de59tmd7', key: 'a829797134b44941' },
{ name: 'Smart IR', id: '83867600f4cfa2c4176e', key: 'a829797134b44941' }
]
20220421 tenim un error
nicolau@mars:~/sebas/python/smart_devices$ DEBUG=* tuya-cli wizard
? Do you want to use these saved API credentials? kska5drqa54nec0vpte3 f73dd40109aa440292ee22d3540a02ad eu No
? The API key from tuya.com: k5drqa54nec0vpte3
? The API secret from tuya.com fd40109aa440292ee22d3540a02ad
? Provide a 'virtual ID' of a device currently registered in the app: 30858b4e62d74d557
[
Error: your ip(83.42.172.188) don't have access to this API
at OpenAPI._client.got_1.default.extend.hooks.afterResponse (/usr/local/lib/node_modules/@tuyapi/cli/node_modules/@tuyapi/openapi/dist/api.js:73:31)
at EventEmitter.<anonymous> (/usr/local/lib/node_modules/@tuyapi/cli/node_modules/got/dist/source/as-promise.js:87:38)
at processTicksAndRejections (internal/process/task_queues.js:97:5),
Error: your ip(83.42.172.188) cross-region access is not allowed
at OpenAPI._client.got_1.default.extend.hooks.afterResponse (/usr/local/lib/node_modules/@tuyapi/cli/node_modules/@tuyapi/openapi/dist/api.js:73:31)
at EventEmitter.<anonymous> (/usr/local/lib/node_modules/@tuyapi/cli/node_modules/got/dist/source/as-promise.js:87:38)
at processTicksAndRejections (internal/process/task_queues.js:97:5)
]
There was an issue fetching that device. Make sure your account is linked and the ID is correct.
Clar que ara tambe funciona tinytuya :
nicolau@mars:~$ python3 -m tinytuya wizard
TinyTuya Setup Wizard [1.1.1]
Enter API Key from tuya.com: k5drqa54nec0vpte3
Enter API Secret from tuya.com: fd40109aa440292ee22d3540a02ad
Enter any Device ID currently registered in Tuya App (used to pull full list): 35680858b4e62d74d557
Enter Your Region (Options: us, eu, cn or in): eu
>> Configuration Data Saved to tinytuya.json
{
"apiKey": "k5drqa54nec0vpte3",
"apiSecret": "fd40109aa440292ee22d3540a02ad",
"apiRegion": "eu",
"apiDeviceID": "35680858b4e62d74d557"
}
Device Listing
[
{
"name": "endoll",
"id": "35680858b4e62d74d557",
"key": "a406776a30b28d00"
},
{
"name": "Menjador",
"id": "12564452bcddc22230a2",
"key": "732620377d5a19c6"
},
{
"name": "TV",
"id": "bf8024bdf46e41de59tmd7",
"key": "a829797134b44941"
},
{
"name": "Smart IR",
"id": "83867600f4cfa2c4176e",
"key": "a829797134b44941"
}
]
>> Saving list to devices.json
4 registered devices saved
Poll local devices? (Y/n):
Scanning local network for Tuya devices...
1 local devices discovered
Polling local devices...
[endoll] - 192.168.1.87 - Off - DPS: {'1': False, '11': 0}
[Menjador] - 0 - Error: No IP found
[TV] - 0 - Error: No IP found
[Smart IR] - 0 - Error: No IP found
>> Saving device snapshot data to snapshot.json
Done.
Ha deixar 3 fitxers json :
nicolau@mars:~/sebas/python/smart_devices$ ls *.json
4 -rw-r--r-- 1 nicolau nicolau 452 Dec 29 12:35 devices.json
4 -rw-r--r-- 1 nicolau nicolau 1557 Dec 29 12:36 snapshot.json
4 -rw-r--r-- 1 nicolau nicolau 159 Dec 6 12:32 tinytuya.json
tuya-cli parameters
nicolau@mars:~$ tuya-cli --help
Usage: tuya-cli [options] [command]
Options:
-V, --version output the version number
-h, --help display help for command
Commands:
cloud [options]
link [options] link a new device
get [options] get a property on a device
set [options] set a property on a device
list list all locally saved devices
list-app [options] list devices from Tuya Smart app (deprecated)
mock [options] mock a Tuya device for local testing
wizard list devices from an offical app
help output usage information
nicolau@mars:~$
tuya-cli get
Usage: tuya-cli get [options]
get a property on a device
Options:
-s, --save save key so you can omit it for subsequent commands
--ip <ip_addr> ip address of device
--id <id> id of device
--key [key] key of device
--dps [dps] property index to get (default: 1)
-a, --all get all properties of a device (default: false)
--protocol-version [version] tuya protocol version (default: 3.1)
-h, --help display help for command
nicolau@mars:~$ tuya-cli get --id 0720009584f3eb84f920 --key 703a87d2b5c3eb33 --all --protocol-version 3.1 {
github }
{ devId: '07200858b4e62d74d557', dps: { '1': true, '11': 0 } }
nicolau@mars:~$
DEBUG=* tuya-cli get --id 30858b4e62d74d557 --key a776a30b28d00 --all --protocol-version 3.1
TuyAPI Finding missing IP undefined or ID 30858b4e62d74d557 +0ms
TuyAPI Received UDP message. +1s
TuyAPI UDP data: +4ms
TuyAPI {
TuyAPI payload: {
TuyAPI ip: '192.168.1.87',
TuyAPI gwId: '30858b4e62d74d557',
TuyAPI active: 2,
TuyAPI ability: 0,
TuyAPI mode: 0,
TuyAPI encrypt: true,
TuyAPI productKey: 'r15JnoGqWPM4PPtl',
TuyAPI version: '3.3'
TuyAPI },
TuyAPI leftover: false,
TuyAPI commandByte: 19,
TuyAPI sequenceN: 0
TuyAPI } +0ms
TuyAPI Connecting to 192.168.1.87... +7ms
TuyAPI Socket connected. +10ms
TuyAPI GET Payload: +1ms
TuyAPI {
TuyAPI gwId: '30858b4e62d74d557',
TuyAPI devId: '30858b4e62d74d557',
TuyAPI t: '1607192447',
TuyAPI dps: {},
TuyAPI uid: '30858b4e62d74d557'
TuyAPI } +0ms
TuyAPI GET Payload: +4ms
TuyAPI {
TuyAPI gwId: '30858b4e62d74d557',
TuyAPI devId: '30858b4e62d74d557',
TuyAPI t: '1607192447',
TuyAPI dps: {},
TuyAPI uid: '30858b4e62d74d557'
TuyAPI } +0ms
TuyAPI Error event from socket. 192.168.1.87 Error: read ECONNRESET
at TCP.onStreamRead (internal/stream_base_commons.js:209:20) {
errno: 'ECONNRESET',
code: 'ECONNRESET',
syscall: 'read'
} +9ms
tuyapi
This library implements the Tuya Smart interface for Home Assistant
sample :
email(cf) 20201228 :
I can confirm you can control your Tuya devices using HTTP GET/POST with Cloud API [HTTPS].
Create a Developer account at https://developer.tuya.com/en/
Contact Tech Support and ask for a free personal license at https://service.console.tuya.com/
Once you have access the free personal license,
go to https://developer.tuya.com/en/docs/iot/open-api/quick-start/quick-start1?id=K95ztz9u9t89n
and follow the steps provided there
NOTES: The API URL has to be changed to your region.
https://openapi.tuyacn.com in China.
https://openapi.tuyaeu.com in Europe.
and so on...
get SmartPlug SP21 data
Ara que tenim el "Device ID", podem demanar el estat, oi ?
Based on Jason Cox test.py :
nicolau@mars:~/sebas/python/smart_plug$ cat switch_flip_flop.py
DEVICEID = "30858b4e62d74d557" # endoll
DEVICEIP = "192.168.1.87" # endoll xarxa GAS2
DEVICEKEY = "a776a30b28d00" # endoll "Smart Bulb 2"
DEVICEVERS = "3.3"
d = tinytuya.OutletDevice( DEVICEID, DEVICEIP, DEVICEKEY )
data = d.status()
print( ">>> plug state (bool, True is ON) - estat {%r}.\n" % data['dps']['1'] )
switch_state = data['dps']['1'] # actual state
switch_state = not ( switch_state ) # future state
data = d.set_status( switch_state ) # set new state
I el resultat és :
nicolau@mars:~/sebas/python/smart_plug$ ./switch_flip_flop.py
TinyTuya (Tuya Interface) version [1.1.1]
Testing device {35680858b4e62d74d557} at IP {192.168.1.87} with key {a406776a30b28d00} version {3.3}.
Reading test: response {{'devId': '35680858b4e62d74d557', 'dps': {'1': True, '11': 0}}}.
Device state {True}.
Control test: attempting to toggle power state of device
>>> Setting state to: False
>>> Setting state to: True
^Ckbd 2 - bye
És un endoll "senzill" - només ens diu si està "on" o "off", res mes.
tuyapower
El meu codi a "/home/nicolau/sebas/python/smart_plug/1_plug_power.py" no reporta cap mesura de consum - es un Teckin "barat"
This project
powermonitor has been replaced by a PyPi module
tuyapower to simplify adding this capability to your python projects
20220421 restart - per manegar el calentador lligat a les plaques solars
Funciona "tinytuya" :
nicolau@mars:~/sebas/python/smart_devices$ python3 -m tinytuya wizard
TinyTuya Setup Wizard [1.1.1]
Existing settings: <--- ~/sebas/python/smart_devices/tinytuya.json
API Key=kska5drqa54nec0vpte3
Secret=f73dd40109aa440292ee22d3540a02ad
DeviceID=35680858b4e62d74d557
Region=eu
Use existing credentials (Y/n):
Device Listing <--- ~/sebas/python/smart_devices/devices.json
[
{
"name": "llum",
"id": "74853874e09806b5a3fd",
"key": "843624b39f4a0fb1"
},
{
"name": "endoll",
"id": "35680858b4e62d74d557",
"key": "3c36029ba8b711e4"
}
]
Poll local devices? (Y/n):
Scanning local network for Tuya devices...
2 local devices discovered
Polling local devices...
Polling local devices...
[llum] - 192.168.1.128 - No Response
[endoll] - 192.168.1.129 - On - DPS: {'1': True, '11': 0}
>> Saving device snapshot data to snapshot.json
Done.
Funciona el python que llegeix el estat del SP :
nicolau@mars:~/sebas/python/smart_devices$ ./1_plug_power.py
Polling device {35680858b4e62d74d557} at IP {192.168.1.68} with key {bb9971d884846ff0} and protocol version {3.3}.
Dictionary {{'devId': '35680858b4e62d74d557', 'dps': {'1': False, '11': 0}}}.
Switch On: False
I tambe el q manega el SP :
nicolau@mars:~/sebas/python/smart_devices$ ./2_switch_plug_flip_flop.py
TinyTuya (Tuya Interface) version [1.1.1]
Testing device {35680858b4e62d74d557} at IP {192.168.1.68} with key {bb9971d884846ff0} version {3.3}.
Reading test: response {{'devId': '35680858b4e62d74d557', 'dps': {'1': False, '11': 0}}}.
Device state {False}.
Control test: attempting to toggle power state of device
>>> Setting state to: True
>>> Setting state to: False
>>> Setting state to: True
>>> Setting state to: False
^Ckbd 2 - bye
Tambe funciona "tuya-cli" amb els parametres correctes :
DEBUG=* tuya-cli get --id 35680858b4e62d74d557 --key bb9971d884846ff0 --all --protocol-version 3.3
I també el "wizard" quan el parametritzem correctament :
nicolau@mars:~/sebas/python/smart_devices$ DEBUG=* tuya-cli wizard
? Do you want to use these saved API credentials? kska5drqa54nec0vpte3 f73dd40109aa440292ee22d3540a02ad eu Yes
? Provide a 'virtual ID' of a device currently registered in the app: 35680858b4e62d74d557
[
{
name: 'endoll',
id: '35680858b4e62d74d557',
key: 'bb9971d884846ff0'
},
{ name: 'llum', id: '74853874e09806b5a3fd', key: 'aff405bdde35ee56' },
{
name: 'Smart IR',
id: '83867600f4cfa2c4176e',
key: 'a829797134b44941'
}
]
Tambe funciona el escaneig :
nicolau@mars:~/sebas/python/smart_devices$ python3 -m tinytuya
TinyTuya (Tuya device scanner) [1.1.1]
[Loaded devices.json - 3 devices]
Scanning on UDP ports 6666 and 6667 for devices (15 retries)...
llum [Valid payload]: 192.168.1.69
ID = 74853874e09806b5a3fd, Product ID = gswrpjab2vfawful, Version = 3.3
Status: {'20': False, '21': 'white', '22': 1000, '23': 1000, '24': '00bc03e803e8',
'25': '05464601000003e803e800000000464601007803e803e8000000...800000000', '26': 0}
endoll [Valid payload]: 192.168.1.68
ID = 35680858b4e62d74d557, Product ID = r15JnoGqWPM4PPtl, Version = 3.3
Status: {'1': False, '11': 0}
Scan Complete! Found 2 devices.
SmartBulb + access using python
I have a
Teckin SmartBulb SB50 at IP = 192.168.1.39 {xarxa Movistar}, IP = 192.168.1.94 {xarxa GAS2}.
Farem servir GAS2, doncs hi tenim un tap
We can reach it from MARS :
nicolau@mars:~/sebas/python/smart_devices$ ping sb50
PING sb50 (192.168.1.94) 56(84) bytes of data.
64 bytes from sb50 (192.168.1.94): icmp_seq=1 ttl=255 time=6.18 ms
64 bytes from sb50 (192.168.1.94): icmp_seq=2 ttl=255 time=16.5 ms
64 bytes from sb50 (192.168.1.94): icmp_seq=3 ttl=255 time=7.19 ms
And the route is fine :
nicolau@mars:/etc$ traceroute sb50
traceroute to sb50 (192.168.1.94), 64 hops max
1 192.168.1.94 57.558ms 7.416ms 6.080ms
So we try :
nicolau@mars:~$ sudo nmap sb50 -Pn
Starting Nmap 7.60 ( https://nmap.org ) at 2020-12-28 14:13 CET
Nmap scan report for sb50 (192.168.1.94)
Host is up (0.013s latency).
Not shown: 999 closed ports
PORT STATE SERVICE
6668/tcp filtered irc
Nmap done: 1 IP address (1 host up) scanned in 6.51 seconds
The alive ports are :
nicolau@mars:~$ sudo nmap sb50 -p 6600-6699
Starting Nmap 7.60 ( https://nmap.org ) at 2020-12-28 14:09 CET
Nmap scan report for sb50 (192.168.1.94)
Host is up (0.13s latency).
Not shown: 93 closed ports
PORT STATE SERVICE
6614/tcp filtered unknown
6634/tcp filtered mpls-pm
6655/tcp filtered pcs-sf-ui-man
6657/tcp filtered palcom-disc
6658/tcp filtered unknown
6668/tcp open irc
6670/tcp filtered irc
Nmap done: 1 IP address (1 host up) scanned in 1.56 seconds
SmartBulb access using python
First we try tinytuya :
nicolau@mars:~$ python3 -m tinytuya
TinyTuya (Tuya device scanner) [1.1.1]
Scanning on UDP ports 6666 and 6667 for devices (15 retries)...
3.3 Device Found [Valid payload]: 192.168.1.87
ID = 35680858b4e62d74d557, Product ID = r15JnoGqWPM4PPtl, Version = 3.3
No Stats - Device Key required to poll for status
3.3 Device Found [Valid payload]: 192.168.1.94
ID = 12564452bcddc22230a2, Product ID = key4fv3xs8twchhy, Version = 3.3
No Stats - Device Key required to poll for status
Scan Complete! Found 2 devices.
Then we try the "tinytuya wizard" - it requires API Key from tuya.com and API Secret from tuya.com :
nicolau@mars:~/sebas/python/smart_devices$ python3 -m tinytuya wizard
TinyTuya Setup Wizard [1.1.2]
Existing settings:
API Key=kska5drqa54nec0vpte3
Secret=f73dd40109aa440292ee22d3540a02ad
DeviceID=35680858b4e62d74d557
Region=eu
Use existing credentials (Y/n):
Device Listing
[
{
"name": "endoll",
"id": "35680858b4e62d74d557",
"key": "a406776a30b28d00"
},
{
"name": "Smart Bulb 2",
"id": "12564452bcddc22230a2",
"key": "c47b05eafac34ce3"
},
{
"name": "TV",
"id": "bf8024bdf46e41de59tmd7",
"key": "a829797134b44941"
},
{
"name": "Smart IR",
"id": "83867600f4cfa2c4176e",
"key": "a829797134b44941"
}
]
>> Saving list to devices.json
4 registered devices saved
Poll local devices? (Y/n):
Scanning local network for Tuya devices...
2 local devices discovered
Polling local devices...
[endoll] - 192.168.1.87 - Off - DPS: {'1': False, '11': 0}
[Smart Bulb 2] - 192.168.1.94 - Off - DPS: {'1': False, '2': 'white', '3': 255, '4': 255,
'5': 'ff00000000ffff', '6': 'bd76000168ffff',
'7': 'ffff500100ff00', '8': 'ffff8003ff000000ff000000ff000000000000000000',
'9': 'ffff5001ff0000', '10': 'ffff0505ff000000ff00ffff00ff00ff0000ff000000'}
[TV] - 0 - Error: No IP found
[Smart IR] - 0 - Error: No IP found
>> Saving device snapshot data to snapshot.json
Done.
Then we try tuyapower :
nicolau@mars:~/sebas/python/smart_devices$ python3 -m tuyapower
TuyaPower (Tuya compatible smart plug scanner) [0.0.25] tinytuya [1.1.2]
Scanning on UDP ports 6666 and 6667 for devices (15 retries)...
FOUND Device [Valid payload]: 192.168.1.87
ID = 35680858b4e62d74d557, product = r15JnoGqWPM4PPtl, Version = 3.3
Device Key required to poll for stats
FOUND Device [Valid payload]: 192.168.1.94
ID = 12564452bcddc22230a2, product = key4fv3xs8twchhy, Version = 3.3
Device Key required to poll for stats
Scan Complete! Found 2 devices.
SmartBulb at Tuya cloud
Lets find the Device Key for the SB50 - read here
Ja el tenim a "devices.json", fitxer que s'ha generat amb python3 -m tinytuya wizard
nicolau@mars:~/sebas/python/smart_devices$ cat devices.json
[
{
"name": "Smart Bulb 2",
"id": "12564452bcddc22230a2",
"key": "c47b05eafac34ce3"
},
Aixi que anem per feina :
nicolau@mars:~/sebas/python/smart_devices$ python3 -m tinytuya wizard
TinyTuya Setup Wizard [1.1.1]
Existing settings:
API Key=k5drqa54nec0vpte3
Secret=fd40109aa440292ee22d3540a02ad
DeviceID=35680858b4e62d74d557
Region=eu
Use existing credentials (Y/n):
Device Listing
[
{
"name": "Smart Bulb 2",
"id": "12564452bcddc22230a2",
"key": "c47b05eafac34ce3"
},
{
"name": "endoll",
"id": "35680858b4e62d74d557",
"key": "a406776a30b28d00"
},
{
"name": "TV",
"id": "bf8024bdf46e41de59tmd7",
"key": "a829797134b44941"
},
{
"name": "Smart IR",
"id": "83867600f4cfa2c4176e",
"key": "a829797134b44941"
}
]
>> Saving list to devices.json
4 registered devices saved
Poll local devices? (Y/n):
Scanning local network for Tuya devices...
2 local devices discovered
Polling local devices...
[Smart Bulb 2] - 192.168.1.94 - Off - DPS: {'1': False, '2': 'white', '3': 255, '4': 255,
'5': 'ff00000000ffff', '6': 'bd76000168ffff', '7': 'ffff500100ff00',
'8': 'ffff8003ff000000ff000000ff000000000000000000', '9': 'ffff5001ff0000',
'10': 'ffff0505ff000000ff00ffff00ff00ff0000ff000000'}
[endoll] - 192.168.1.87 - Off - DPS: {'1': False, '11': 0}
[TV] - 0 - Error: No IP found
[Smart IR] - 0 - Error: No IP found
>> Saving device snapshot data to snapshot.json
Done.
SmartBulb Teckin SB50 by MTV
MTV 20201228 :
Conectem la SB50 al wifi local :
- conectem el SmartPhone a la xarxa wifi on posarem la SB50
- engeguem "Smart Life"
- apaguem i encenem la SB50 3 vegades (no massa depressa) - es posa intermitent ràpid
- al Smart Life, escollim "afegir device", signe (+)
- escollim "lightning" + "BLE+wifi" o millor "wifi"
- confirmem a la APP que la bombeta pampalluga ràpid
- a la APP, escollim la wifi de 2,4 GHz i posem la clau de pas
- en 15-20 segons la bombeta es posa encesa fixe i Smart Life diu que se ha registrat a Amazon, i, en el meu cas, que s'ha conectat a Alexa
miquel@T410:~$ sudo nmap 192.168.1.87 -p 6660-6699
Starting Nmap 7.60 ( https://nmap.org ) at 2020-12-28 21:18 CET
Nmap scan report for 192.168.1.87
Host is up (0.089s latency).
PORT STATE SERVICE
6660/tcp closed unknown
6661/tcp closed unknown
6662/tcp closed radmind
6663/tcp closed unknown
6664/tcp closed unknown
6665/tcp closed irc
6666/tcp closed irc
6667/tcp closed irc
6668/tcp open irc
6669/tcp closed irc
Nmap done: 1 IP address (1 host up) scanned in 0.42 seconds
MTV 20201229 : instalem tinytuya (python3 -m pip install tinytuya) i engeguem :
miquel@miquel-ThinkPad-T410:~/python/smartbulb$ python3 -m tinytuya
TinyTuya (Tuya device scanner) [1.1.2]
Scanning on UDP ports 6666 and 6667 for devices (15 retries)...
3.3 Device Found [Valid payload]: 192.168.1.87
ID = 875836268caab5e45621, Product ID = gswrpjab2vfawful, Version = 3.3
No Stats - Device Key required to poll for status
Scan Complete! Found 1 devices.
La crida mes explicita es :
nicolau@mars:~/sebas/python/smart_devices$ python -m tinytuya scan
TinyTuya (Tuya device scanner) [1.1.1]
[Loaded devices.json - 2 devices]
Scanning on UDP ports 6666 and 6667 for devices (15 retries)...
endoll [Valid payload]: 192.168.1.129
ID = 35680858b4e62d74d557, Product ID = r15JnoGqWPM4PPtl, Version = 3.3
Status: {'1': True, '11': 0}
llum [Valid payload]: 192.168.1.128
ID = 74853874e09806b5a3fd, Product ID = gswrpjab2vfawful, Version = 3.3
Status: {'20': False, '21': 'white', '22': 1000, '23': 500, '24': '000003e803e8',
'25': '07464602000003e803e800000000464602007803e803e8000...3e803e800000000',
'26': 0}
Scan Complete! Found 2 devices.
SmartBulb by ESP
Quines wifi tenim ?
Enric Casa 20:c9:d0:26:fd:51
Enric Casa 5 GHz 20:c9:d0:26:fd:52
ONO6CCE c0:3f:0e:fe:6c:ce
All SB50
- SAG - 20190909
- EAB - 20201223
- MTV - 20201228
- ESP - 20201229
- DRC - 20210104
- CMI - 20210107
- NAV - 20220415
Tuya and RRG
- Universal IR Remote control
- homepage : pypi & tinytuya
- install : python3.7 -m pip install tinytuya
- scan : python3 -m tinytuya -> get ID and KEY
- python code : github jason a cox
IAV A60
20260309 - Antela
SmartBulb/AWS/Tuya protocol hack
Lets use T60 with 2 RJ45 connected to the the ThrowingStar.
Esquema : TS & T60
I see :
- alexa (.1.85) asking DNS (8.8.4.4) about api.amazon.com
- alexa (.1.85) asking DNS (8.8.8.8) about avs-alexa-14-eu.amazon.com
- sb50 (.1.94) asking DNS about m2.tuyaeu.com
- sp21 (.1.87) asking DNS about m2.tuyaeu.com
- A60 (esp) en instalar fa :
- DNS a3.tuyaeu.com [18.195.249.137]
- DNS m2.tuyaeu.com [52.57.38.165]
En manegar fa :
- DNS cognito-identity.eu-west-1.amazonaws.com [34.247.62.69]
- DNS device-metrics-us-2.amazon.com [52.46.153.164]
SAG : a device is sending UDP from port 49154 to port 6667 on destination IP = 255.255.255.255 (broadcast)
tinytuya says "scanning on UDP ports 6666 and 6667 for devices"
fake DNS ,
minimal python dns server
reverse engineering links
Shelly cloud
- Shelly cloud
No cloud required : control your Shelly devices locally without connecting them to an external cloud or server.
Shelly 1 = 14,40 € ; Shelly Plus 1 = 18,03 € ; Shelly Plus 1PM = 20,45 €
- login
- choose language
Shelly EM - medidor de energia
EM, 50 €
Shelly local access
See common HTTP API, as
/status {gracies, Ramon}
#!/usr/bin/env python3
# -*- coding: utf-8 -*-
#Comencem a fer proves amb el Shelly EM -
medidor de energia, 50 €
import requests
import time
print ("---------- comencem ------------")
while 1:
try:
response = requests.get("
http://192.168.1.201/status")
objjson = response.json()
except KeyboardInterrupt:
print( '--- tenim CTRL C' )
exit()
except:
print("------ha petat la url--- ")
print ("Voltatge:"+str(int(objjson["emeters"][0]["voltage"]))+ " Potència:"+str(objjson["emeters"][0]["power"]))
time.sleep(1)
local access to a Shelly device
A Shelly device creates an access point with open security at first. Once connected to its wifi Access Point, open the url 192.168.33.1
Shelly URLs
Smart Powermeter
Volem llegir la potencia consumida en cada instant via Tuya.
Smart Powermeter ZMAi-90
Fabricant "Kavolet", modelo "VJL5928901383121WV".
Vendido por "XIAOXINMOA" ->
hacer una pregunta (20221204)
Conexionat a la xarxa elèctrica :
- "in L" (live) : brown
- "in N" (neutral) : blue
Vincular el ZMAi-90 a Tuya o SmartLife :
- conectamos el movil a la red 2,4 GHz wifi donde pondremos el ZMAi-90
- turn on bluetooth {recommended}
- engeguem la APP "Tuya Smart" (o Smart Life) i fem "login"
- top-right : click (+) to "Add device"
- select "socket+wifi" item
BLE stands for "Bluetooth Low Energy"
- apretar el botón "Pair" 5 segundos
- el LED amarillo parpadea rápido
- APP : mensaje "nuevo dispositivo encontrado" -> agregar + pwd wifi
Que vemos en la APP :
- consumo acumulado desde puesta en marcha
- consumo ultima hora (kWh), energia consumida
- amperaje actual, potencia actual y voltaje actual
Mai mai mai "apagar" el switch : deix sense correct el router i nomes es pot restablir amb una altra wifi (del mateix nom ?)
Estadistiques : sols 7 dies
lets connect it !
2022.11.28 :
- conectem el ZMAi-90 a 220 i hi posem una minima carrega
- pressionem el botó 5 segons
- engeguem, "Smart Life"
- trobem "add wifi smart meter"
- enter wifi 2,4 GHz info (SID, pwd)
- displays :
- current (A), active power (kW), voltage (V)
- virtual ID = "bf43d154068c6d3814vgnc"
- MAC = cc:8c:bf:52:73:de
A veure q detectem :
nicolau@mars:~/sebas/python/smart_devices$
python3 -m tinytuya wizard
TinyTuya Setup Wizard
[1.8.0] ---
pypi.org docu
Existing settings:
API Key=kska5drqa54nec0vpte3
Secret=f73dd40109aa440292ee22d3540a02ad
DeviceID=35680858b4e62d74d557
Region=eu
Use existing credentials (Y/n):
Device Listing
[
{
"name": "wifi smart meter",
"id": "bf43d154068c6d3814vgnc",
"key": "1f3e3dd124c64a55",
"mac": "cc:8c:bf:52:73:de",
"category": "zndb",
"product_name": "wifi smart meter",
"product_id": "nqbs1onwskmmmaac",
"biz_type": 18,
"model": "",
"sub": false,
"icon": "https://images.tuyaeu.com/smart/icon/ay1536897190133VVeLx/32346148448dd9829abb97ce317c5e82.png"
},
{
"name": "llum",
"id": "74853874e09806b5a3fd",
"key": "843624b39f4a0fb1",
"mac": "e0:98:06:b5:a3:fd",
"category": "dj",
"product_name": "Smart Bulb ",
"product_id": "gswrpjab2vfawful",
"biz_type": 18,
"model": "LM99XE2",
"sub": false,
"icon": "https://images.tuyaeu.com/smart/icon/001458092465966zkPdc/50464e473e4cfe1b7c84fe4d16bb0867.png"
},
{
"name": "Smart Switch",
"id": "bff1ca2990e3767841v7km",
"key": "d9d284aa2b71abdc",
"mac": "84:e3:42:0d:06:11",
"category": "tdq",
"product_name": "Smart Switch",
"product_id": "w1gxnw6e3pzfaf89",
"biz_type": 18,
"model": "101 \u5347\u7ea7\u7248",
"sub": false,
"icon": "https://images.tuyaeu.com/smart/icon/ay15327721968035jwx9/71aa9d18b995b9081b1654c69439d356.jpg"
},
{
"name": "endoll",
"id": "35680858b4e62d74d557",
"key": "3c36029ba8b711e4",
"mac": "b4:e6:2d:74:d5:57",
"category": "cz",
"product_name": "smart socket",
"product_id": "r15JnoGqWPM4PPtl",
"biz_type": 18,
"model": "SP21/SE131",
"sub": false,
"icon": "https://images.tuyaeu.com/smart/icon/152956414744qw5qx565_0.jpg"
},
{
"name": "Smart IR",
"id": "83867600f4cfa2c4176e",
"key": "d8f248b99f6d17b4",
"mac": "f4:cf:a2:c4:17:6e",
"category": "qt",
"product_name": "Smart IR",
"product_id": "JvihcnJiXk1grl60",
"biz_type": 18,
"sub": false,
"icon": "https://images.tuyaeu.com/smart/icon/ay1525749833414yotNt/f0d080dfc793d4dcf423d953ccb7d1aa.png"
}
]
>> Saving list to devices.json
5 registered devices saved
>> Saving raw TuyaPlatform response to tuya-raw.json
Poll local devices? (Y/n):
Scanning local network for Tuya devices (retry 30 times)...
2 local devices discovered
Polling local devices...
[wifi smart meter] - 192.168.1.139 - Off - DPS: {'1': 14, '10': 0, '12': False, '13': 0, '16': True}
[llum] - 0 - Error: No IP found
[Smart Switch] - 0 - Error: No IP found
[endoll] - 192.168.1.129 - On - DPS: {'1': True, '11': 0}
[Smart IR] - 0 - Error: No IP found
>> Saving device snapshot data to snapshot.json
Done.
Amb detall :
nicolau@mars:~/sebas/python/smart_devices$ DEBUG=* tuya-cli wizard
? Do you want to use these saved API credentials? kska5drqa54nec0vpte3 f73dd40109aa440292ee22d3540a02ad eu Yes
? Provide a 'virtual ID' of a device currently registered in the app: 35680858b4e62d74d557
[
{ name: 'wifi smart meter', id: 'bf43d154068c6d3814vgnc', key: '1f3e3dd124c64a55' },
{ name: 'llum', id: '74853874e09806b5a3fd', key: '843624b39f4a0fb1' },
{ name: 'Smart Switch', id: 'bff1ca2990e3767841v7km', key: 'd9d284aa2b71abdc' },
{ name: 'endoll', id: '35680858b4e62d74d557', key: '3c36029ba8b711e4' },
{ name: 'Smart IR', id: '83867600f4cfa2c4176e', key: 'd8f248b99f6d17b4' }
]
Llegim amb python :
nicolau@mars:~/sebas/python/smart_devices$ ./7_smart_powermeter_read.py
>>> (0) Polling device {bf43d154068c6d3814vgnc} at IP {192.168.1.139} with key {1f3e3dd124c64a55} and protocol version {3.3}.
>>> (1) Dictionary {{'dps': {'1': 17, '10': 0, '12': False, '13': 0, '16': True}}}.
>>> (2) Switch status: True
... maneguem via "Smart Meter" ...
nicolau@mars:~/sebas/python/smart_devices$ ./7_smart_powermeter_read.py
>>> (0) Polling device {bf43d154068c6d3814vgnc} at IP {192.168.1.139} with key {1f3e3dd124c64a55} and protocol version {3.3}.
>>> (1) Dictionary {{'dps': {'1': 17, '10': 0, '12': False, '13': 0, '16': False}}}.
>>> (2) Switch status: False
No puc canviar el estat (?)
llegim Smart Power Meter via Cloud
Origen : home-assistant
nicolau@mars:~/sebas/python/smart_devices$ cat a_cloud_display_dps.py
#! /usr/bin/env python3
import tinytuya
import json
c = tinytuya.Cloud(
apiRegion="eu",
apiKey="kska5drqa54nec0vpte3",
apiSecret="f73dd40109aa440292ee22d3540a02ad",
apiDeviceID="35680858b4e62d74d557") # any of your enabled devices
# display list of devices
devices = c.getdevices()
print("Device List: %r" % devices)
# select a Device ID to Test
id = "bf43d154068c6d3814vgnc"
print( ">>> display DPS IDs of Device (%s)." % id )
result = c.getdps(id)
print( json.dumps(result, sort_keys=False, indent=4) )
I el resultat es espectacular :
>>> display DPS IDs of Device (bf43d154068c6d3814vgnc).
{
"result": {
"category": "zndb",
"functions": [
{
"code": "switch_prepayment",
"dp_id": 12,
"type": "Boolean",
"values": "{}"
},
{
"code": "clear_energy",
"dp_id": 14,
"type": "Boolean",
"values": "{}"
},
{
"code": "charge_energy",
"dp_id": 15,
"type": "Integer",
"values": "{\"unit\":\"kW\u00b7h\",\"min\":0,\"max\":50000,\"scale\":0,\"step\":1}"
},
{
"code": "switch",
"dp_id": 16,
"type": "Boolean",
"values": "{}"
},
{
"code": "alarm_set_2",
"dp_id": 17,
"type": "Json",
"values": "{}"
},
{
"code": "event_clear",
"dp_id": 20,
"type": "Boolean",
"values": "{}"
}
],
"status": [
{
"code": "forward_energy_total",
"dp_id": 1,
"type": "Integer",
"values": "{\"unit\":\"kW\u00b7h\",\"min\":0,\"max\":99999999,\"scale\":2,\"step\":1}"
},
{
"code": "phase_a",
"dp_id": 6,
"type": "Json",
"values": "{}"
},
{
"code": "fault",
"dp_id": 10,
"type": "Bitmap",
"values": "{\"label\":
[\"ov_cr\",\"unbalance_alarm\",\"ov_vol\",\"undervoltage_alarm\",
\"miss_phase_alarm\",\"outage_alarm\",\"magnetism_alarm\",\"terminal_alarm\",
\"cover_alarm\",\"credit_alarm\",\"no_balance_alarm\",\"battery_alarm\",\"meter_hardware_alarm\"]}"
},
{
"code": "switch_prepayment",
"dp_id": 12,
"type": "Boolean",
"values": "{}"
},
{
"code": "balance_energy",
"dp_id": 13,
"type": "Integer",
"values": "{\"unit\":\"kW\u00b7h\",\"min\":0,\"max\":99999999,\"scale\":2,\"step\":1}"
},
{
"code": "clear_energy",
"dp_id": 14,
"type": "Boolean",
"values": "{}"
},
{
"code": "charge_energy",
"dp_id": 15,
"type": "Integer",
"values": "{\"unit\":\"kW\u00b7h\",\"min\":0,\"max\":50000,\"scale\":0,\"step\":1}"
},
{
"code": "switch",
"dp_id": 16,
"type": "Boolean",
"values": "{}"
},
{
"code": "alarm_set_2",
"dp_id": 17,
"type": "Json",
"values": "{}"
},
{
"code": "event_clear",
"dp_id": 20,
"type": "Boolean",
"values": "{}"
}
]
},
"success": true,
"t": 1669744557218,
"tid": "13770faa700f11edb328265ef7a90a71"
maneguem Smart Power Meter via Cloud
Origen : jasonacox
nicolau@mars:~/sebas/python/smart_devices$ cat b_cloud_switch_on_off.py
#! /usr/bin/env python3
import json
import sys
import tinytuya
go_ON = '1' # default value
numArg = len(sys.argv)
if ( numArg > 1 ) :
go_ON = sys.argv[1] # get user selection (0/1)
c = tinytuya.Cloud( # connect to Tuya Cloud
apiRegion="eu",
apiKey="kska5drqa54nec0vpte3",
apiSecret="f73dd40109aa440292ee22d3540a02ad",
apiDeviceID="35680858b4e62d74d557") # any of your enabled devices
# Select a Device ID to Test
id = "bf43d154068c6d3814vgnc"
print( "(1) >>> display DPS IDs of Device (%s)." % (id) )
result = c.getdps(id)
print(json.dumps(result, sort_keys=False, indent=4))
# Display Properties of Device
result = c.getproperties(id)
print( "(2) >>> properties of device:\n" )
print(json.dumps(result, sort_keys=False, indent=4))
# Display Status of Device
result = c.getstatus(id)
print( "(3) >>> status of device:\n" )
print(json.dumps(result, sort_keys=False, indent=4))
print( "(4) >>> what do we do ? go ON (%s)." % (go_ON) )
if go_ON == '1':
commands = {
"commands": [
{"code": "switch", "value": True}, # send command - turn on switch
{"code": "countdown_1", "value": 0} ] }
else:
commands = {
"commands": [
{"code": "switch", "value": False}, # send command - turn off switch
{"code": "countdown_1", "value": 0} ] }
print( "(5) >>> sending command...[%s]" % (commands) )
result = c.sendcommand(id,commands)
print( "(6) >>> Results:\n" )
print(json.dumps(result, sort_keys=False, indent=4))
sys.exit()
estadistiques del Smart Power Meter via Cloud
Origen : jasonacox
nicolau@mars:~/sebas/python/smart_devices$ cat c_cloud_stats.py
#! /usr/bin/env python3
import json
import tinytuya
c = tinytuya.Cloud( # connect to Tuya Cloud
apiRegion="eu",
apiKey="kska5drqa54nec0vpte3",
apiSecret="f73dd40109aa440292ee22d3540a02ad",
apiDeviceID="35680858b4e62d74d557") # any of your enabled devices
# Select a Device ID to Test
id = "bf43d154068c6d3814vgnc"
print( ">>> display device log." )
#r = c.getdevicelog( '00112233445566778899', start=-1, end=0, size=100 )
#r = c.getdevicelog( '00112233445566778899', start=1669990000, end=1669990300, size=20 )
r = c.getdevicelog( id )
print( json.dumps(r, indent=2) )
altres SM
- SmartMeter :
Ketotek - montaje en riel DIN de 35 mm, 55 €,
SmartLife, 2,4 GHz
Smart Switch MS-101-16A
Comprem un Ledlux, 14 € :
Interruptor inteligente WiFi 220 V, compatible con red WiFi 2,4 GHz, aplicación Tuya o Smart Life.
Compte : Aliexpress 5 € 20
Engeguem APP "Smart Life" + "Add Device" + "Smart Switch"
- MAC = 84:E3:42:0D:06:11
- IP = 192.168.1.141
- id = BFF1CA2990E3767841v7km
Lets scan, using "python3 -m tinytuya wizard" or :
nicolau@mars:~/sebas/python/smart_devices$ python3 -m tinytuya {wizard by default}
TinyTuya (Tuya device scanner) [1.1.1]
[Loaded devices.json - 3 devices]
Scanning on UDP ports 6666 and 6667 for devices (15 retries)...
Smart Switch [Valid payload]: 192.168.1.141
ID = bff1ca2990e3767841v7km, Product ID = keyk9uwr9vqw87ak, Version = 3.3
Status: {'1': False, '9': 0, '38': 'off', '42': ''}
endoll [Valid payload]: 192.168.1.129
ID = 35680858b4e62d74d557, Product ID = r15JnoGqWPM4PPtl, Version = 3.3
Status: {'1': True, '11': 0}
llum [Valid payload]: 192.168.1.128
ID = 74853874e09806b5a3fd, Product ID = gswrpjab2vfawful, Version = 3.3
Status: {'20': False, '21': 'white', '22': 1000, '23': 500, '24': '000003e803e8',
'25': '07464602000003e803e800000000464602007803e803e80000000046460200f003e803e80', '26': 0}
Scan Complete! Found 3 devices.
Or also :
nicolau@mars:~/sebas/python/smart_devices$ DEBUG=* tuya-cli wizard
? Do you want to use these saved API credentials? kska5dnec0vpte3 f73d40292ee22d3540a02ad eu Yes
? Provide a 'virtual ID' of a device currently registered in the app: 35680858b4e62d74d557
[
{ name: 'Smart Switch', id: 'bff1ca2990e3767841v7km', key: '3f22c7de725da772' },
{ name: 'llum', id: '74853874e09806b5a3fd', key: '843624b39f4a0fb1' },
{ name: 'endoll', id: '35680858b4e62d74d557', key: '3c36029ba8b711e4' }
]
Lets read its status :
nicolau@mars:~/sebas/python/smart_devices$ ./5_smart_switch_read.py
Polling device {bff1ca2990e3767841v7km} at IP {192.168.1.141} with key {3f22c7de725da772} and protocol version {3.3}.
Dictionary {{'dps': {'1': False, '9': 0, '38': 'off', '42': ''}}}.
Switch On: False
... some "Smart Life" action to set switch to "on" and ...
nicolau@mars:~/sebas/python/smart_devices$ ./5_smart_switch_read.py
Polling device {bff1ca2990e3767841v7km} at IP {192.168.1.141} with key {3f22c7de725da772} and protocol version {3.3}.
Dictionary {{'dps': {'1': True, '9': 0, '38': 'off', '42': ''}}}.
Switch On: True
Lets change its status :
nicolau@mars:~/sebas/python/smart_devices$ cat 6_smart_switch_flip_flop.py
/home/sebas/dades/python/smart_devices/6_smart_switch_flip_flop.py
print( "\nAttempting to toggle power state of device")
switch_state = data['dps']['1'] # actual state
while True: # Toggle switch state
switch_state = not ( switch_state ) # future state
try:
print( ">>> Setting state to: %r" % switch_state )
data = d.set_status( switch_state )
time.sleep(2)
except KeyboardInterrupt:
print( "kbd 2 - bye" )
sys.exit()
except:
print( "--- Timeout trying to toggle device power.")
esquema electric
.---------------.
| |
L | / | L
(*) ------- | --- ./ . --- | ------- (*)
| |
(in) | | (out)
| |
N | / | N
(*) ------- | --- ./ . --- | ------- (*)
| |
.---------------.
Smart relé
Nomes ens arriben 2 fils : blau i negre.
(*) --- (B) --- [termostat ceilhit] --- (N) ---
|
(*) ----------- [ manta electrica ] -----------
Interruptor inteligente sin cable neutro :
Weten 433RF (control 433 MHz, TuyaSmart, con condensador),
T4EU1C
Shelly
- shelly 1L, 16 €, carga máxima 4,1 A
Shelly 1L es un relé universal por WiFi para montar detrás de un interruptor de pared existente,
que está habilitado para trabajar con todos los sistemas inteligentes clave del hogar como Google Home, Amazon Alexa y Shelly Cloud.
¡Funciona sin neutro!
Convierta cualquier interruptor de pared existente en un interruptor inteligente sin cambiar el cableado o instalar cables nuevos con Shelly 1L.
El primer dispositivo en el mundo que es capaz de automatizar incluso los electrodomésticos conectados sin neutro presente.
- Shelly 1 - 16 €
Smart IR (infra-red) control "Panamalar S06"
- IP = 192.168.1.142
- MAC = F4:CF:A2:C4:17:6E
- virtual ID : 8386 7600 F4CF A2C4 176E
Mirem el tipus de dispositiu :
nicolau@mars:~$ sudo nmap 192.168.1.142 -p 6660-6669
Starting Nmap 7.60 ( https://nmap.org ) at 2022-11-20 13:15 CET
Note: Host seems down. If it is really up, but blocking our ping probes, try -Pn
Nmap done: 1 IP address (0 hosts up) scanned in 3.04 seconds
Sembla que NO es Tuya-like.
nicolau@mars:~$ sudo nmap 192.168.1.142 -p 9990-9999
Starting Nmap 7.60 ( https://nmap.org ) at 2022-11-20 13:15 CET
Nmap scan report for 192.168.1.142
Host is up (0.072s latency).
PORT STATE SERVICE
9970/tcp closed unknown
9971/tcp closed unknown
9972/tcp closed unknown
9973/tcp closed unknown
9974/tcp closed unknown
9975/tcp closed unknown
9976/tcp closed unknown
9977/tcp closed unknown
9978/tcp closed xybrid-rt
9979/tcp closed visweather
9980/tcp closed unknown
9981/tcp closed pumpkindb
9982/tcp closed unknown
9983/tcp closed unknown
9984/tcp closed unknown
9985/tcp closed unknown
9986/tcp closed unknown
9987/tcp closed dsm-scm-target
9988/tcp closed nsesrvr
9989/tcp closed unknown
9990/tcp filtered osm-appsrvr
9991/tcp filtered issa
9992/tcp closed issc
9993/tcp filtered palace-2
9994/tcp filtered palace-3
9995/tcp filtered palace-4
9996/tcp filtered palace-5
9997/tcp closed palace-6
9998/tcp filtered distinct32
9999/tcp filtered abyss
Nmap done: 1 IP address (1 host up) scanned in 4.06 seconds
Sembla que es "TPlink-like"
Intentem detectar-lo com "TPlink-like" :
nicolau@mars:~$ kasa --host 192.168.1.142
No --strip nor --bulb nor --plug given, discovering..
Traceback (most recent call last):
File "/home/nicolau/.local/lib/python3.7/site-packages/kasa/protocol.py", line 51, in query
reader, writer = await asyncio.wait_for(task, timeout=timeout)
File "/usr/lib/python3.7/asyncio/selector_events.py", line 494, in _sock_connect_cb
raise OSError(err, f'Connect call failed {address}')
ConnectionRefusedError: [Errno 111] Connect call failed ('192.168.1.142', 9999)
The above exception was the direct cause of the following exception:
Traceback (most recent call last):
File "/home/nicolau/.local/bin/kasa", line 11, in <module>
sys.exit(cli())
File "/home/nicolau/.local/lib/python3.7/site-packages/asyncclick/core.py", line 862, in __call__
return anyio.run(self._main, main, args, kwargs, **({"backend":_anyio_backend} if _anyio_backend is not None else {}))
File "/home/nicolau/.local/lib/python3.7/site-packages/kasa/discover.py", line 207, in discover_single
info = await protocol.query(host, Discover.DISCOVERY_QUERY)
File "/home/nicolau/.local/lib/python3.7/site-packages/kasa/protocol.py", line 80, in query
) from ex
kasa.exceptions.SmartDeviceException: Unable to query the device: [Errno 111] Connect call failed ('192.168.1.142', 9999)
Termostats wifi
Termostat inteligent wifi
2 fils, rele
smart temperature meter
Com q els termostats inteligents no hi caben, separem el sensor de temperatura del relé (smart switch) actuador.
Estaria be que l'alimentacio fos per USB i no per piles (3 x 1,5 v)
instalem el termometre a Smart Life
1) mode Wifi :
- "Add device" + "Sensors" + "Temperature + Humidity sensor" (wifi) : "LED WIFI T&H Sensor"
- "Device information"
- Virtual ID : bfe483b0ac18224f06dqww
- IP (externa) : 93.176.186.2
- MAC : 1c:90:ff:da:ad:42
- IP (interna) : 192.168.1.141
2) mode Bluetooh :
- turn "on" the Bluetooth in mobile
- open SmartLife app and choose "+"
- press and hold the sensor button for 5 secs
- the wifi icon starts blinking on sensor display
- message on mobile : "devices to be added: 1"
- press "go to add"
- it will connect the wifi automatically
nicolau@mars:~/sebas/python/smart_devices$ python3 -m tinytuya wizard
TinyTuya Setup Wizard [1.8.0]
Existing settings:
API Key=aaaaadrqec0vpte3
Secret=sssss401040292ee22d3540a02ad
DeviceID=ddddddd62d74d557
Region=eu
Use existing credentials (Y/n):
Device Listing
[
{
"name": "LED WIFI T&H Sensor",
"id": "bfe483b0ac18224f06dqww",
"key": "fb9d5ba086f97ed4",
"mac": "1c:90:ff:da:ad:42",
"category": "wsdcg",
"product_name": "LED WIFI T&H Sensor",
"product_id": "o2c5btmpepi9pzf8",
"biz_type": 18,
"model": "\u63d2\u7535\u6b3e\u6a21\u7ec4\u5f00\u53d1\u5e38\u4f9b\u7535\u6b3e",
"sub": false,
"icon": "https://images.tuyaeu.com/smart/icon/ay15427647462366edzT/1e738d42af8bebcca4f802f0074f134d.png"
},
Model : 插 电 款 模 组 开 发 常 供 电 款 = desenvolupament de mòduls de tipus endollable i tipus d'alimentació normal
A veure si podem llegir les seves dades :
d = tinytuya.OutletDevice( DEVICE_ID, DEVICE_IP, DEVICE_KEY ) # connect to device and fetch state
d.set_version(3.3)
d.set_socketRetryLimit(2) # set retry count limit [default 5]
d.set_socketTimeout(2) # set connection timeout in seconds [default 5]
d.set_sendWait(1) # seconds to wait after sending for a response
while True: # forever loop
try:
szT = Get_Timestamp()
# dps = d.detect_available_dps() # return a list of DPS available from device
# iTemp = dps['1']
# iHum = dps['2']
data = d.status()
iTemp = data['dps']['1']
iHum = data['dps']['2']
print( '[%s] - T (%s), H (%s)' % (szT, iTemp, iHum) )
print ( "### sleep 10 sec ###" )
time.sleep(10)
except KeyboardInterrupt:
print( "kbd 2 - bye" )
sys.exit()
except KeyError: # as wrong IP (?) -
issue 337
szOut = '%s - T %s ; H %s\n' % (szT, 0, 0) # keep uniform format in temperature file so it can be scanned later
Escriu_Temperatura ( szOut )
except SocketPermissionError:
print( "--- run as root" )
sys.exit()
Al R4 gravem la temperatura cada 15 minuts via crontab : /home/pi/python/termometre/1_llegir_temperatura.py => /home/pi/python/termometre/dades/
tinytuya i el canvi de IP
Tinytuya github +
PyPi (DPS list)
d = tinytuya.OutletDevice( DEVICE_ID, "Auto", DEVICE_KEY ) # connect to device and fetch state
d.set_version(3.3)
d.set_socketRetryLimit(2) # set retry count limit [default 5]
d.set_socketTimeout(2) # set connection timeout in seconds [default 5]
d.set_sendWait(1) # seconds to wait after sending for a response
try:
dps = d.detect_available_dps() # return a list of DPS available from device
except:
print( "error - bye" )
sys.exit()
Here is the auto-find :
Classes
OutletDevice(dev_id, address, local_key=None, dev_type='default')
CoverDevice(dev_id, address, local_key=None, dev_type='default')
BulbDevice(dev_id, address, local_key=None, dev_type='default')
dev_id (str): Device ID e.g. 01234567891234567890
address (str): Device Network IP Address e.g. 10.0.1.99 or 0.0.0.0 to auto-find
local_key (str, optional): The encryption key. Defaults to None.
dev_type (str): Device type for payload options (see below)
incidencia AliExpress
2022 12 20 - 10 € - 8159603715244799 - sensor temperatura (a piles)
número de rastreo CNESP0802912340003706392
2022 12 23 - 9,50 € - order 8159739386574799 - termometre tuya amb cable USB
número de rastreo CNESP0802912340003789031
2023 02 04 - 9,88 € - order 8162040106314799
2023 02 23 - 7,73 € - order 8162959790314799
EcoScooting
- hotline: +34 91 903 29 17, lu-vi (9:30-21:30), sa-do (9:30-18:30)
- atención al cliente, tf +34 91 903 29 17 {lu a vi (9:30 a 18:30) - sa y do (9:30 a 13:30)}
- web ecoscooting.com
- teléfono 93 122 28 79
- email customersupport@ecoscooting.com
- formulario solicitud
Nomes funciona el telefon, 91 903 29 17 => tot ha tornat a Xina
RRG, 2023/01/29
En Ramon em deix un "wifi temperature & humidity sensor", Amazon Alexa, Google Assistant, Tuya
- a "Smart Life" instalem via "sensors", "Sensor + wifi"
- a "Smart Life" veig
- Virtual ID = bf7e6d36b541c6d116hswg
- IP = 93.176.162.43, externa del router
- MAC = 1c.90.ff.43.c7.35
- macvendors.com diu q es "Tuya Smart Inc"
- la poso com filtre al Wireshark i veig la IP = 192.168.1.143
- anem per Tuya "wizard" - geekness
nicolau@mars:~/sebas/python/smart_devices$ python -m tinytuya wizard
TinyTuya Setup Wizard [1.8.0]
Existing settings:
API Key=aaaaadrqec0vpte3
Secret=sssss401040292ee22d3540a02ad
DeviceID=ddddddd62d74d557
Region=eu
Use existing credentials (Y/n):
Device Listing
[
{
"name": "WiFi Temperature & Humidity Sensor",
"id": "bf7e6d36b541c6d116hswg",
"key": "7670d8a9b443acc7",
"mac": "1c:90:ff:43:c7:35",
"category": "wsdcg",
"product_name": "WiFi Temperature & Humidity Sensor",
"product_id": "yqiqbaldtr0i7mru",
"biz_type": 18,
"model": "TH-01",
"sub": false,
"icon": "https://images.tuyaeu.com/smart/icon/ay15427647462366edzT/fb47ce65c323640a1a82d1bd03f61005.png"
},
R4 llegeix la temperatura a fitxer
Engeguem periodicament :
pi@R4:~/python/termometre $ crontab -l
*/15 * * * * /home/pi/python/termometre/1_llegir_temperatura.py 1>> /home/pi/logs/llegir_temperatura.log 2>&1
Llegim temperatura i humitat :
pi@R4:~/python/termometre $ cat 1_llegir_temperatura.py
d = tinytuya.OutletDevice( DEVICE_ID, "Auto", DEVICE_KEY ) # connect to device and fetch state
d.set_version(3.3)
# function to write a temperature to the file
def Escriu_Temperatura ( szLinia ) :
file1 = open( myFQFN, "a") # append mode
file1.write( szOut )
file1.close()
try:
if bVerbose: print('Auto ip')
dps = d.detect_available_dps() # return a list of DPS available from device
iTemp = dps['1']
iHum = dps['2']
szOut = '%s - T %s ; H %s\n' % (szT, iTemp, iHum)
if bVerbose: print( '[%s] - T (%s), H (%s)' % (szT, iTemp, iHum) )
Escriu_Temperatura ( szOut )
Now we can plot any day we want, using 2_plot_temp.py that creates a PGN file.
If we FTP it, it can be displayed from IP_PI4
page
T34-Smart Plug+
install tinytuya module
Install tinytuya on Minie :
sebas@minie:~/dades/python/smart_devices$ python3 -m tinytuya wizard
/usr/bin/python3: No module named tinytuya
sebas@minie:~/dades/python/smart_devices$ DEBUG=* tuya-cli wizard
tuya-cli: command not found
sebas@minie:~/dades/python/smart_devices$ npm i @tuyapi/cli -g
Command 'npm' not found, but can be installed with:
sudo apt install npm
sebas@minie:~/dades/python/smart_devices$ python3 -m pip install tinytuya
/usr/bin/python3: No module named pip
sebas@minie:~/dades/python/smart_devices$ sudo apt-get install python3-pip
sebas@minie:~/dades/python/smart_devices$ sudo apt autoremove
sebas@minie:~/dades/python/smart_devices$ python3 -m pip install tinytuya
Defaulting to user installation because normal site-packages is not writeable
Collecting tinytuya
Downloading tinytuya-1.15.1-py2.py3-none-any.whl (121 kB)
━━━━━━━━━━━━━━━━━━━━━━━━━━━━━━━━━━━━━━━━ 121.3/121.3 KB 2.9 MB/s eta 0:00:00
Requirement already satisfied: requests in /usr/lib/python3/dist-packages (from tinytuya) (2.25.1)
Requirement already satisfied: cryptography in /usr/lib/python3/dist-packages (from tinytuya) (3.4.8)
Requirement already satisfied: colorama in /usr/lib/python3/dist-packages (from tinytuya) (0.4.4)
Installing collected packages: tinytuya
WARNING: The script tinytuya is installed in '/home/sebas/.local/bin' which is not on PATH.
Consider adding this directory to PATH or, if you prefer to suppress this warning, use --no-warn-script-location.
Successfully installed tinytuya-1.15.1
sebas@minie:~/dades/python/smart_devices$ python3 -m tinytuya wizard
TinyTuya Setup Wizard [1.15.1]
Existing settings:
API Keyasdka5dfga54neryvpte3
Secret=f73dd42349aa657292ee89d3540782ad
DeviceID=3523486784890d74d557
Region=eu
Use existing credentials (Y/n):
Download DP Name mappings? (Y/n):
Device Listing
[
{
"name": "termometre",
"id": "bfe483b0ac18224f06dqww",
"key": "fb9d5ba086f97ed4",
"mac": "1c:90:ff:da:ad:42",
"uuid": "89f3fd7e9ce05450",
"sn": "2796230217i9pzf8",
},
{
"name": "llum",
"id": "bf520e2283ffcb3013p23s",
"key": "V{UkDSPDdA67gmmv",
"mac": "a8:80:55:2d:21:4d",
"uuid": "1bdca6610c0ccfc3",
},
{
"name": "endoll",
"id": "35680858b4e62d74d557",
"key": "uFEew}YTv|3x8Y{I",
"mac": "b4:e6:2d:74:d5:57",
"uuid": "35680858b4e62d74d557",
"category": "cz",
},
{
"name": "wifi power meter",
"id": "bf43d154068c6d3814vgnc",
"key": "7015320193334718",
"mac": "cc:8c:bf:52:73:de",
"uuid": "5c5fd355fafb2325",
"sn": "BXLDD25YU012D8",
"category": "zndb",
>> Saving list to devices.json
4 registered devices saved
>> Saving raw TuyaPlatform response to tuya-raw.json
Poll local devices? (Y/n):
Scanning local network for Tuya devices...
3 local devices discovered
Polling local devices...
[endoll ] 192.168.1.128 - [On] - DPS: {'1': True, '11': 0}
[llum ] 192.168.1.130 - [Off] - DPS: {'20': False, '21': 'white', '22': 1000, '23': 1000, '24': '000003e803e8', '25': '0646460103e80', '26': 0, '34': False}
[termometre ] 192.168.1.129 - [Off] - DPS: {'1': 310, '2': 56, '9': 'c', '10': 390, '11': 0, '12': 60, '13': 20, '14': 'cancel', '15': 'cancel', '21': True}
[wifi power meter ] Error: No IP found
>> Saving device snapshot data to snapshot.json
>> Saving IP addresses to devices.json
3 device IP addresses found
Done.
install device "T34-Smart Plug+"
- connect Android with Smart Life APP to 2,4 GHz wifi
- on Android, turn "on" bluetooth
- conecto el endoll al endoll
- pulsar el boto blau durant 5 segons per a que es posi intermitent : "pairing mode"
- engego "Smart Life" i pico "+" per afegir un nom dispositiu
- "Devices to be added = T34-Smart-Plug+"
- wifi name = Maset, give PWD
Podem escollir "Power" per engegar o parar, i "Electric" per veure el consum.
"Device Information" :
- Virtual ID = "bf.9d.63.96.84.07.a0.05.7f.bz.9o"
- IP = 93.176.177.160 {IP externa del router}
- MAC = "b8:06:0d:27:c4:93"
- Signal Strength = -60 dBm {excellent > -50 dBm, good -50 dBm to -70 dBm, fair -70 dBm to -80 dBm, poor < -80 dBm}
acces python al T34-Smart Plug+
sebas@minie:~/dades/python/smart_devices$ python3 -m tinytuya wizard
TinyTuya Setup Wizard [1.15.1]
Existing settings:
API Key=ks1234rqa68nec0897e3
Secret=f73dd40109aasad29asd22d35asd02ad
DeviceID=35680858b4e62d74d557
Region=eu
Use existing credentials (Y/n):
Download DP Name mappings? (Y/n):
Device Listing
[
{
"name": "T34-Smart Plug+",
"id": "bf9d63968407a0057fbz9o",
"key": "CJ[wv*VK}V_?5~b.",
"mac": "b8:06:0d:27:c4:93",
"uuid": "cd07955f4a18f66a",
"sn": "10013866605347",
"category": "tdq",
"mapping": {
"1": {
"code": "switch_1",
"type": "Boolean",
"values": {}
},
"9": {
"code": "countdown_1",
"type": "Integer",
"values": {
"unit": "s",
"min": 0,
"max": 86400,
"scale": 0,
"step": 1
}
},
"20": {
"code": "add_ele",
"type": "Integer",
"values": {
"unit": "kW\u00b7h",
"min": 0,
"max": 50000,
"scale": 3,
"step": 100
}
},
"21": {
"code": "cur_current",
"type": "Integer",
"values": {
"unit": "mA",
"min": 0,
"max": 30000,
"scale": 0,
"step": 1
}
},
"22": {
"code": "cur_power",
"type": "Integer",
"values": {
"unit": "W",
"min": 0,
"max": 50000,
"scale": 1,
"step": 1
}
},
"23": {
"code": "cur_voltage",
"type": "Integer",
"values": {
"unit": "V",
"min": 0,
"max": 5000,
"scale": 1,
"step": 1
}
},
"24": {
"code": "test_bit",
...
Polling local devices...
[T34-Smart Plug+ ] 192.168.1.140 - [On] - DPS: {'1': True, '9': 0, '20': 234, '21': 0, '22': 0, '23': 2361, '24': 1, '29': 0, '38': 'memory', '42': '', '43': '', '44': 'AAAC'}
[endoll ] 192.168.1.128 - [On] - DPS: {'1': True, '11': 0}
smart plug with power meter
20240713, 8€ AliExpress, specs :
Tuya EU Smart Plug, 16A/20A Wifi Smart Socket with Power Monitoring, Remote Control, supports Alexa Google Home Yandex voice control, model EU-02-20A-GW
Acces des R4 :
pi@R4:~/python/plug_amb_power_meter $ python3 -m tinytuya version
TinyTuya [1.7.2]
I una altra interessant sortida es :
pi@R4:~/python/plug_amb_power_meter $ python3 -m tinytuya scan
TinyTuya (Tuya device scanner) [1.7.2]
[Loaded devices.json - 5 devices]
Scanning on UDP ports 6666 and 6667 for devices (20 retries)...
endoll Product ID = r15JnoGqWPM4PPtl [Valid payload]:
Address = 192.168.1.128, Device ID = 35680858b4e62d74d557, Local Key = uFEew}YTv|3x8Y{I, Version = 3.3, MAC = b4:e6:2d:74:d5:57
Status: {'1': True, '11': 0}
T34-Smart Plug+ Product ID = keyjnuy4s3kre7m7 [Valid payload]:
Address = 192.168.1.140, Device ID = bf9d63968407a0057fbz9o, Local Key = CJ[wv*VK}V_?5~b., Version = 3.4, MAC = b8:06:0d:27:c4:93
Status: {'1': True, '9': 0, '20': 234, '21': 0, '22': 0, '23': 2340, '24': 1, '29': 0, '38': 'memory', '42': '', '43': '', '44': 'AAAC'}
termometre Product ID = o2c5btmpepi9pzf8 [Valid payload]:
Address = 192.168.1.129, Device ID = bfe483b0ac18224f06dqww, Local Key = fb9d5ba086f97ed4, Version = 3.3, MAC = 1c:90:ff:da:ad:42
Status: {'1': 317, '2': 58, '9': 'c', '10': 390, '11': 0, '12': 60, '13': 20, '14': 'cancel', '15': 'cancel', '21': True, '101': False, '102': 0, '103': 0, '104': 0, '105': 0, '106': 0, '107': 0}
llum Product ID = key8u54q9dtru5jw [Valid payload]:
Address = 192.168.1.130, Device ID = bf520e2283ffcb3013p23s, Local Key = V{UkDSPDdA67gmmv, Version = 3.4, MAC = a8:80:55:2d:21:4d
Status: {'20': False, '21': 'white', '22': 1000, '23': 1000, '24': '000003e803e8', '25': '06464601000003e803e800000000464601007803e803e80000000046460100f003e803e800000000', '26': 0, '34': False}
Scan Complete! Found 4 devices.
>> Saving device snapshot data to snapshot.json
Aixi veiem que la potencia consumida cada instant es al DPS 22.
Per llegir-la, codifiquem :
pi@R4:~/python/plug_amb_power_meter $ ./1_llegir_potencia.py
>>> llegir la potencia
>>> data 2024-07-20.
>>> time 19:48.
>>> filename /home/pi/python/dades/powermeter/potencia_2024-07-20.txt.
TinyTuya (Tuya Interface) version [1.7.2]
Testing device {bf9d63968407a0057fbz9o} on IP {192.168.1.140} with key {CJ[wv*VK}V_?5~b.} version {3.4}.
>>> DATA {'dps': {'1': True, '9': 0, '20': 1, '21': 119, '22': 263, '23': 2361, '24': 1, '29': 0, '38': 'memory', '42': '', '43': '', '44': 'AAAC'}}.
19:48 - potencia {26.3} W.
output in R4@/home/pi/python/dades/powermeter/potencia_2024-07-20.txt
Volem generar una imatge de 1920 x 1080 px mitjançant "matplotlib" (webp if possible)
WebP is now a supported output format. Figures may now be saved in WebP format by using the .webp file extension, or passing format='webp' to savefig.
-
matplotlib
Despres, fem la lectura periodica i posem el resultat en un fitxer : R4@/home/pi/python/dades/powermeter/potencia_2024-07-20.txt
acces python per manegar el interruptor
sebas@minie:~/dades/python/smart_devices$ cat h_smart_plug_with_powermeter_read_status.py
while True: # forever loop
try:
d = tinytuya.OutletDevice( DEVICEID, DEVICEIP, DEVICEKEY ) # connect to device and fetch state
d.set_version(3.4)
now = datetime.datetime.now()
szNow = now.strftime("%Y-%m-%d %H:%M:%S")
data = d.status() # response type {<class 'dict'>}
szStatus = data['dps']
bStatus = szStatus['1']
print( ">>> (%s) sw status is {%r}." % (szNow, bStatus) )
print ( "### sleep 5 ###" )
time.sleep(5)
except KeyboardInterrupt:
print( "kbd 2 - bye" )
sys.exit()
except:
print( "--- Timeout trying to toggle device power.")
sys.exit()
Podem manegar el interruptor amb "i_smart_plug_with_powermeter_turn_onoff.py" :
if switch_state == 0:
print( ">>> turn ON" )
d.turn_on(switch=1)
switch_state = 1 ;
else :
print( ">>> turn OFF" )
d.turn_off(switch=1)
switch_state = 0 ;
Smart Plug plus Power Meter Qing "EU-02-16A"
20251125 compro un SmartSwitch amb PowerMeter a Alibaba.
El fabricat es diu Shenzhen Qing
Configuracio
- poso el telefon a la wifi de 2,4 MHz
- conecto el SmartSwitch a l'endoll
- en 5 segons tenim el llum blau pampallugant "rapid" (2 cops per segon)
- obro la App "SmartLife"
- amb (+) afegeixo un device, de tipus "Electrical Socket Plug" amb "BLE+Wifi"
- s'inventa un nom, així que l'he de editar per posar-li "kiko"
- podem veure la potencia que hi passa picant al dispositiu i despres "Electric"
acces des python
sebas@minie:~/dades/python/smart_devices$ python3 -m tinytuya wizard > wizard_out.txt
Error from Tuya server: Error from Tuya Cloud: Code 1106: 'permission deny'
Check DeviceID and Region
If eu still gives you Error 1106, you need to confirm exactly which Data Center your cloud project is using.
- log in to the Tuya IoT Platform (u=cfb@g)
- click "Cloud" -> apareix el meu projecte -> "Open" # > Development > Open your project
- click the "Overview" tab
- look for the "Data Center" field (usually near the API Key) ->
China Data Center, Central Europe Data Center, India Data Center, Western America Data Center, Western Europe Data Center, Eastern America Data Center {20251125}
The cloud development project is a collection of resources on the Tuya Developer Platform, including devices, APIs, and data.
Resources deployed for each project are isolated from those for the other projects.
Smart Breaker RMC001
20151217 - manufacturer Shenzhen Ruomu Zhilian -> "arbre"
resum de la xarxa 20251218
sebas@minie:~/dades/python/smart_devices$ ./g_scan_json.py
Llegint fitxer 'devices.json'.
LLISTAT DE DISPOSITIUS
---------------------------------------------------------------------------------------------------------------------
NOM IP VERSIÓ ID MAC KEY
---------------------------------------------------------------------------------------------------------------------
termometre 192.168.1.128 3.3 bfe483b0ac18224f06dqww 1c:90:ff:da:ad:42 &6]H^n8M3FdL=)I3
T34-Smart Plug+ 192.168.1.129 3.4 bf9d63968407a0057fbz9o b8:06:0d:27:c4:93 CJ[wv*VK}V_?5~b.
arbre 192.168.1.150 3.5 bf850526dd568f9b3e5fqr 00:33:7a:58:4c:1f >g</^p*$Hk-nC}=a
llum 192.168.1.130 3.4 bf520e2283ffcb3013p23s a8:80:55:2d:21:4d V{UkDSPDdA67gmmv
---------------------------------------------------------------------------------------------------------------------
Tapo P110
20251120 compro un Tapo 110 - es un TP-Link per 9,83 € - smart wifi socket with energy monitorig
configuracio
- activate Bluetooth on Android phone
- connect Tapo to power - LED shall flash green-yellow
if it flashes green only, it is in "Amazon FFS"
- HotSpot : Tapo_Plug_61BC
- install "TP_Link Tapo" APP under Android - version 3.14.519
- create "TP-Link ID" : c@g.c + "R*.2*5.11"
- click (+) at upper right corner to add a device
- select "Plug", then "Tapo P110"
- select "wifi" mode or "bluetooth" mode
- provide wifi credentials
- use "Tapo" APP to manage the device
Device info :
IP address = 192.168.1.156
MAC address = A8-29-48-49-61-BC
Firmware version = 1.4.0 Build 251020 Rel. 161559 ### API local bloqueda ###
manage Tapo P110 using python
- install library
$ pip install python-tapo-p100
$ pip uninstall python-tapo-p100
$ pip install python-tapo-p100-api
$ pip uninstall python-tapo-p100-api
$ pip install tapo-plug
$ pip uninstall tapo-plug
$ python3 -m pip install PyP100
$ python3 -m pip uninstall PyP100
$ python3 -m pip install tapo
$ python3 -m pip uninstall tapo
$ python3 -m pip install python-tapo {ERROR: No matching distribution found for python-tapo}
$ python3 -m pip install cryptography requests {Requirement already satisfied}
$ python3 -m pip install tapo {nuvol}
- verify where was it installed :
sebas@minie:~/dades/python/smart_devices/tapo$ pip show tapo-plug
Name: tapo-plug
Version: 0.7
Summary: A REST API warper for TP-Link Tapo P100/P105.
Home-page: https://gitlab.com/Naqwada/TapoPlug-Rest-API
Author: Samy Younsi (Naqwada)
Author-email: naqwada@pm.me
License: MIT
Location: /home/sebas/.local/lib/python3.10/site-packages
Requires: Crypto, pkcs7, requests
Required-by:
- python code : sebas@minie:~/dades/python/smart_devices/tapo$ ./1_tapo_p110.py
- from tapo import Tapo + ModuleNotFoundError: No module named 'tapo' :
*** no comprar TAPO ***
dubtes
ESP32
Read ESP32 quick ref
ESPhome
homepage :
ESPHome is a system to control your ESP8266/ESP32 by simple yet powerful configuration files and control them remotely through Home Automation systems
firmware lliure per ESP
video :
qué sentido tiene instalar (firmware ESP32 alternativos)
Tasmota
amb Tasmo Admin
(see how to) o
Espurna o
ESPHome en vuestros dispositivos SONOFF ?
Com es posa un firmware "lliure" a un ESP de compra ?
For retrieving the firmware bin, if you have physical access to the ESP microcontroller inside the device,
you can connect over serial and use esptool.py to backup the firmware directly.
There's plenty of guides to do this, such as on the Espurna and Sonoff-Tasmota wikis.
codetheweb
Projecte : tuya-convert, amb instruccions per
Tasmota i
Tasmota i
ESPurna i
Docker
Some manufacturers have been silently switching from the ESP82xx based modules to other chipsets,
and the flashing can not be done.
So, tuya-convert does not workk on new devices.
Superhouse steps :
- install tuya-convert on raspberry + "install_prereq.sh"
- connect raspberry cable to internet
- connect smartphone to "vtrust-flash" wifi (pwd "flashmeifyoucan")
- run "start-flash.sh"
- set device into flashing mode ("EZmode", push power button for 5 sec) - LED blink fast
- connect device to same wifi
- install Tasmota
- update device to have all functions
ESP32 home energy monitor super-project
See code at github : ESP32 + AWS + App !!!
YHDC SCT-013-030 ---> ESP32
ESP32 ---> MQTT
MQTT ---> AWS (IoT service)
AWS (IoT service) ---> IoT rule : write into DynamoDB
AWS (Lambda) ---> store old data into S3
AWS (Lambda) --->
GraphQL API : query readings
S3 (web app)
Dygraphs ---> user visualization of DynamoDB data
The people at OpenEnergyMonitor have an open source system called EmonCMS.
It’s specifically designed to ingest data from energy monitors.
It either runs on a Raspberry Pi that you host yourself or you can use their cloud service.
Every 30 seconds it sends 30 readings over an MQTT connection to the AWS IoT service.
Once the message is received, an IoT Rule is triggered that writes the raw reading to a DynamoDB table.
This happens 2880 times a day (2 times per minute, 1440 minutes in a day).
Instead, I realized that older data doesn’t have to stay stored in DynamoDB.
I could offload old data and store it on S3 instead!
So, I made a Lambda function that is triggered at night and archives all readings from the past day to a single CSV file on S3
savjee.be
v 2 :
multitasking on ESP32 with Arduino and FreeRTOS +
integrating with Home Assistant
Connect ESP32 to AWS IoT
Projecte al github -
This starter template shows you how to set up an MQTT connection with AWS IoT and publish JSON messages
- create special certificates
- connect to WiFi
- set up a secure MQTT connection
- construct a JSON message
Connect ESP32 to AWS IoT (with Arduino code)
ESP URLs
- caixa ESP32 : 1 Minit 3D Print - Hibiscus Sense ESP32 Case
*** AWS IoT button HS110 control ***
AWS IoT Button - how it works
What is AWS IoT?
AWS IoT provides the cloud services that connect your IoT devices to other devices and AWS cloud services.
AWS IoT provides device software that can help you integrate your IoT devices into AWS IoT-based solutions.
If your devices can connect to AWS IoT, AWS IoT can connect them to the cloud services that AWS provides.
First, you will need an AWS account. It’s free and easy to create an account. Sign up now.
After you configure the AWS IoT Button to connect to your Wi-Fi network
and provision the button with an AWS IoT Core certificate and private key,
the button will securely connect to AWS IoT Core and publish a message on a topic when clicked.
You can use the AWS IoT rules engine to set up a rule and configure single-click, double-click, or long-press events to be routed to any AWS service.
You can configure it to send you a notification through Amazon SNS or store the clicks in an Amazon DynamoDB table.
You can even code custom logic written in Node.js, Python, or Java in an AWS Lambda function,
and then configure the function to connect to third-party services or other AWS IoT-powered connected things.
IoT button
un projecte : pawelmat
AWS IoT button HS110 control by pavelmat :
devpost ,
github
my Home Assistant on a R4
Homepage ,
forum
HA install
Use an A2 class SD card if possible
Instructions :
- download 64-bit image :
hassos_rpi4-64-5.9.img.xz {20220327}
- flash the downloaded image to an SD card using balenaEtcher :
start "balenaEtcher-1.5.113-x64.AppImage" and pointo to image and then SD
- obtenim
nicolau@mars:~$ df -h | grep sd
/dev/sda1 229G 125G 92G 58% /
/dev/sdb2 23M 17M 4.2M 81% /media/nicolau/hassos-kernel
/dev/sdb3 101M 101M 0 100% /media/nicolau/disk
/dev/sdb8 976M 675M 234M 75% /media/nicolau/hassos-data
/dev/sdb7 89M 1.6M 81M 2% /media/nicolau/hassos-overlay
- we boot and get {20220327}
Welcome to Home Assistant
homeassistant login:
Compte que no fa servir "config.txt" ni "cmdline.txt"
HA console
Welcome to Home Assistant
homeassistant login: root
Welcome to the Home Assitant command line.
For more details use 'help' and 'exit' to close
If you need access to hostsystem use 'login'
configuring HA
The web interface will be served on http://192.168.1.73:8123/onboarding.html
configuration details
Devices and services are represented in Home Assistant as integrations.
You can set them up now, or do it later from the configuration screen.
- create user account
- create location
HA integrations
Important: not all Tuya devices are supported by the tuya API used by this integration.
For more details refer to TuyaHA Library.
- with Home Assistant Cloud, you can connect your Home Assistant instance in a few simple clicks to Amazon Alexa.
Home Assistant Cloud requires a paid subscription after a 30-day free trial.
- Smart Things
is integrated into Home Assistant through the SmartThings Cloud API
- Tuya -
The tuya integration is the main integration to integrate
Tuya Smart related platforms, except the Zigbee hub.
Go "configuration", "integrations", click "Add integration", search for "tuya" and enter credentials
Tuya HA integration - usr/pwd problem
HA says "invalid user/pwd"
Jo tinc un usuari que faig servir per anar a
https://developer.tuya.com/en/ i
https://iot.tuya.com
El acces al nuvol amb python sembla que requereix un altre usr/pwd, vist que no funcionen :
- Home Assistant
- debug_discovery.py -
issue 66
Punt de acces :
https://github.com/PaulAnnekov/tuyaha/blob/master/tools/debug_discovery.py
https://px1.tuyaeu.com/homeassistant/auth.do
auth_response = requests.post(
TuyaFQDN,
data={
"userName": USERNAME,
"password": PASSWORD,
"countryCode": COUNTRY_CODE,
"bizType": BIZ_TYPE,
"from": FROM,
},
)
- tuya_tray -
Mind issue 7 (usr/pwd error) :
punt de acces :
https://github.com/dev-est/tuya_tray/blob/master/tuya-tray.py
from tuyapy import TuyaApi
api = TuyaApi()
api.init(username,password,country_code,application)
self.device_ids = api.get_all_devices()
Tinc un requeriment al servei tecnic : service.console.tuya
Solució : usr/pwd de Smart Life !
Tuya HA integration - SB50 problem
La SB50 no es veu ni des tuyaha ni des HA, pero es pot manegar amb Smart Life
HA issue
tuyaha issue
HA links, videos, etc
Microchip al nuvol
Microchip products
Google IoT Core Cloud uses the popular MQTT publish subscribe mechanism,
but employs a clever security mechanism based on the JSON Web Token (or JWT)
to make the authentication/login process efficient even on the smallest 8-bit microcontroller architectures.
- url
EV75S95A - SAM-IoT WG Development Board
Homepage
The SAM-IoT WG Development Board features the SAMD21G18 Arm® Cortex®-M0+ based 32-bit microcontroller (MCU),
an ATECC608A CryptoAuthentication™ secure element IC
and the fully certified ATWINC1510 Wi-Fi® network controller,
so you can quickly and easily connect your embedded application to Google’s Cloud IoT core platform.
AC164160 - AVR-IoT WG Development Board
Homepage
The AVR-IoT WG development board combines a powerful ATmega4808 AVR® MCU,
an ATECC608A CryptoAuthentication™ secure element IC
and the fully certified ATWINC1510 Wi-Fi® network controller,
which provides the most simple and effective way to connect your embedded application to Google’s Cloud IoT core platform.
AC164164 - PIC-IoT WG Development Board
Homepage
The PIC-IoT WG Development Board combines a powerful PIC24FJ128GA705 MCU,
an ATECC608A CryptoAuthentication™ secure element IC
and the fully-certified ATWINC1510 Wi-Fi® network controller,
which provides the most simple and effective way to connect your embedded application to the Google Cloud IoT Core.
You can also connect this board to the Amazon AWS by a simple firmware upgrade,
or you can use the PIC-IoT WA board (EV54Y39A) which is a AWS provisioned version of this board.
EV54Y39A - PIC-IoT WA Development Board
Homepage
The PIC-IoT WA Development Board combines a powerful PIC24FJ128GA705 MCU,
an ATECC608A CryptoAuthentication™ secure element IC
and the fully-certified ATWINC1510 Wi-Fi® network controller,
which provides the most simple and effective way to connect your embedded application to Amazon Web Services (AWS).
You can also connect this board to the Google Cloud by a simple firmware upgrade,
or you can use the PIC-IoT WG board (AC164164) which is a google provisioned version of this board
DM164140 - MPLAB® Xpress Evaluation Board
Microchip introdueix
MPLAB® Xpress Cloud-Based IDE
que complementa la eina "local"
MPLAB® X Integrated Development Environment (IDE)
20201218 - en MTV em regala una
MPLAB® Xpress Evaluation Board
The centerpiece of the MPLAB Xpress evaluation board is the PIC16F18855 MCU,
an 8-bit device with the unique combination of low power consumption, performance to handle almost any application task,
and on-chip peripherals that enable you to control your system with a minimal amount of code.
User's guide
Quick start guide for
MPLAB® Xpress Cloud-Based IDE for MPLAB Xpress Evaluation Boards :
- point your browser to mplabxpress.microchip.com and click the “Get Started” button
- you are at IDE
- find an example that suits your interest, and click the “Open” tab to launch the example in the MPLAB Xpress IDE
- compile your code - press the “Make and Program Device” icon in the upper left quadrant of the IDE.
A project_name.hex file will be generated and placed into the "Downloads" directory of your PC.
- connect the MPLAB Xpress Evaluation Board to your PC with a micro-USB cable.
The MPLAB Xpress Evaluation Board will appear as a USB mass storage device or FLASH drive - "XPRESS" icon at Ubuntu
- copy the generated .hex file to the root directory of the MPLAB Xpress Evaluation Board’s FLASH drive.
The MPLAB Xpress Evaluation Board only recognizes files placed in the root directory.
- perform a hard reset using the RESET button on the board.
jugant amb la MPLAB Xpress Evaluation Board
La "MPLAB Xpress Evaluation Board" te un PIC 16F18855 8-bit microcontroller i també un PIC 18LF25K50 que fa de debugger
20201217 Problem :
- Ubuntu no mostra el "flash disc" en conectar el USB
- Windows 7 no mostra el "flash disc" en conectar el USB
Solució : cable USB "complert"
Windows 7 veu "h:\README.HTM", que ens porta a https://www.microchip.com/mplab/mplab-xpress
Cal fer login des el Cloud IDE i no es facil :
- anem al cloud IDE
- piquem a dalt a la dreta "myMicrochip Login"
- ens porta a microchip.com
- piquem "Log in to Existing MPLAB Xpress IDE", a la dreta de la primera pantalla, en fons vermell
- u "camp@g", p "R2021"
- el perfil és a myMicrochip
In order to debug a real device, you have to start and connect the USB Bridge tool.
The USB Bridge requires Java 8 to be installed.
See the Java version you have
The Java Uninstall tool will only work on Microsoft Windows
MQTT i el nuvol
wikipedia MQTT
Articles del cloud que contenen temes de MQTT :
MQTT + ESP32 sample
ESP32 uses MQTT so it can manage multiple clients that "publish" and other multiple clients that "subscribe" -
youtube
Code and schematics : url
- publish topic : temp_humiditu
- subscribe topic : temp_humidity
- an ESP32 client connected to a DHT22 temperature and humidity sensor will publish the sensor data to a topic called temp_humidity
- a python MQTT client running on the Pi will subscribe to the temp_humidity topic and show the results on an OLED display
ESP32 python MQTT publish client
Here is the MQTT client code that will run on the ESP32. It polls the DHT-22 and publishes the sensor data to a topic called temp_humidity.
$ cat dht_publish.py
from time import sleep
from umqtt.simple import MQTTClient
from machine import Pin
from dht import DHT22
SERVER = '192.168.1.22' # MQTT Server Address (Change to the IP address of your Pi)
CLIENT_ID = 'ESP32_DHT22_Sensor'
TOPIC = b'temp_humidity'
client = MQTTClient(CLIENT_ID, SERVER)
client.connect() # Connect to MQTT broker
sensor = DHT22(Pin(15, Pin.IN, Pin.PULL_UP)) # DHT-22 on GPIO 15 (input with internal pull-up resistor)
while True:
try:
sensor.measure() # Poll sensor
t = sensor.temperature()
h = sensor.humidity()
if isinstance(t, float) and isinstance(h, float): # Confirm sensor results are numeric
msg = (b'{0:3.1f},{1:3.1f}'.format(t, h))
client.publish(TOPIC, msg) # Publish sensor data to MQTT topic
print(msg)
else:
print('Invalid sensor readings.')
except OSError:
print('Failed to read sensor.')
sleep(4)
Raspberry python MQTT subscribe client
Here is the Raspberry Pi Python MQTT client code that will subscribe to the temp_humidity topic and present the results to an OLED display :
url
$ cat dht_subscribe.py
import paho.mqtt.client as mqtt
import Adafruit_SSD1306
from PIL import Image, ImageDraw, ImageFont
disp = Adafruit_SSD1306.SSD1306_128_32(rst=0)
disp.begin()
FONT_PATH = '/usr/share/fonts/truetype/piboto/PibotoCondensed-Regular.ttf'
FONT = ImageFont.truetype(FONT_PATH, 22)
def display_data(t, h):
image = Image.new('1', (disp.width, disp.height))
draw = ImageDraw.Draw(image)
# Draw temperature / Humidity values.
draw.text((0, 8), '{0}°C'.format(t), font=FONT, fill=255)
draw.text((71, 8), '{0}%'.format(h), font=FONT, fill=255)
# Draw bar charts.
draw.rectangle((0, 0, 50, 8), outline=255, fill=0)
draw.rectangle((71, 0, 121, 8), outline=255, fill=0)
draw.rectangle((0, 0, t / 100.0 * 50, 8), outline=255, fill=255)
draw.rectangle((71, 0, 71 + (h / 100.0 * 50), 8), outline=255, fill=255)
# Send to OLED display.
disp.clear()
disp.image(image)
disp.display()
# Callback fires when conected to MQTT broker.
def on_connect(client, userdata, flags, rc):
print('Connected with result code {0}'.format(rc))
# Subscribe (or renew if reconnect).
client.subscribe('temp_humidity')
# Callback fires when a published message is received.
def on_message(client, userdata, msg):
# Decode temperature and humidity values from binary message paylod.
t,h = [float(x) for x in msg.payload.decode("utf-8").split(',')]
print('{0}°C {1}%'.format(t, h))
display_data(t, h) # Display data on OLED display.
client = mqtt.Client()
client.on_connect = on_connect # Specify on_connect callback
client.on_message = on_message # Specify on_message callback
client.connect('localhost', 1883, 60) # Connect to MQTT broker (also running on Pi).
# Processes MQTT network traffic, callbacks and reconnections. (Blocking)
client.loop_forever()
Tuya MQTT endpoints
Tuya IoT Development Platform can connect to devices deployed globally. Choose the endpoint based on where devices are deployed.
MQTT endpoints distributed in six global data centers.
Data center MQTT endpoint Port number
China Data Center m1.tuyacn.com 8883
Central Europe Data Center m1.tuyaeu.com 8883
Western America Data Center m1.tuyaus.com 8883
Eastern America Data Center m1-ueaz.tuyaus.com 8883
Western Europe Data Center m1-weaz.tuyaeu.com 8883
India Data Center m1.tuyain.com 8883
developer.tuya
Firebase
Firebase is a complete platform for building mobile and web applications.
Homepage,
(old)
docs,
wiki.
3 flavors : for iOS, for Android, for Web.
Firebase for Android
Setup & prerequisites :
Android Studio at Win
To install Android Studio on Windows,
proceed as follows:
- Launch the .exe file you downloaded.
We could not detect a Java Development Kit (JDK) v7 or newer on your system.
Get jdk-7u79-windows-x64.exe or jdk-8u92-windows-x64.exe better.
Install it :
C:\> java -version
java version "1.8.0_92"
Java(TM) SE Runtime Environment (build 1.8.0_92-b14)
Java HotSpot(TM) 64-Bit Server VM (build 25.92-b14, mixed mode)
Read doc
- Follow the setup wizard to install Android Studio and any necessary SDK tools.
- On some Windows systems, the launcher script does not find where the JDK is installed.
If you encounter this problem, you need to set an environment variable indicating the correct location :
C:\Program Files\Java\jdk1.8.0_92
Select Start menu > Computer > System Properties > Advanced System Properties.
Then open Advanced tab > Environment Variables and add a new system variable JAVA_HOME that points to your JDK folder, for example C:\Program Files\Java\jdk1.8.0_77.
That's it! We've installed
- Android Studio - C:\Program Files\Android\Android Studio
- Android SDK - C:\Users\Administrator\AppData\Local\Android\sdk
- Android Virtual Device
Setup:
Setup Type: Standard
SDK Folder: C:\Users\Administrator\AppData\Local\Android\Sdk
Total Download Size: 916 MB
SDK Components to Download:
Android SDK Tools 25.1.6 220 MB
Android Support Repository 218 MB
Google APIs Intel x86 Atom System Image 397 MB
Google Repository 80,7 MB
Resultat :
Android Studio version 2.1.1
* start a new Android project
* open an existing Android Studio project
* check out project from Version Control
* import project (Eclipse ADT, Gradle, etc)
* import an Android code sample
New project for
- phone and tablet
- wear
- TV
- android auto
- glass
Main Activity := none ;
Dubtes de cloud
- que hi pinta aqui el MQTT ?
Sample tuya-mqtt
del nou estat del device es fa un "publish" ...
Google Cloud IoT Core uses Cloud Pub/Sub underneath
that can aggregate dispersed device data into a single global system that integrates seamlessly with Google Cloud data analytics services.
- what are "DPS keys" ?
The Tuya devices send back data points (DPS) also called device function points, in a JSON string.
The DPS attributes define the state of the device.
Each key in the DPS dictionary refers to key value pair, the key is the dpID and its value is the dpValue.
You can refer to the
Tuya developer platform for definition of function points for the products.
pypi.org tinytuya
- SmartLife - is a Tuya based device and currently open to this OTA hack
Cloud o local ?
Nice video -
El control local te permite no depender de un fabricante, y evita que en un futuro tu dispositivo pueda convertirse en un pisapapeles.
Dispositivos SHELLY
🧰 Dispositivos SHELLY:
Dispositivos SONOFF
🧰 Dispositivos SONOFF:
Local Control of Tuya Devices - LocalTuya project for Home Assistant
Incidents al nuvol
- 20240718, 21 h : un update de CrowdStrike fa que els Windows al Azure generin un BSoD, quedan en bucle de reinici.
eldiario.es
CrowdStrike es una de las empresas especializadas en ciberseguridad más importantes del mundo.
Es conocida por su plataforma Falcon, que utiliza inteligencia artificial y aprendizaje automático para ofrecer protección avanzada contra amenazas informáticas.
Com es que no havien provat la actualitzacio en un entorn de proves ?
Links de cloud
AWS links
Alexa protocol details URLs
TP-Link URLs
python code links
Tuya URLs
- pypi.org/project/tinytuya :
.
python -m tinytuya scan # listen for Tuya Devices and match to devices.json if available + create snapshot.json file
python -m tinytuya snapshot # get a rapid poll of status of all devices {maco i rapid}
python -m tinytuya json # same as above but with a non-interactive JSON response
python -m tinytuya devices # list all register devices discovered from Wizard and poll them
Also, DPS table,, RGB bulb device, etc !
- tuyapi homepage - lots of links to projects built with TuyAPI
tuyapi : 6.0.1 documentation ,
tuyapi @ pypi ,
lots of tuyapi resources ,
npm package with samples
my MQTT question , 20201221, 22 h
- controlling Tuya devices with cloud API instead of controlling them locally -
molt interessant
- very interesting softscheck {un hack q es una passada !}
- Tuya API list
- Tuya MQTT standard protocol
- which interworking modes does Tuya cloud support ?
- tuya cloud API intro ,
interessant, com "control the devices through Postman" {***},
jugar amb la API
sense escriure codi
- cloudtuya -
node.js API to control Tuya / Smart Life devices by just passing your email and password, that you are using in the Tuya/Smart Life app.
This library is using an Tuya API endpoint, that was specially designed for Home Assistant.
tuyaha project , which actually is a python library,
this package implements a Tuya API endpoint that was specially designed for Home Assistant.
Home Assistant es una imatge per Raspberry 4 !
See video integrating Tuya into Home Assistant
- tinytuya details {*** very complete, docu, URLs, etc ***},
description ,
github [*** the best ***]
- tuya-convert - provides with the means to backup the original
and flash an alternative firmware
Smart home - Smart hack talk at 35C3 in Leipzig
Vtrust
- tuya tray - application using the Tuya API to create a taskbar application
to control SmartLife/Tuya lights - tuya-tray.py funciona perfecte al Ubuntu/MARS !!!
Compte : el usr+pwd son els de SmartLife !
- manage SmartLife devices using .net
- Santi 202501 : Aliexpress
smart switch 2 vias, 1,80 €, 16 A
curtain module, 3 A, 3,29 € {compte amb la versio "ZigBee"}
Tuya servers / IPs
Tuya servers I've seen :
nicolau@mars:~$ ping a1.tuyaeu.com
PING a1.tuyaeu.com (18.194.156.95) 56(84) bytes of data.
64 bytes from ec2-18-194-156-95.eu-central-1.compute.amazonaws.com (18.194.156.95): icmp_seq=1 ttl=227 time=41.5 ms
nicolau@mars:~$ ping a1.tuyacn.com
PING a1.tuyacn.com (122.51.123.21) 56(84) bytes of data.
64 bytes from 122.51.123.21 (122.51.123.21): icmp_seq=1 ttl=42 time=368 ms
nicolau@mars:~$ ping a1.tuyaus.com
PING a1.tuyaus.com (44.238.201.34) 56(84) bytes of data.
64 bytes from ec2-44-238-201-34.us-west-2.compute.amazonaws.com (44.238.201.34): icmp_seq=1 ttl=223 time=225 ms
nicolau@mars:~$ ping openapi.tuyaeu.com
PING out-kong-89f3d345e4401982.elb.eu-central-1.amazonaws.com (3.127.225.168) 56(84) bytes of data.
Smartplug access URLs
- python-kasa
is a Python library to control TPLink smart home devices (plugs, wall switches, power strips, and bulbs) using asyncio
- using machinekit
- using Java !
- control Edimax SP1101W from Raspi
- ESPurna ("spark" in Catalan)
is a custom firmware for ESP8285/ESP8266 based smart switches, lights and sensors : MQTT enabled {!!!}
MQTT URLs
Microchip URLs
Other URLs

 ,
Tuya IoT
,
Tuya IoT 
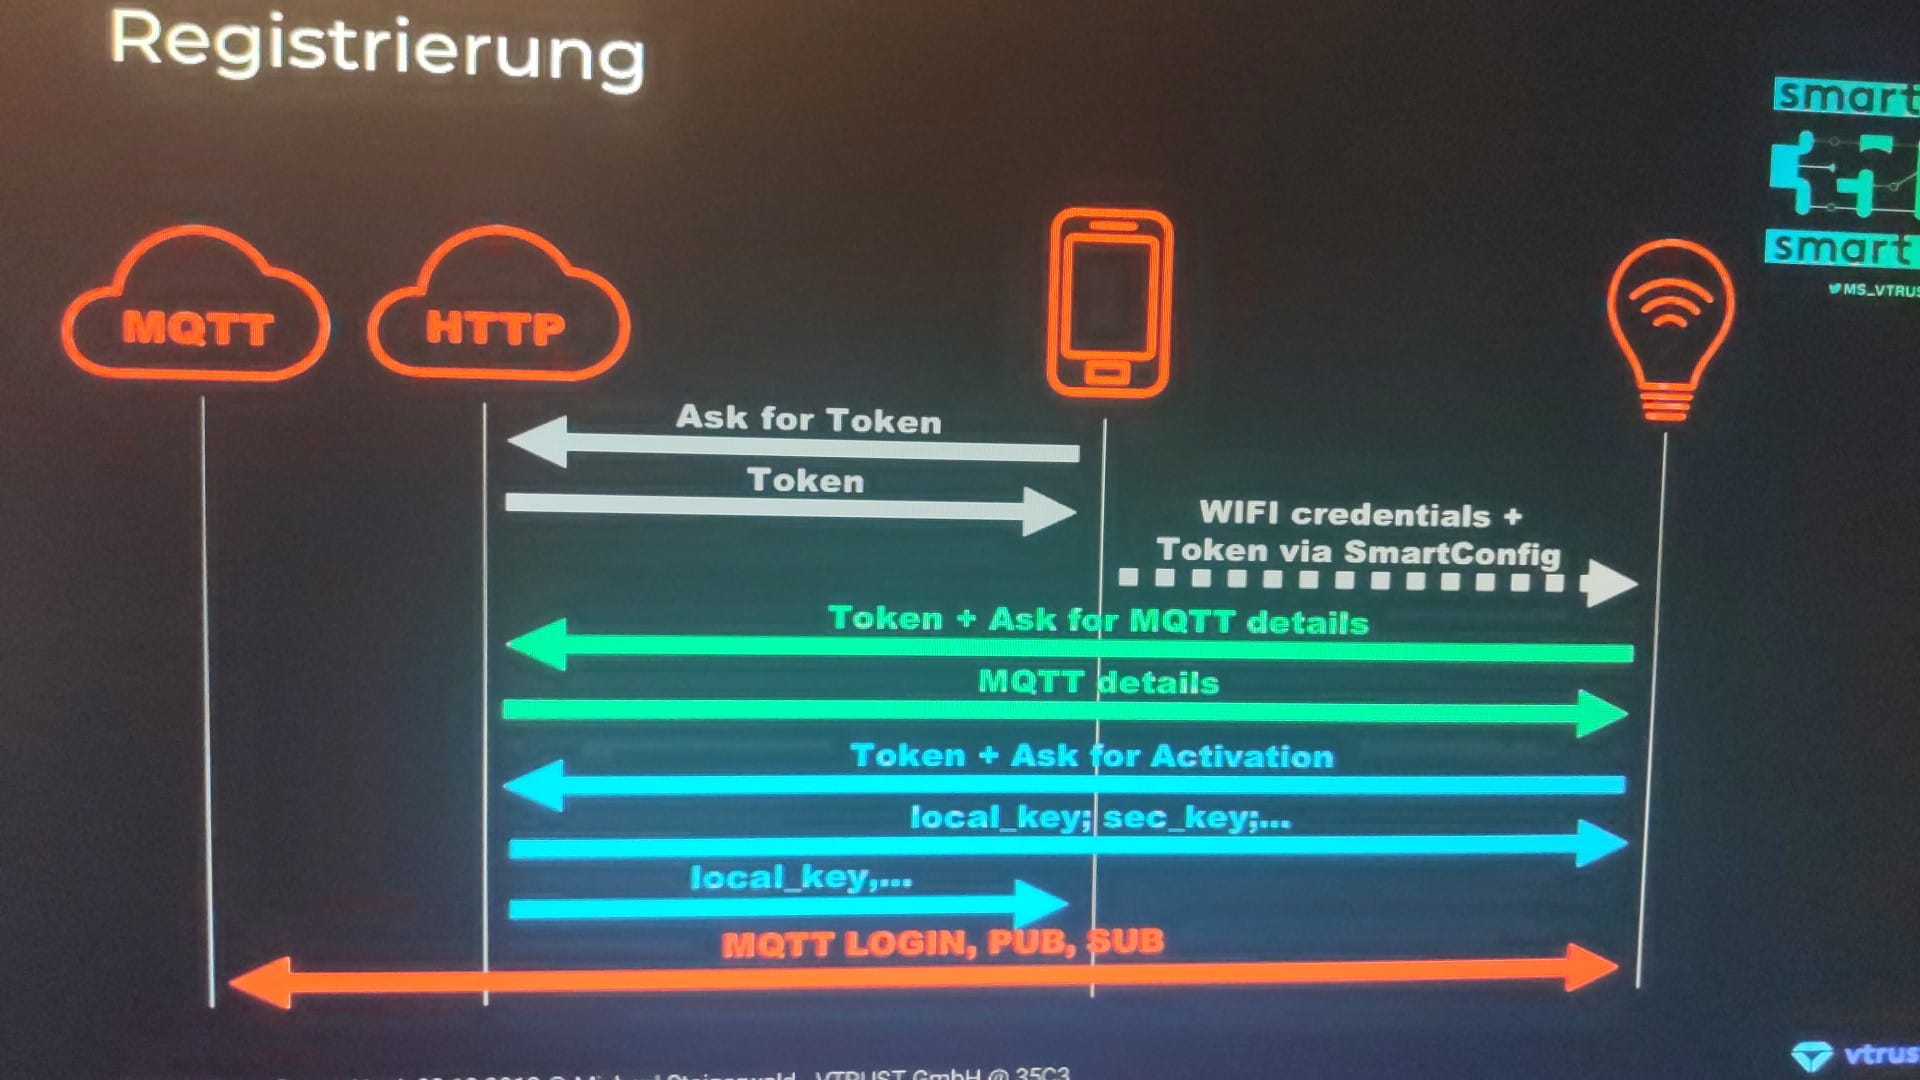
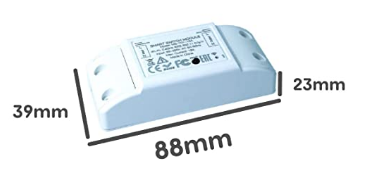


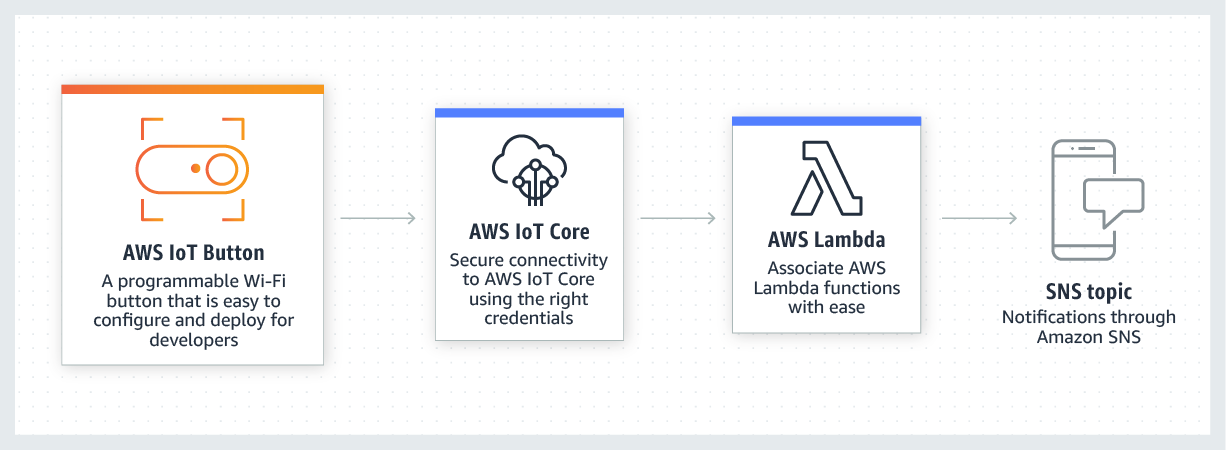
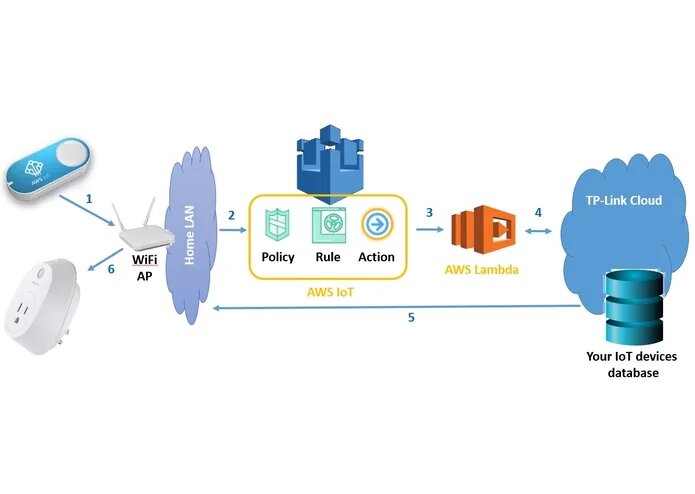
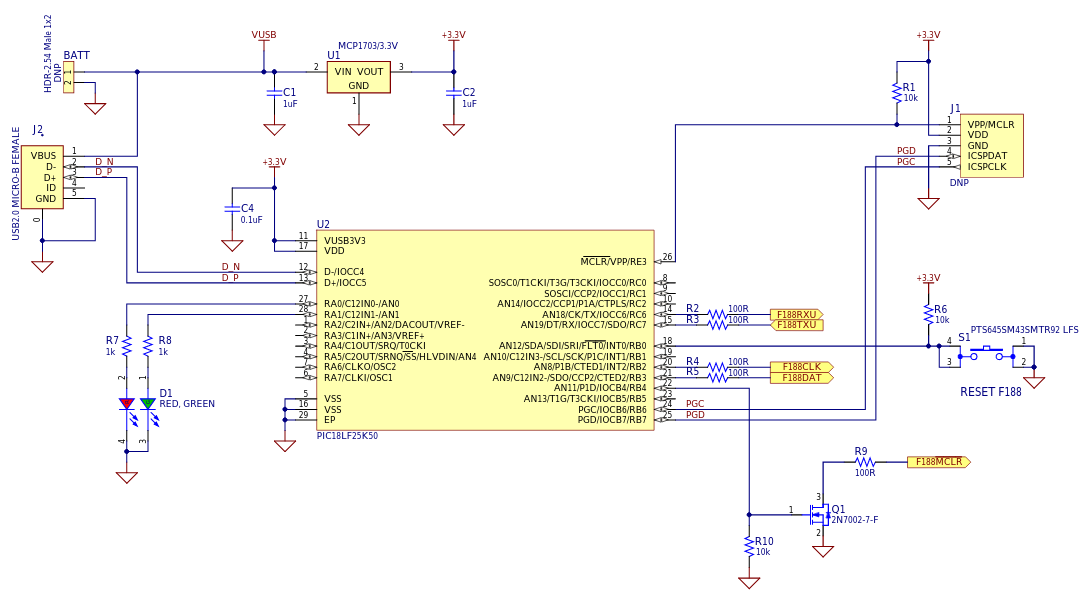


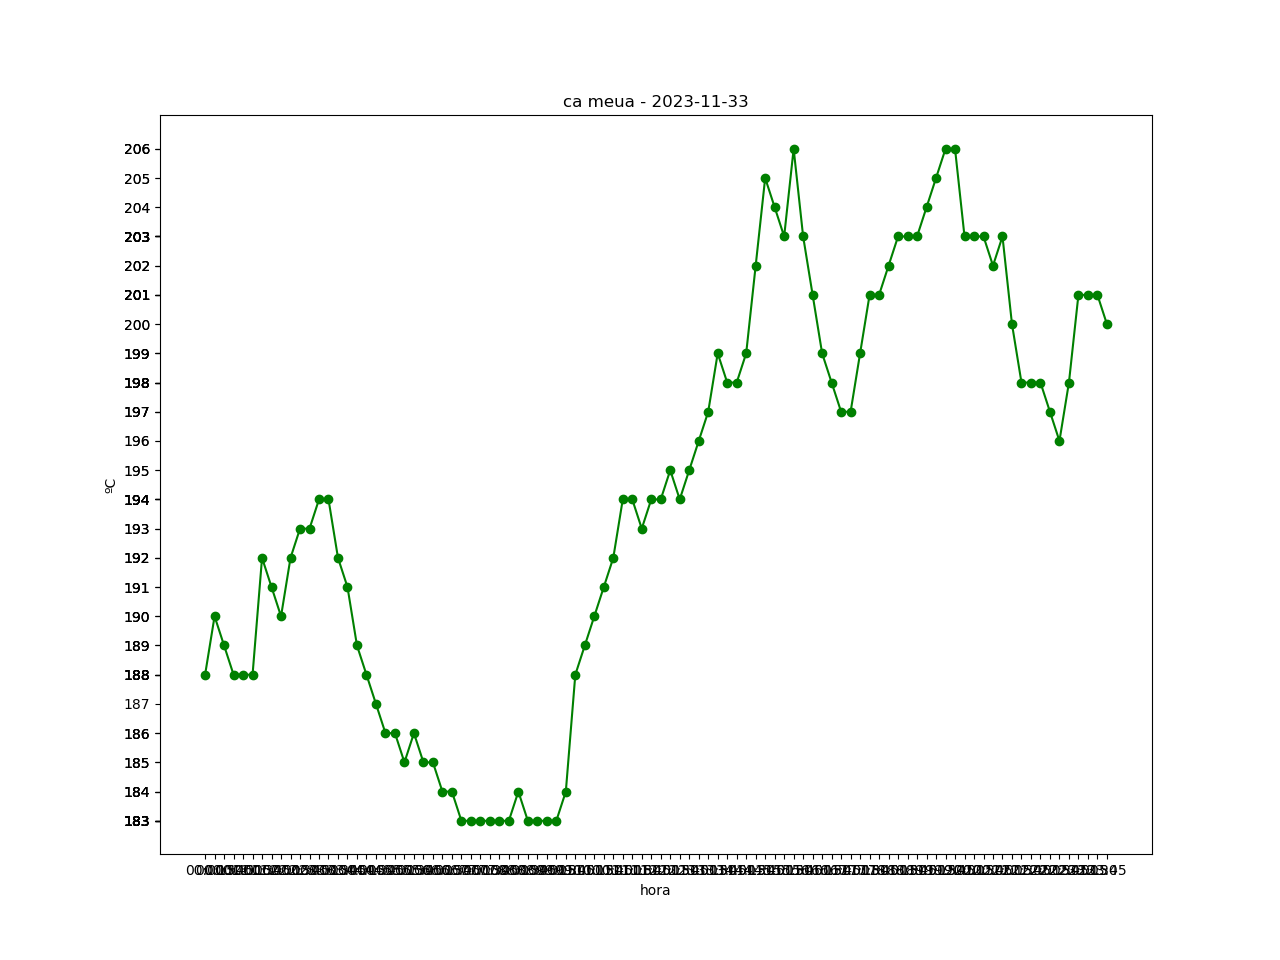