
Arduino is an open source electronic platform based on easy-to-use hardware and software. You can tell your board what to do by sending a set of instructions to the board's microcontroller. To do this, it uses the Arduino programming language and the Arduino software (IDE). The software (Arduino IDE) makes it easy to write code (C language) and upload it to the Arduino board.
Arduino board designs use various microcontrollers and microprocessors. Generally, the hardware consists of an Atmel AVR microcontroller, connected under the "minimum system" configuration on a printed circuit board to which expansion boards (shields) can be connected through the arrangement of the input and output ports present on the selected plate.

Here you will find the designs that I have made with the Arduino:
| Arduino Programming Language | Different designs to learn to program in Arduino in book format: |
| Lights works Random building lights Turntable by segment and sound Sliding platform Action push button Clock-platform screen Analog shuttle train DCC level crossing TCO with S88 Multipurpose accessory decoder Xpressnet throttle for panel Route launcher Xpressnet Public address system for the model layout DCC Decoder for RENFE signals Funicular control Neopixel lighting TCO Xpressnet with touch screen | |
| LocoSpeed | Scale train speed meter |
| FastClockLN | Display for Fast Clock |
| PacoMouse | Additional customizable throttle |
This little practical guide comes as a thread on "Basic notions to program in C of the Arduino or understand the listings", in the CTMS forum (Control Tren Modelo por Software). The content of that thread has been transferred here in the form of a book thinking of railway modeling enthusiasts who want to get closer to Arduino programming to apply it in their models.
This is an introductory book to the Arduino programming language in which each chapter advances a little more in the knowledge of the language with examples applied to railway modeling.
|
This design is available as a GitHub repository
Arduino programming language
1. Basic notions
Basic notions of the Arduino language. Basic skecth functions: setup () and loop ()
2. Classic example: Blink
The classic example of flashing an LED using the Arduino. Control of a pin as output and pauses.
3. Another simple example
Control of an LED by pressing a button. Reading of a digital input pin.4. Simple example for the layout. Men-at-work lights
Flashing lights to mark road works on the layout. The for() loop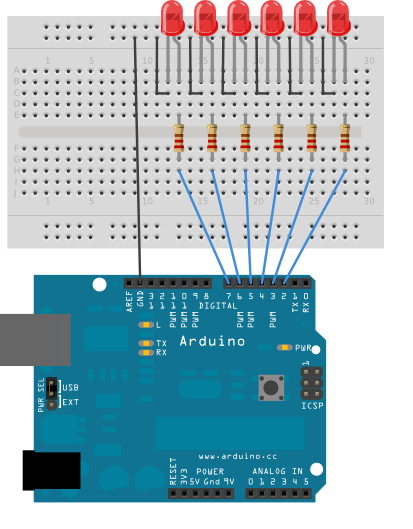
5. Libraries included in Arduino IDE
Control of the position of a servo from a potentiometer. Analog inputs and Servo.h library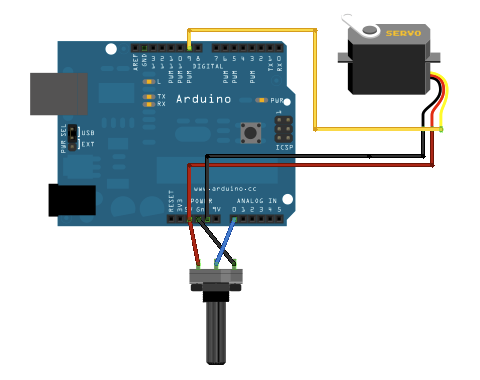
6. Other libraries
Simple sketch for a single output DCC accessory decoder. The Library Manager.
7. Other timings: Random lights for buildings
Random lights to animate buildings. Random numbers and millis ()8. Incompatible libraries: Turntable by segment and sound
Servo driven segment turntable with real sound (.wav file) stored on an SD card. Using of switch() - case
9. Use of shields: Sliding platform with stepper motor
Control of a sliding platform with 5 outputs with stepper motor. With limit switch detection for precise positioning. Motor shields and use of struct {} and while ()
10. The Strings: Action Push Button
Action button that allows controlling up to 3 servos and 10 outputs according to a programmed sequence. The sequence is written in a String as simple commands (move servo, turn on, turn off, pause, loop). Strings and libraries in .zip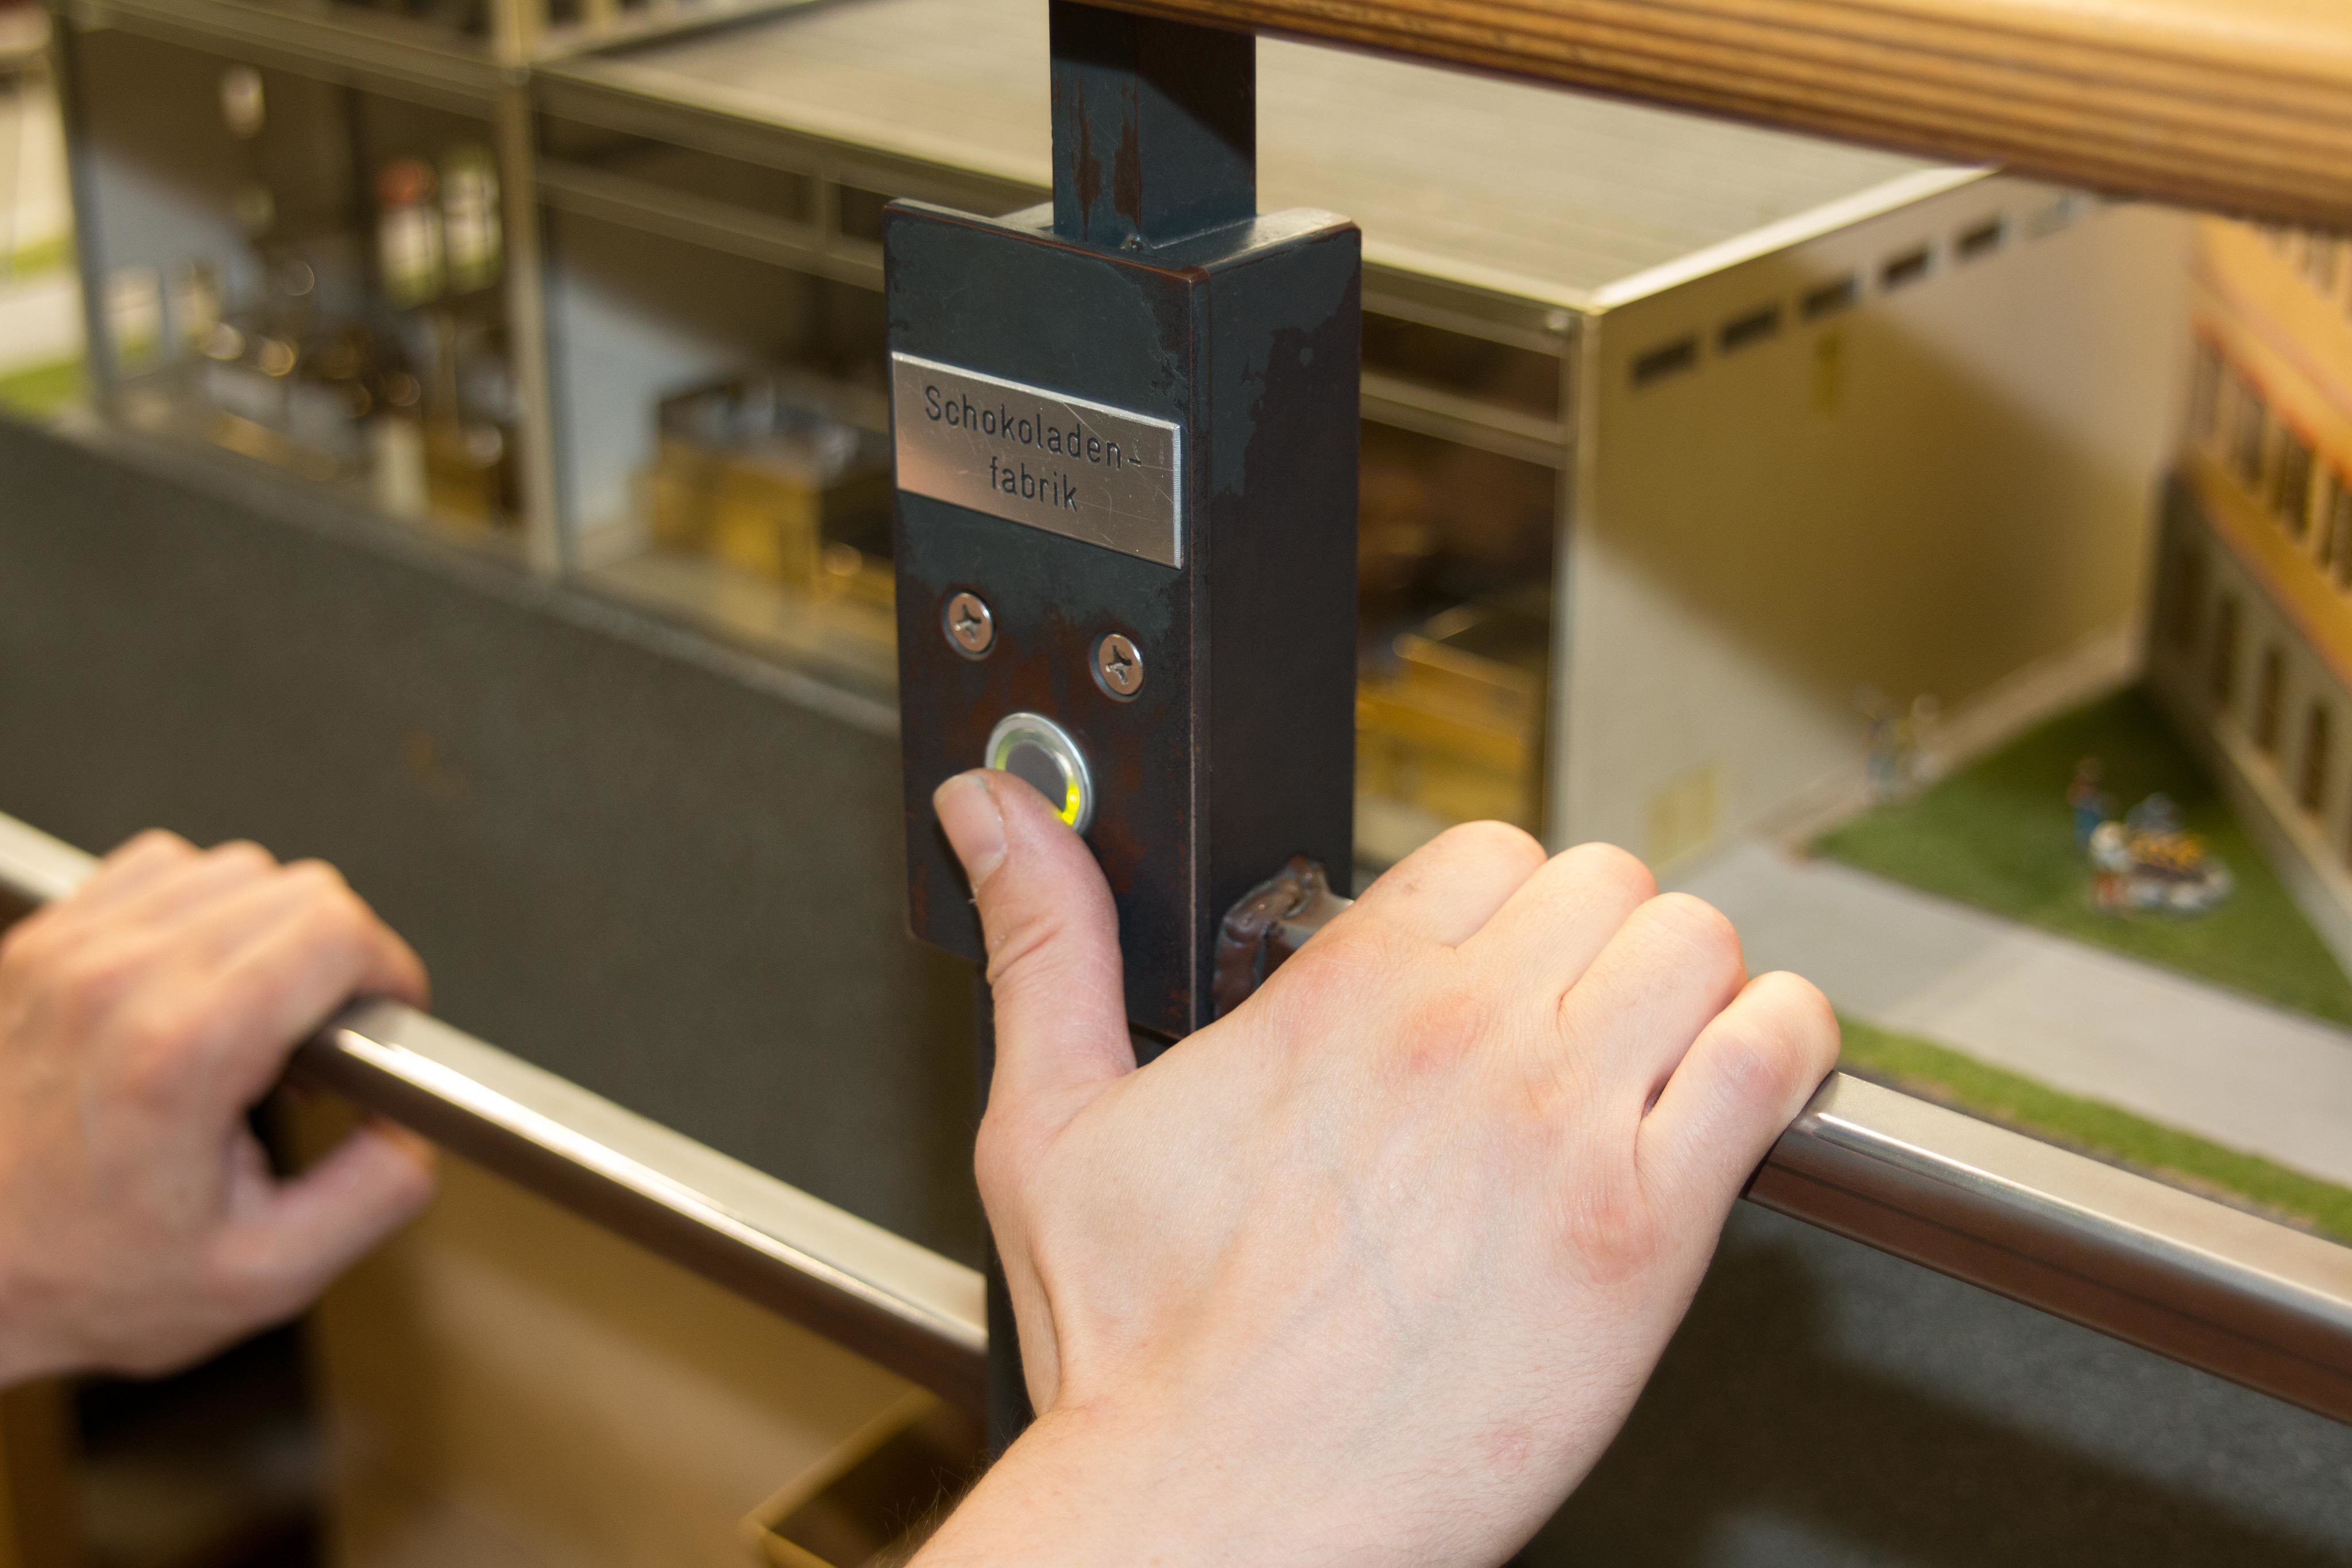
11. Communications (Serial and I2C): Clock-Platform screen
Platform screen with serial port control. It also shows the real time and temperature. It uses a 0.96 "OLED screen (128x32 pixels) and a DS3231 clock chip. The ternary operator and use of Serial and other libraries.12. Bits and PWM: Analog Shuttle Train
Shuttle train (back and forth) in analog by PWM with acceleration and braking using only the Arduino Motor Shield. Analog outputs (PWM) and registers of the Arduino.13. From idea to program: DCC level crossing
DCC decoder for level crossing with servo, high beams and driver's light. Top-down programming and NmraDcc.h library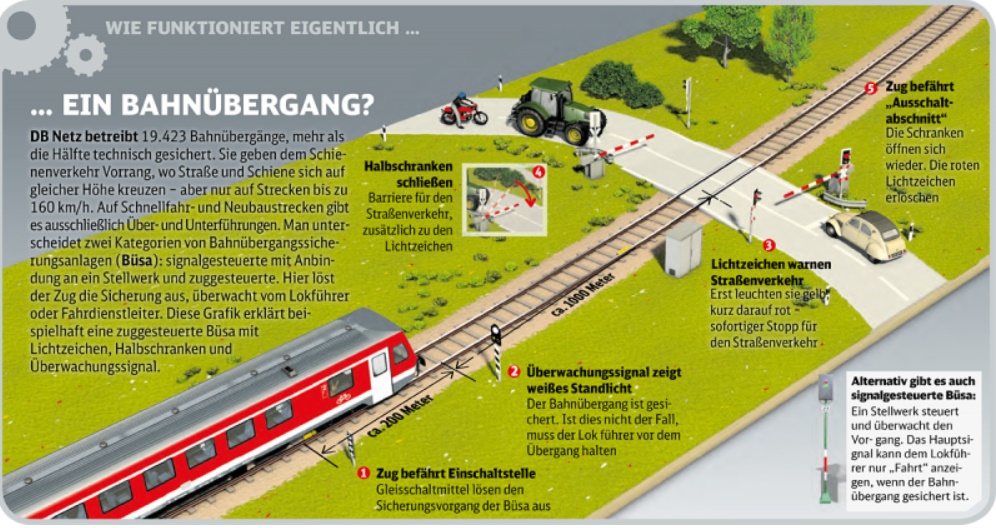
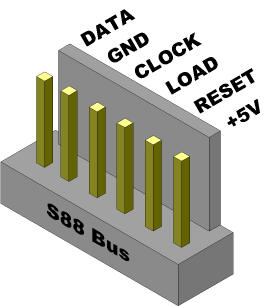
14. Problematic Bits: Serial Bits and S88 feedback
Computer interface with P50 protocol for reading S88 feedback modules. Serial usage and shift registers with binary data.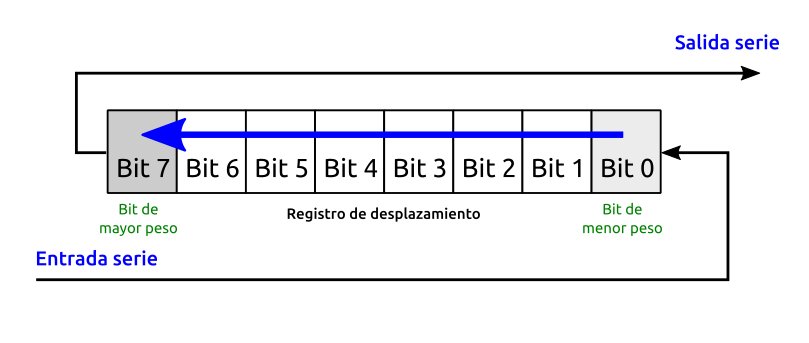
15. EEPROM memory: Multipurpose accessory decoder
Accessory DCC decoder configurable from serial port. It can control 14 outputs as fixed, intermittent, pulse or servo type. Use of EEPROM and text formatting.
16. Interrupts: XpressNet throttle for panel
Simple throttle to control locomotives with Xpressnet connection, rotary encoder and 4-digit display. Use of the XpressNet.h Library, interrupts and union {}
17. Boards Manager and Queue: XpressNet Route Launcher
TCO Xpressnet with up to 56 keys and with serial port assignment of turnouts or routes for each key. Use an Arduino Pro Micro. Using other types of Arduino with the Boards Manager and FIFO queues.
18. Sketch in several files: Public address system for the model layout
DCC decoder for public address and ambient sound of the model layout with the DFPlayer. Play up to 144 .wav and .mp3 files from SD card with only 16 accessory addresses. Preprocessing and prototyping of Arduino compiler functions.
19. Writing a library: DCC decoder for RENFE signals
Creation and use of a library that shows various aspects in one or several signals of several lights in accordance with the General Traffic Regulations of RENFE. Creation of own libraries, passing of parameters by value and by reference.

20. State machine: Control of a funicular
Automation for the BRAWA funicular (Standseilbahn 6410) installed in a module with push button to be operated by the public. Programming of a finite state machine (FSM).
21. Batteries and Neopixels: Scene in a glass jar
N scale train diorama in a glass jar with day/night light effect using a Neopixel and an Arduino Pro Mini. Low consumption modes, processor frequency and power supply voltage measurement with the ADC.22. Touch screen: TCO Xpressnet with touch panel
TCO with an ILI9341 touch screen and Xpressnet connection. Uses of #define. Definition of icons. Resistive touch panel.Anexo I. Reference to Language
Anexo II. Libraries

LocoSpeed is a scale train speed meter (Z, N, TT, H0 and 0) made with Arduino Uno or Arduino Nano, a 0.96" SSD1306 OLED screen and two infrared detectors.
Together with Jos€p Callarisa we have improved the initial design of Jörg Kießling in N-modellbahn and the later version of MarkusNTrains MarkusNTrains.
Speedometer (Speed measurement):
Scale speed, loop counter in both directions, train length, lap time and estimated length traveled are displayed.

Dial
An analog dial is shown with the speed and direction in addition to the length of the train.

Crono
Designed for the running of locomotives in which the total running time is shown, as well as the number of laps and partial times in both directions.

Radar
The radar option allows setting a speed limit in which if it is exceeded by the detected train, it activates an output for two seconds or a tone speaker

Serial Output (Text or CSV Mode)
The serial output (9600 baud) allows the detection data to be read in the Serial Monitor (or similar: Putty, Terminal, ...). You can choose between a Text mode and a CSV mode to be able to create a .csv file by copying the data from the Serial Monitor into the notepad, save it as locospeed.csv and then load it into Excel.

In CSV mode, the current data can also be displayed in the computer if you use Chrome, Edge or Opera browsers. To do this, open the file LocoSpeed.html your computer. The new scale speed can be automatically copied to the clipboard.

Configuration
If when connecting the power supply to the Arduino (or resetting it) both detectors are occupied (they detect an obstacle), the configuration mode is entered.
When 'SET SCALE' comes out, remove the obstacle from both detectors and then block only one to go through the different scale options (Z, N, TT, H0 or 0) or display mode, when the one that interests you is selected remove the obstacle and a few seconds later it will initialize normally in the chosen mode.

The 3D design of the LED holder is from Jos€p so that the infrared has a better focus. If you use it, print it in a dark color, at first I did it in white and it was transparent to infrared so I always looked busy.

Download the program and manual here
This design is available as a GitHub repository
Another design to measure speed but installed in a wagon and using an ESP8266 with WiFi is the PacoWagon

Simple Loconet Fast Clock display based on an Arduino Nano, with four 8x8 dot matrix displays with the MX7219, four buttons and an optional real-time clock (RTC) module with the DS3231.
FastClockLN can work in different modes (Slave, Sync, RTC Sync and Master)
You can download the manual and program here.
This design is available as a GitHub repository

PacoMouse is a simple additional throttle to control our model layout. It can be mounted in different versions with Loconet or Xpressnet connection, or WiFi connection with Z21, ECoS, Loconet over TCP or Xpressnet LAN protocols.
Based on an Arduino Nano (also Uno or Pro Mini) for the Loconet or Xpressnet versions or a Wemos D1 mini (ESP8266) for the Z21, Loconet, Xpressnet or ECoS WiFi versions, it has an EC11 type rotary encoder with a push button, a 3x4 or 4x4 keyboard and an SSD1306, SH1106 or SSD1309 OLED screen (sizes 0.96", 1.3", 1.54" or 2.42").
You can found the complete design here.
This is a digital informative conference that will be presented at the 2019 technical conference of the FCAF (Federació Catalana d'Amics del Ferrocarril) about the Arduino and its use with DCC:
 |
|||||||
|
With the Arduino IDE environment you can also program other boards such as those equipped with the ESP8266 WiFi chip:
| PacoWagon | Wagon for measuring speed and distance traveled and ramp/cant for scale trains |
| PacoWagonDisplay | WiFi display for PacoWagon and the Fast Clocks MRclock, Rocrail and JMRI |
