|
home / njs
(navigation links)
|
El último traje no trae bolsillos
|
JavaScript i node.js
go 2 top
Javascript
Javascript functions
How to define a Javascript function :
<head>
<script type="text/javascript">
function myfunction() {
alert("how are you");
}
</script>
</head>
How to call a Javascript function :
<body>
<p> Click the following button to see the function in action </p>
<input type = "button" onclick = "myfunction()" value = "Display">
</body>
javatpoint
Another way is :
<p> <a href="#" onClick="alert('Hello');"> click me </a></p>
<p> <a href="#" onClick="myfunction();"> click me to call "myfunction()" </a></p>
simple HTML guide
From an external file :
<script type="text/javascript" src="./js/user_function.js"></script>
Where the file is
$ cat user_function.js
function myfunction() {
alert( "*** how are you" ) ;
}
Javascript dark/light mode
- place this code at very end of "body" :
<script type="text/javascript">
function toggleDarkLight() {
var myElement = document.getElementById("myDivElement");
var currentClass = myElement.className;
myElement.className = currentClass == "dark-element" ? "light-element" : "dark-element";
}
</script>
- place the toggle link anywhere :
<p> <a href="#" onClick="toggleDarkLight()"> mode clar / fosc </a> </p>
- code the HTML :
<div id="myDivElement" class="dark-element">
Aquest element es el que canvia de mode clar/fosc
</div>
- code the color in CSS :
/* https://codepen.io/HarlemSquirrel/pen/NdMebZ */
:root {
--color_fosc: #303030 ;
--color_clar: #FFCC33 ;
}
body.dark-mode {
background-color: var(--color_fosc) ;
color: var(--color_clar) ;
font-size: 16px ;
}
body.light-mode {
background-color: var(--color_clar) ;
color: var(--color_fosc) ;
}
generate page
Define some places :
<p> #01# Titol: <span id="mytitol"></span></p>
<p> #95# Date/Time: <span id="mydatetime"></span></p>
Fill them :
<script>
var dt = new Date();
document.getElementById("mytitol").innerHTML = "Titol de la versio 1.f";
document.getElementById("mydatetime").innerHTML = dt.toLocaleString("es-ES");
</script>
JS functions in deep
- in nom.js we have the "onClick()" function :
$( ".clk_DONE" ).click( function() {
console.log( '*** (' + genTimeStamp() + ') *** click DONE' ) ;
}) ; //
- in nom.html we have the hyperlink :
(1b) get <a href="#!" class="clk_DONE">*** lets do it ***</a>
From stackoverflow
Si volem fer servir "id" en lloc de "class" :
$( "#clk_PICAT" ).click( function() {
console.log( '*** (' + genTimeStamp() + ') *** click PICAT' ) ;
}) ; //
Compte que el "id" ha de ser unic en el document !
I es crida aixi :
<div id="clk_PICAT">lets call JavaScript function</div>
O aquest parell :
<a id="toggleButton">See More</a>
$('#toggleButton').on('click', function(){
Top five features in JavaScript ES6 Worth Mastering
- Arrow functions
- Promises
- Async functions
- Destructuring
- Default and Rest parameters
javatutors {****}
curs ES6
- #1 : var define una variable global o local sin tener en cuenta el ámbito del bloque donde se declara;
let, por el contrario, sí tiene en cuenta este ámbito.
- #2 : "use strict";
no permite utilizar variables no declaradas.
- #4 : const permite declarar constantes limitando su alcance (scope)
AJAX
AJAX stands for Asynchronous JavaScript and XML.
In a nutshell, it is the use of the XMLHttpRequest object to communicate with server-side scripts.
It can send as well as receive information in a variety of formats,
including JSON, XML, HTML, and even text files.
AJAX's most appealing characteristic, however, is its "asynchronous" nature,
which means it can do all of this without having to refresh the page.
This lets you update portions of a page based upon user events.
Geting started,
$.ajax() methods.
Complete documentation of the
configuration options.
key concepts:
A is for Asynchronous
The asynchronicity of Ajax catches many new jQuery users off guard.
Because Ajax calls are asynchronous by default, the response is not immediately available.
Responses can only be handled using a callback.
So, for example, the following code will not work:
var response;
$.get( "foo.php", function( r ) {
response = r ;
} ) ;
console.log( response ) ; // "response" is undefined
Instead, we need to pass a callback function to our request;
this callback will run when the request succeeds,
at which point we can access the data that it returned, if any.
$.get( "foo.php", function( response ) {
console.log( response ) ; // server response
} ) ;
I'll repeat it again:
// ajax(..) is some arbitrary Ajax function given by some library
var data = ajax( "http://some.url.1" ) ; //
console.log( data ) ; // Oops! "data" generally won't have the Ajax results
The simplest (but definitely not only, or necessarily even best!) way of "waiting" is to use a function:
// ajax(..) is some arbitrary Ajax function given by some library
ajax( "http://some.url.1", function ( data ) {
console.log( data ) ; // Yay, I gots me some "data"!
} );
Ajax and data from Mongo :
(1),
(2),
(3).
Few samples
I see different kinds of exchanges between client (browser) and server (node.js) :
- click selecting a link -> new (partial) HTML back
- click + data (as date) -> new JSON object back
- click + data (as user name+pwd) -> some text back, as "accepted" or "rejected"
- client asks for a complex JSON object, as a description of a pic -> server sends JSON -> client requests a file, whose name was provided in JSON
(1) Client sends URI
As here : /nodejs-projects/min_web_server/client/client.js
$( "#clkLogon" ).click( function() {
$.get( '/logon.htm', function( page ) {
console.log( '**** Demanem al server la sub-pagina LOGON.' ) ;
$( "#content" ).html( page ) ; // show received HTML at specific <div>
} ) ;
} ) ;
(1) Server sends back HTML
// at the URL "/:filename", serve "filename" from "public" folder
// if "/" then serve "index.html"
app.use( '/', express.static(__dirname + '/public') ) ;
(1) Trace
- start mongo
- start node.js : "node my_server.js"
- start browser at http://localhost/index.htm
- click "Logon/Registrar-se"
(2) Client sends date
<form id="myFormReqDades1Dia">
<label for="dataReserva">Data reserva: </label><input type="text" autofocus name="data_Reserva" /><br/>
<input type="submit" value="Ensenyam les reserves d'aquest dia">
</form>
. . .
<script>
$( "#myFormReqDades1Dia" ).submit( function() {
// produces a msg as "GET /qui_te_reserves/data_Reserva=2014/12/06"
console.log( '*** Demanem al server la llista de reserves de un dia.' ) ;
console.log( $( this ).serialize() ) ; // show the request
$.get( "/qui_te_reserves/" + $(this).serialize(), function( dades ) {
console.log( ">>> Server response: ", dades ) ; // now we have to do the presentation formatting
});
return false; // stop processing
} ) ; // "myFormReqDades1Dia" submit
</script>
(2) Server sends back JSON object
app.get( '/qui_te_reserves/data_Reserva=:dia_consultat', function( req, res ){
var DiaConsultat = req.params.dia_consultat ; // extract request parameter
console.log( ">>> GET dia : veure 20 reserves del dia (%s) ", DiaConsultat ) ;
var CollectionName = "reserves_pistes" ; // fixed value
var MyCollection = db.get( CollectionName ) ; // get the collection
MyCollection.find( { rdata: DiaConsultat }, { limit: 20 }, function( err, docs ){ // mongo data -> "docs"
var i = docs.length;
console.error( "+++ the collection for that date has (%s) elements.", i );
res.json( docs ) ; // send JSON object
}) ; // find()
} ) ; // get '/qui_te_reserves/data_Reserva=:dia_consultat'
(2) Trace
c:\sebas\JavaScript\simple_web_server> node ver_bbdd.js
App listening on port {80}.
>>> GET dia : veure 20 reserves del dia (2014/12/06)
+++ the collection for that date has (2) elements.
GET /qui_te_reserves/data_Reserva=2014/12/06 200 5.276 ms - 9
(4) Client
request last pic from timeout :
$.getJSON( '/fes_photo_gimme_json', function( mi_json ) {
if ( mi_json.status == "OK" ) {
$( #idn_imatge ).attr( 'src', mi_json.imgURL ) ; // request pic file and place it in page
dump headers
To list all request headers, code (in server)
app.get('/', (req, res) => {
console.log( req.headers )
console.log( JSON.stringify(req.headers) ) ;
})
... to get
{ host: '192.168.1.123:1212',
connection: 'keep-alive',
'content-length': '57',
accept: 'text/html, */*; q=0.01',
origin: 'http://192.168.1.123:1212',
'x-requested-with': 'XMLHttpRequest',
'user-agent': 'Mozilla/5.0 (Windows NT 6.1; WOW64) AppleWebKit/537.36 (KHTML, like Gecko) Chrome/51.0.2704.103 Safari/537.36',
'content-type': 'application/x-www-form-urlencoded; charset=UTF-8',
dnt: '1',
referer: 'http://192.168.1.123:1212/',
'accept-encoding': 'gzip, deflate',
'accept-language': 'en-GB,en;q=0.8,es;q=0.6,ru;q=0.4',
cookie: 'connect.sid=s%3A_vBGnKP8VDq99uXErTSlEcHnOnPSJ6fo.y%2FugrrPxxk9kWGqLqLpeOZZ55QizpHU%2BfH1hgFkjRDU' }
"connection" headers are VERY large (480 lines), with interesting fields as
req.connection.remoteAddress
192.168.1.46
Code to display headers is :
sag@odin:~/express-sendfile $ cat minim.js
app.use( function ( req, res, next ) {
console.log( req ) ; // output is 802 lines large (20190410)
next() ;
} ) ; // timestamp all
Ajax pushing JSON
{minut 15} In 2005, Jesse James Garrett discovered that you could use web browsers to have full interactive applications
without having to do a page replacement after every user interaction.
So it was Ajax that pushed the popularity of JSON.
The "X" stands for XML, so you have to use XML ! That didn't last very long ...
{minut 18} There will be no more changes to JSON, because there is no version number in it.
{minut 35} GML
Douglas Crockford
JSON
JSON :
what is it,
history,
wiki,
they’ve got a nifty website that explains the whole thing
Plot it online
JSON, or JavaScript Object Notation, is a minimal, readable format for structuring data.
It is used primarily to transmit data between a server and web application, as an alternative to XML.
What is JSON and data types,
including array
NDJSON is "new line delimited JSON"
Line Separator is '\n'. This means '\r\n' is also supported because trailing white space is ignored when parsing JSON values.
Each Line is a valid JSON value
Douglas Crockford
The JSON Saga - historia de los formatos de
markup {***}
Turns out JavaScript is brilliant for writing state machines,
because you can put functions right in the state transition tables.
lets get some JSON message from a server
sebas@minie:~$
curl https://api.esios.ree.es/indicators/1001 
{
"indicator": {
"name": "Término de facturación de energía activa del PVPC 2.0TD",
"short_name": "PVPC T. 2.0TD",
"id": 1001,
"composited": false,
"step_type": "linear",
"disaggregated": true,
"magnitud": [
{
"name": "Precio",
"id": 23
}
],
"tiempo": [
{
"name": "Hora",
"id": 4
}
],
"geos": [
{
"geo_id": 8741,
"geo_name": "Península"
},
{
"geo_id": 8742,
"geo_name": "Canarias"
},
{
"geo_id": 8743,
"geo_name": "Baleares"
},
{
"geo_id": 8744,
"geo_name": "Ceuta"
},
{
"geo_id": 8745,
"geo_name": "Melilla"
}
],
"values_updated_at": "2024-03-28T20:46:24.000+01:00",
"values": [
{
"value": 58.27,
"datetime": "2024-03-29T00:00:00.000+01:00",
"datetime_utc": "2024-03-28T23:00:00Z",
"tz_time": "2024-03-28T23:00:00.000Z",
"geo_id": 8741,
"geo_name": "Península"
},
...
"geo_name": "Melilla"
}
]
}
Convert JSON text into JavaScript object
A common use of JSON is to read data from a web server, and display the data in a web page.
For simplicity, this can be demonstrated using a string as input.
First, create a JavaScript string containing JSON syntax:
var text = '{ "employees" : [' +
'{ "firstName":"John" , "lastName":"Doe" },' +
'{ "firstName":"Anna" , "lastName":"Smith" },' +
'{ "firstName":"Peter" , "lastName":"Jones" }
]
}' ;
Then, use the JavaScript built-in function JSON.parse() to convert the string into a JavaScript object:
var obj = JSON.parse(text) ; // no cal amb el jQuery adient
Finally, use the new JavaScript object in your page:
<p id="demo"></p>
<script>
document.getElementById("demo").innerHTML = obj.employees[1].firstName + " " + obj.employees[1].lastName;
</script>
Try JSON parse
JSON eval
JSON in JavaScript and conversions
Read a single JSON object from text file
If we have this text file :
sebas@pi0alby:/home/sebas/python/tinet $ cat jb_json.txt
{"qq": 1, "ts_ini": "2020-12-20 03:30:05", "ts_fin": "2020-12-20 04:00:05"}
We can read it into a program and write back the modified data using this code :
if __name__ == '__main__':
now = datetime.datetime.now()
szAra = now.strftime("%Y-%m-%d %H:%M:%S") # get timestamp to be used in this execution
try:
pjf = open( fn_JBjson, 'r' ) # open json file to read
my_json = json.load( pjf ) # read json data from file
pjf.close() # close the "memory" file
qq_JB = my_json['qq'] # connected by default, so both green and red are sent
szCaiguda = my_json['ts_ini'] # get fail-start timestamp from file
szFinal_Caiguda = my_json['ts_fin'] # get fail-end timestamp from file
My_Main()
pjf = open( fn_JBjson, 'w' ) # open json file to write
my_json['qq'] = qq_JB # connected by default, so both green and red are sent
my_json['ts_ini'] = szCaiguda # get fail-start timestamp from file
my_json['ts_fin'] = szFinal_Caiguda # get fail-end timestamp from file
json.dump( my_json, pjf ) # write json to file
pjf.close() # close the "memory" file
print( '>>> at end, JB ip status is {', qq_JB, '}, fail start/end {', szCaiguda, '/', szFinal_Caiguda, '}' )
except:
print( "--- Unexpected error: ", sys.exc_info()[0] )
sys.exit() # bye
Quite elegant, fast and easy, isn't it ?
Read multiple JSON objects from text file
If we have this text file
pi@odin:~/timer $ cat config.json
[
{ "user": "sebas", "IP": "11.12.13.14", "tf": "638015371" },
{ "user": "pere", "IP": "21.22.23.24", "tf": "666777888" }
]
We can get the JSON objects it represents by this code :
pi@odin:~/timer $ cat 6_test_json.js
var fs = require('fs');
var myfile = './config.json';
var mydata ;
fs.readFile( myfile, 'utf8', function ( err, dadesJSON ) {
if ( err ) throw err;
console.dir( "in" + dadesJSON ) ;
mydata = JSON.parse( dadesJSON ) ;
mydata.forEach( function ( element, index ) {
mydata[index].status = '+' ; // create new field
mydata[index].timestamp = ' ' ; // create new field
console.log( "Index " + index + " has" ) ;
console.dir( "\t out.user \t " + mydata[index].user ) ;
console.dir( "\t out.ip \t " + mydata[index].IP ) ;
console.dir( "\t out.tf \t " + mydata[index].tf ) ;
console.dir( "\t out.status \t " + mydata[index].status ) ;
console.dir( "\t out.timestamp \t " + mydata[index].timestamp ) ;
} ) ; // forEach
} ) ;
"mydata" és un valor javascript de tipo array. "mydata[0]" és un valor javascript de tipo object.
Server JSON format
Read
Ajax response : XML, HTML, or JSON?
El
client demana un JSON amb :
$.getJSON( '/info', setInfo ) ;
El server pot fer
res.JSON( myJSON ) ;
o be
res.send( serverInfo ) ;
o be
res.send( { serverfn, myVersion, servername, nodesJsonFn, hostname, started, pid:process.pid } ) ; // see //t60/node_projects/pere/nodesmonitor/server.js
Diferencia res.send() i res.json() :
stackOverflow,
full stack
Combinacions :
.--- res.JSON() ---.
| |
| .--- (+) JSON : [ok]
$.getJSON() ---. |
| .--- (-) JSON : error al server ? o el converteix ??
|
.--- res.send() ---.
|
.--- (+) JSON : [ok]
|
.--- (-) JSON : error al client ?
Codi per fer proves :
JSON basics at github,
~/nodejs-projects/min_web_server @ pomnia
Altres funcions JSON
See JavaScript tutorial
- my_JSON_object = JSON.parse( dadesJSON_txt_format ) ;
- JSON.stringify( err )
JSON.parse()
A common use of JSON is to exchange data to/from a web server.
When receiving data from a web server, the data is always a string.
Parse the data with JSON.parse(), and the data becomes a JavaScript object.
url
JSON.stringify()
A common use of JSON is to exchange data to/from a web server.
When sending data to a web server, the data has to be a string.
Convert a JavaScript object into a string with JSON.stringify().
url
JSON vs JavScript security concerns
JavaScript does not allow you to access documents (be they XML or HTML) that come from another server.
However, if you import a JSON file as a script tag you circumvent this problem,
and any JSON data can be imported into any website.
compact JSON
The short call-return can be as Pere's :
$.getJSON( '/api/dibuix_temperatures', result => drawValues( result.valors ) ) ;
But I prefer "large" with tracing and more :
$.getJSON( '/api/dibuix_temperatures', function( mi_json) {
drawValues( mi_json.valors ) ;
let szMarca = "### el dibuix s'ha fet a les ... " + mi_json.timestamp ;
$( "#id_estat" ).html( szMarca ) ;
} ) ; // getJSON()
RRG i JSON
holyday api +
github
this
ESP, 20140923 - que dimonis fa el this a "var self = this;" ?
Calculadora.prototype.multiplica = function(){
var self = this;
this.calculoMultiplicar(self);
}
Lluis :
El JavaScript te varios problemes de disseny, i aquest es un d'ells.
Es veu que el programador PREVEU o SAP que la variable "this" es perdrà en les properes linies de codi.
I en aquesta sentencia s'ho guarda (a la variable "self")
node.js
Node.js is a JavaScript run-time environment. This run-time environment includes everything you need to execute a program written in JavaScript.
Another (Minit software manager) :
Node.js is a platform built on Chrome's JavaScript runtime for easily building fast, scalable network applications.
Node.js uses an event-driven, non-blocking I/O model that makes it lightweight and efficient, perfect for data-intensive real-time applications that run across distributed devices.
Node.js is bundled with several useful libraries to handle server tasks:
System, Events, Standard I/O, Modules, Timers, Child Processes, POSIX, HTTP, Multipart Parsing, TCP, DNS, Assert, Path, URL, Query Strings.
Read developerWorks :
Node.js for Java developers - Lightweight, event driven I/O for your web apps,
beyond the basics (watch, read, listen, download),
full cloud envir
wiki
Node.js is a scalable, event-driven I/O environment
node.js is a packaged compilation of
- Google's V8 JavaScript engine - motor/interprete de JavaScript
- the libuv platform abstraction layer, "c" layer
- and a core library, which is itself primarily written in JavaScript
Dahl's original goal was to create web sites with push capabilities
as seen in web applications like Gmail.
Caracteristiques especials :
- asynchronous & callbacks
- event-driven
Examples and
code.
5-6 magnifics exemples (complicats), as
XAT or "websockets"
Display version :
c:\> node -v
v0.10.24
Fiddler
Tool to monitor/catch the traffic between browser and server.
Keep Fiddler
open while you mess around with node.
It is very helpful to be able to see what was returned with each request.
Watch training videos to learn how to use Fiddler
ES9
ECMAScript 2015 (ES6)
Read JS history
sebas@henry:~/nodes/wsm $ node -p process.versions.v8
6.2.414.50
sebas@henry:~/nodes/wsm $ node -v
v8.11.1
sag@odin:~/express-sendfile $ node -v
v5.12.0
sag@odin:~/express-sendfile $ node -p process.versions.v8
4.6.85.32
nicolau@mars:~$ node
> process.version
'v8.10.0'
> process.versions
{ http_parser: '2.7.1',
node: '8.10.0',
v8: '6.2.414.50',
uv: '1.18.0',
zlib: '1.2.11',
ares: '1.14.0',
modules: '57',
nghttp2: '1.30.0',
openssl: '1.0.2n',
icu: '60.2',
unicode: '10.0',
cldr: '32.0.1',
tz: '2017c' }
>
MARS ES6 alert
A syslog trobo (20201218)
Dec 18 12:10:02 mars gnome-shell[2125]:
Some code accessed the property 'WindowPreviewMenu' on the module 'windowPreview'.
That property was defined with 'let' or 'const' inside the module.
This was previously supported, but is not correct according to the ES6 standard.
Any symbols to be exported from a module must be defined with 'var'.
The property access will work as previously for the time being, but please fix your code anyway.
node async calls and callback
The "error-first" callback is a standard protocol for Node callbacks.
This is a very simple convention, with basically one rule: the first argument for the callback function should be the error object.
Aixi queda algo tan senzill com aixo
// You call async functions like this
someAsyncFunction ( param1, param2, my_callback ) ;
// And define your callback like this
function my_callback ( err, result ) {...}
El meu codi
function Get_Ocupacio ( Param_NomSoci, Param_Avui, CB ) {
szTxt = "<p>Get ocupacio. " ;
var CollectionName = app.get( 'rcolname' ) ; // get collection name
var MyCollection = db.get( CollectionName ) ; // get the collection
console.log( ">>> GET ocupacio - soci (%s) - veure fins a 20 reserves a partir del dia (%s) ", Param_NomSoci, Param_Avui ) ;
// MyCollection.find ( { rnom: Param_NomSoci }, { limit: 20 }, function ( err, docs ) { // no date filter
var Avui_getOcupacio = (new Date).yyyymmdd() ;
MyCollection.find ( { rnom: Param_NomSoci, rdata: { $gte: Avui_getOcupacio } }, { limit: 20 }, function ( err, docs ) {
// http://docs.mongodb.org/manual/reference/operator/query/gte/
if ( err ) {
console.log( '--- Get ocupacio. Error mongodb is (' + err.message + ').' ) ;
szTxt += '<p>--- Get ocupacio. Error mongodb is (' + err.message + ').' ;
} else {
var i = docs.length ;
console.log( "+++ Get ocupacio in collection (%s) - date (%s), user (%s) has (%s) elements.", CollectionName, Param_Avui, Param_NomSoci, i ) ;
szTxt = "<p>END get ocupacio. " ;
} ; // if Error
CB ( err, szTxt ) ; // dintre de la funcio del find() !
}) ; // find()
} ; // Get_Ocupacio ( Param_NomSoci, Param_Avui )
I la seva crida
Get_Ocupacio ( Logon_NomSoci, Avui, function( err, szOcupacio ) {
console.log( '*** acaba GETOCUPACIO.' ) ;
szMsg_Logon_OK += szOcupacio ;
szMsg_Logon_OK += '<p>El teu correu electronic es {' + docs[0].uEmail + '}. ' ;
res.send( szMsg_Logon_OK ) ;
} ) ;
abnormal node end
If our code detects it can not go ahead, as
- there is another instance of the code running
- a unique resource is not available
... we can terminate our code using process.exit() but ...
Hem de retornar adequadament de totes les funcions de callback aniudades ...
- o bé amb un control exhaustiu en cada una de elles
- o bé amb un supracontrol, actualment ho fariem amb async/await però també amb promises o artefactes similars
- o bé a la brava, amb process.exit() però això només val si té sentit matar el procés
Funcions que hi ha aniuades en el "wsm" :
- el main o la que sigui que crida al .listen()
- el callback del .listen()
- el callback del .on()
Justament el que volem és retornar de la tercera fins dalt de tot del stack
detect EADDRINUSE
mate@punt-omnia:~/nodejs-projects/min_web_server$ cat my_server.js
// +++ start the server
app.listen( serverInfo.myPort, () => {
console.log( szStartLine ) ;
} ).on( 'error', function( err ) {
if ( err.errno === 'EADDRINUSE' ) { // catch "port in use" error
console.error( '--- port (' + serverInfo.myPort + ') busy, process.exit() ---' ) ;
process.exit() ;
} else {
console.log( err ) ;
} ;
} ) ; // app.listen
Projects where we can use it :
- [+] rspi semafor [1212] - /home/pi/semafor/1_sem.js
- [+] rspi send fotos [2145] - /home/sag/express-sendfile/server.js
- [-] rspi mando remot [1212] - /home/sag/Raspberry-Pi-Simple-Web-GPIO-GUI/app.js
- [+] pomnia timer [3001] - /home/mate/nodejs-projects/timer/1_gen_html.js
- [+] pomnia minim_web_server [80] - /home/mate/nodejs-projects/min_web_server/my_server.js
Correct date and time format
If you want days and months and hours and minutes and seconds in 2-digit format, use this code :
// Date() prototypes - use as
// var szOut = 'Now is ' + (new Date).yyyymmdd() + '-' + (new Date).hhmmss() + ' ' + szIn + '<br>' ;
// or better
// var szOut = genTimeStamp() + ' ' + szIn + '<br>' ;
Date.prototype.yyyymmdd = function ( ) {
var yyyy = this.getFullYear().toString();
var mm = (this.getMonth()+1).toString(); // getMonth() is zero-based
var dd = this.getDate().toString();
return yyyy + '/' + (mm[1]?mm:'0'+mm[0]) + '/' + (dd[1]?dd:'0'+dd[0]);
}; // yyyymmdd()
Date.prototype.hhmmss = function () {
function fixTime(i) {
return (i < 10) ? "0" + i : i;
}
var today = new Date(),
hh = fixTime( today.getHours() ),
mm = fixTime( today.getMinutes() ),
ss = fixTime( today.getSeconds() ) ;
var myHHMMSS = hh + ':' + mm + ':' + ss ;
return myHHMMSS ;
} ; // hhmmss()
// get a timestamp
function genTimeStamp ( arg ) {
var szOut = (new Date).yyyymmdd() + ' - ' + (new Date).hhmmss() ;
return szOut ;
} ; // genTimeStamp()
__dirname
One must be very carefull when using "./" for file addressing.
"." gives you the directory from which you ran the node command in your terminal window, i.e. your working directory.
"__dirname" is always the directory in which the currently executing script resides.
So, if you start node from /etc/rc.local as "root", there is high chance you wont find your files located at /home/user/nodeproject/somedir
How to locate ".env" on boot
On boot, from /etc/rc.local, we are root, and cant find the ".env" file in project folder.
So we need to code : {gracies, Pere - 20200719}
require( 'dotenv' ).config( {path:__dirname+'/.env'} ) ;
Error handling
All functions must return an error :
fs.readFile( fname, function( err, data ) {
if ( err ) {
console.log( '--- got error :' + JSON.stringify( err ) ) ; // luis crespo, always
return handleError ( err ) ;
} ;
} ) ;
List of errors from Node.js v11.13.0 Documentation
error.code
<string>
The error.code property is a string representing the error code, which is typically E followed by a sequence of capital letters.
if ( err.code === 'ZeroDivisionError' ) { // accept this error
if ( err.code === 'ENOENT' ) {
error.errno
<string> | <number>
The error.errno property is a number or a string.
The number is a negative value which corresponds to the error code defined in libuv Error handling.
See uv-errno.h header file (deps/uv/include/uv-errno.h in the Node.js source tree) for details.
In case of a string, it is the same as error.code.
if ( err.errno === 'EADDRINUSE' ) { // catch port in use error
error.message
<string>
The error.message property is the string description of the error as set by calling "new Error(message)".
node "response.send()"
response.send(msg) is equal to response.write(msg); response.end();
Which means, send can only be called once,
write can be called many times,
but you must call end yourself.
node "response.writeHead()"
If you want the browser to interpret it as html, not plain text, change the line:
response.writeHead( 200, { "Content-Type" : "text/plain"} ) ;
To:
response.writeHead( 200, { "Content-Type" : "text/html"} ) ;
Sample
var texte = "Hello from Koltrane v 2.1.b<p>(" + datetime + ')<p> <a href="./index.htm">Back</a>' ;
res.writeHead( 200, { 'Content-Type': 'text/html' } ) ; // write HTTP headers and select HTML in body
res.write( texte ) ;
res.end( ) ;
node REPL environment
When you enter "node" at your prompt, you enter REPL (Run Evaluate Print Lib) interface :
c:\> node
> console.log( "koko" )
koko
You are under the same envir as if you press F12 at Chrome, JavaScript console window.
FileSystem operations
Documentacio
const fs = require( 'fs' ) ; // manage filesystem
fs.unlink( newFN, (err) => {
if (err) {
if ( err.code === 'ENOENT' ) {
mConsole( '--- (b1) file '+ newFN +' does not exist' ) ;
} else {
throw err ; // fatal error : stop
} ;
} else {
mConsole( '+++ (b1) successfully deleted ' + newFN ) ;
} ;
} ) ; // unlink
storing last temperatures
Supose we want to store last 3 days temperature, measured every 5 minutes.
This is 12 measures per hour, 288 measures per day, total 864 measures.
As we will draw oldest value first (on the left of the graph), we have to add new values to the end,
and remove old values from the head :
tc74_temp = String( results[0] ) ; // convert to string
mConsole( "(+2) python temperature (" + tc74_temp + ")." ) ;
var newLength = my_Temperatures.valors.push( tc74_temp ) ; // add to the end
if ( newLength > kMaxLength ) { // if too large
var elGone = my_Temperatures.valors.shift() ; // then remove from the begin
} ;
push(), pop(), shift(), unshift() array methods
Another article :
orangeable - email
Tracing or logging
El client fa la seva trassa ..... a la consola del navegador
El servidor fa la seva trassa ... al JOURNAL :
pi@pi0:~/njs/fronius $ journalctl -f -t fronius-nodejs
-- Logs begin at Tue 2024-10-01 15:42:01 CEST. --
Oct 04 11:32:46 pi0 fronius-nodejs[749]: (+) Python CSV a PNG results are (["*** output file {/home/pi/njs/fronius/public/imatges/fro_pot/pot_2024_10_03.png} exists ? {False}.",">>> create PNG from CSV rc (0)."]).
Oct 04 11:32:46 pi0 fronius-nodejs[749]: *** 2024/10/04, 11:32:46 - *** Fronius POT return {OK}.
Oct 04 11:32:46 pi0 fronius-nodejs[749]: *** 2024/10/04, 11:32:46 - branch logger - URL (/imatges/fro_pot/pot_2024_10_03.png), PATH (/imatges/fro_pot/pot_2024_10_03.png).
Oct 04 12:03:04 pi0 fronius-nodejs[749]: *** 2024/10/04, 12:03:04 - branch logger - URL (/sysFronius_PNG_pot_JSON/MyDate=2024_08_03), PATH (/sysFronius_PNG_pot_JSON/MyDate=2024_08_03).
Oct 04 12:03:04 pi0 fronius-nodejs[749]: *** 2024/10/04, 12:03:04 - >>> GET /sysFronius_PNG_pot_JSON method - dia {2024_08_03}.
Oct 04 12:03:04 pi0 fronius-nodejs[749]: *** 2024/10/04, 12:03:04 - >>> Checking POT CSV file {/home/pi/njs/fronius/dades/pot_CSV_2024_08_03.csv} exists.
Oct 04 12:03:04 pi0 fronius-nodejs[749]: *** 2024/10/04, 12:03:04 - +++ File (/home/pi/njs/fronius/dades/pot_CSV_2024_08_03.csv) exists - lets call python "5_potencia_csv_a_png.py" - out (/home/pi/njs/fronius/public/imatges/fro_pot/pot_2024_08_03.png).
Oct 04 12:36:16 pi0 fronius-nodejs[749]: (+) Python CSV a PNG results are (["*** output file {/home/pi/njs/fronius/public/imatges/fro_pot/pot_2024_10_03.png} exists ? {True}.","--- output file {/home/pi/njs/fronius/public/imatges/fro_pot/pot_2024_10_03.png} already exists.",">>> create PNG from CSV rc (0)."]).
Oct 04 12:36:16 pi0 fronius-nodejs[749]: *** 2024/10/04, 12:36:16 - *** Fronius POT return {OK}.
Oct 04 12:36:16 pi0 fronius-nodejs[749]: *** 2024/10/04, 12:36:16 - branch logger - URL (/imatges/fro_pot/pot_2024_10_03.png), PATH (/imatges/fro_pot/pot_2024_10_03.png).
Own logging
We start using console.log() :
console.log( '(+) Python results are (%j).', results ) ;
To filter and timestamp, we can use mConsole() :
function mConsole ( szIn ) {
if ( Detalls == 1 ) {
console.log( genTimeStamp() + ' - ' + szIn ) ;
} ;
} ; // mConsole()
To send the last events to a web page, we can use Bitacora(), as
here :
var bitacora = new Array( " ", " ", " ", " ", " ", " ", " ", " ", " ", " ", " ", " " ) ; // 12 lines
var idx_bitacora = 0 ;
var max_bitacora = bitacora.length ;
function Poner_Bitacora ( szIn ) {
var szOut = genTimeStamp() + ' ' + szIn + '<br>' ;
mConsole( 'Posar bitacora : ' + szOut ) ; // first, write to console
bitacora[ idx_bitacora ] = szOut ; // second, record for logging
idx_bitacora = idx_bitacora + 1 ;
if ( idx_bitacora === max_bitacora ) { idx_bitacora = 0 } ;
return 0 ;
} ; // Poner_Bitacora()
function Listar_Bitacora () {
mConsole( 'Listar bitacora - inici = ' + idx_bitacora ) ;
var szOut = " " ;
var idx_out = idx_bitacora ; // oldest element
do {
mConsole( 'Listar bitacora - idx = ' + idx_out ) ;
szOut = szOut + bitacora[ idx_out ] ;
idx_out = idx_out + 1 ;
if ( idx_out === max_bitacora ) { idx_out = 0 } ;
}
while ( !( idx_out === idx_bitacora ) ) ;
return szOut ;
} ; // Listar_Bitacora()
app.get( '/bitacora', function ( req, res ) {
var szResultatBitacora = Listar_Bitacora() ;
console.log( 'Bitacora data request.' ) ;
res.status( 200 ).send( szResultatBitacora ) ;
} ) ; // send bitacora data to client
node.js examples
github Gabriel Elana,
StackOverflow,
StackExchange
minimal web server
We have some nice links :
using HTTP
Save this code in "my_ws.js" :
var http = require ( 'http' ) ;
http.createServer ( function ( req, res ) {
var req_method = req.method ;
var req_url = req.url ;
var req_headers = req.headers ;
var req_userAgent = req_headers[ 'user-agent' ] ;
console.log( 'Method (%s).', req_method ) ;
console.log( 'User Agent (%s).', req_userAgent ) ;
// console.dir ( req ) ; // dump all request (quite large, about 400 lines)
res.writeHead ( 200, {'Content-Type': 'text/plain'} ) ;
res.end ( 'Hello World.\n' ) ;
} ).listen ( 1337, '127.0.0.1' ) ;
console.log ( 'Server running at http://127.0.0.1:1337/' ) ;
Then run "node my_ws.js" !
http ... a bit more ... return timestamp
C:\sag\node.js\simple_web_server> type my_server.js
var express = require( 'express' ) ;
var http = require( 'http' ) ;
var app = express() ; // instantiate Express and assign our app variable to it.
app.set( 'mPort', process.env.PORT || 80 ) ;
http.createServer( function (req, res) {
var currentdate = new Date();
var datetime = "Last Sync: " + currentdate.getDate() + "/"
+ (currentdate.getMonth()+1) + "/"
+ currentdate.getFullYear() + " @ "
+ currentdate.getHours() + ":"
+ currentdate.getMinutes() + ":"
+ currentdate.getSeconds();
res.writeHead( 200, {'Content-Type': 'text/plain'} ) ;
res.write( 'Hello from Koltrane v 1.2 ('+ datetime + ').\n' ) ;
res.end( ) ;
}).listen( app.get('mPort') ) ;
console.log( 'Express node.js server listening on port ' + app.get('mPort') ) ;
app.listen()
var express = require( 'express' ) ;
var app = express() ;
app.set( 'mPort', process.env.PORT || 3001 ) ;
var server = app.listen( app.get('mPort'), function () {
var vHost = server.address().address ;
var vPort = server.address().port ;
console.log( 'Example app v 1.2 listening at http://%s:%s', vHost, vPort ) ;
}) ;
A simple but complete web server introducing express
\\w500\node\web-server-basico\full\my_server.js
#!/usr/bin/env node
// minimal web server on pomnia PC
// so, scan_tron.sh does not give a false error on this IP
// test it by accessing http://10.139.238.194
// versions :
// 20190121 : 1.1 - code start
// 20190122 : 1.2 - use full time and date format
// 1.3 - sudo : npm install morgan --save
// 1.4 - w500 : npm link express, npm link morgan
// 1.5 - from Windows use http://localhost:133/ or http://localhost:133/go
// 1.6 - npm link body-parser
// 2.0 - app.listen, no http
// 2.0.b - use port 80
var myVersion = "2.0.a" ;
var express = require( 'express' ) ;
// var http = require( 'http' ) ;
var morgan = require( 'morgan' ) ; // log requests to the console (express4)
var app = express() ; // instantiate Express and assign our app variable to it.
var bodyParser = require( 'body-parser' ) ;
app.set( 'mPort', process.env.PORT || 80 ) ; // need 80 for wget
var szHostName = require('os').hostname() ; // https://nodejs.org/api/os.html
app.use( bodyParser.json() ) ;
app.use( morgan('dev') ) ; // log every request to the console
// Date() prototypes - use as
// var szOut = (new Date).yyyymmdd() + '-' + (new Date).hhmmss() + ' ' + szIn + '<br>' ;
Date.prototype.yyyymmdd = function ( ) {
var yyyy = this.getFullYear().toString();
var mm = (this.getMonth()+1).toString(); // getMonth() is zero-based
var dd = this.getDate().toString();
return yyyy + '/' + (mm[1]?mm:'0'+mm[0]) + '/' + (dd[1]?dd:'0'+dd[0]);
}; // yyyymmdd()
Date.prototype.hhmmss = function () {
function fixTime(i) {
return (i < 10) ? "0" + i : i;
}
var today = new Date(),
hh = fixTime( today.getHours() ),
mm = fixTime( today.getMinutes() ),
ss = fixTime( today.getSeconds() ) ;
var myHHMMSS = hh + ':' + mm + ':' + ss ;
return myHHMMSS ;
} ; // hhmmss()
// lets set a route to trace all requests
app.use( function ( req, res, next ) {
console.log( '### common TimeStamp:', Date.now() ) ;
next() ;
} ) ; // timestamp all
app.get( '/', function( req, res) {
var szTime = "# " + (new Date).yyyymmdd() + ' - ' + (new Date).hhmmss() + " #" ;
res.writeHead( 200, {'Content-Type': 'text/plain'} ) ;
res.write( '\n*** host ('+ szHostName +') *** v ['+myVersion+'] *** timestamp ('+ szTime +') *** \n' ) ;
res.end( ) ;
console.log( '* GET method {'+szTime+'} *' ) ;
} ) ; // get
app.listen( app.get( 'mPort' ), () => {
console.log( '*** MinWebSrv server listening on port [' + app.get('mPort') + '], host {'+ szHostName +'} ***' ) ;
} ) ;
How does it start on a system reboot ?
/etc/rc.local -> "/usr/bin/pomnia_restart &" -> /home/mate/nodejs-projects/min_web_server/ru.sh !
Hello World to node-inspector
- code app.js :
var http = require( 'http' ) ;
var x = 0;
http.createServer( function ( req, res ) {
x += 1 ;
res.writeHead( 200, {'Content-Type': 'text/plain'} ) ;
res.end( 'Hello World {' + x + '}.' ) ;
} ).listen( 8124 );
console.log('Server running at http://127.0.0.1:8124/');
- start debugger : start "dbg" node-inspector
- start application code : start "app" node --debug app.js
- open debug browser :
http://127.0.0.1:8080/debug?port=5858
- open application browser :
http://127.0.0.1:8124/
How to debug a node application
Enric 201408
function aaa() {
console.log(this);
}
aaa()
Hostia, al explorador surt "window"
Al nodejs del terminal de Mac surt: collons quin array!
node.js install
Depen del sistema operatiu
RH v6.1 64-bit
Instalacio via yum:
rhv6-64b:sebas > su -c 'yum install npm'
At RH v6.1 64-bit:
rhv6-64b:sebas > wget http://nodejs.org/dist/v0.10.12/node-v0.10.12-linux-x64.tar.gz
rhv6-64b:sebas > tar -xvzf ../node-v0.10.12-linux-x64.tar.gz
Descomprimim i ja esta instalat:
rhv6-64b:sebas > ./node version
module.js:340
throw err;
^
Error: Cannot find module '/home/sebas/software/node-js/node-v0.10.12-linux-x64/bin/version'
at Function.Module._resolveFilename (module.js:338:15)
at Function.Module._load (module.js:280:25)
at Function.Module.runMain (module.js:497:10)
at startup (node.js:119:16)
at node.js:901:3
Una millora :
rhv6-64b:/home/sebas/software/node-js/node-v0.10.12-linux-x64/bin > ./node --version
v0.10.12
RH v7
curl -sL https://rpm.nodesource.com/setup | bash -
yum install -y nodejs
[root@rhv7 ~]# node -v
v0.10.38
[root@rhv7 ~]# npm -v
1.4.28
Els detalls mes tecnics son
[root@rhv6-64b hello]# curl -sL https://rpm.nodesource.com/setup | bash -
## Inspecting system...
+ rpm -q --whatprovides redhat-release || rpm -q --whatprovides centos-release || rpm -q --whatprovides cloudlinux-release
+ uname -m
## Confirming "el6-x86_64" is supported...
+ curl -sLf -o /dev/null 'https://rpm.nodesource.com/pub/el/6/x86_64/nodesource-release-el6-1.noarch.rpm'
## Downloading release setup RPM...
+ mktemp
+ curl -sL -o '/tmp/tmp.ybsY0QNiii' 'https://rpm.nodesource.com/pub/el/6/x86_64/nodesource-release-el6-1.noarch.rpm'
## Installing release setup RPM...
+ rpm -i --nosignature --force '/tmp/tmp.ybsY0QNiii'
## Cleaning up...
+ rm -f '/tmp/tmp.ybsY0QNiii'
## Checking for existing installations...
+ rpm -qa 'node|npm' | grep -v nodesource
## Run "yum install -y nodejs" (as root) to install Node.js and npm.
## You may also need development tools to build native addons:
## "yum install -y gcc-c++ make"
Ubuntu 14.04 LTS @ T60
< connect T60 to Internet >
$ sudo apt-get update ; update global
$ sudo apt-get install npm ; install npm
$ curl -sL https://deb.nodesource.com/setup_8.x | sudo -E bash - ; update our Debian apt package repository to include the NodeSource packages
$ sudo apt-get install -y nodejs
$ sudo ln -s /usr/bin/nodejs /usr/bin/node ; create a symbolic link for "node", as many node.js tools use this name ("node") to execute
$ sudo apt-get install git
Obtenim
$ npm -v
1.3.10
$ node -v
v0.10.25 ... v8.3.0 !!!
$ git --version
git version 1.9.1
PiZero
sebas@pi0alby:~/soft $ cat welcome.sag
.
>>> https://www.thepolyglotdeveloper.com/2018/03/install-nodejs-raspberry-pi-zero-w-nodesource/
.
https://nodejs.org/dist/
.
mirem per "armv6l architecture"
.
curl -o node-v11.15.0-linux-armv6l.tar.gz https://nodejs.org/dist/latest-v11.x/node-v11.15.0-linux-armv6l.tar.gz
tar -xzf node-v11.15.0-linux-armv6l.tar.gz
sudo cp -r node-v11.15.0-linux-armv6l/* /usr/local/
sebas@pi0alby:~/soft $ node -v
v11.15.0
Modos de node
- node --debug = habilita el debugger
- node --debug-brk = habilita el debugger i ademés s'atura a la primera línia de codi
node.js require sentence
The "require" sentence is similar to c's "include" or pascal's "uses" directive
It has to be displayed using npm list command
node.js debug
Article amb diverses
opcions
O amb el editor
Visual Studio Code,
que a pesar de ser de Microsoft, es Open Source {Lluis, 20160720}
Client - Firebug (or Chrome + Developer Tools)
Server : node-inspector + Chrome amb F12
- nodejs search path - explicit (./pastrings)
- npm link monk
- npm install -g node-inspector --save
It turns out that Dev Tools is a native part of Nodejs since 6.3
and node-inspector (aka node-debug) is no longer necessary.
To debug: node --inspect index.js
node-debug
Now you can run
node-debug app.js
Obre
http://127.0.0.1:8080/debug?port=5858
node-inspector (at Chrome only)
- cmd line : start node-inspector
We get :
Node Inspector v0.4.0
info - socket.io started
Visit http://127.0.0.1:8080/debug?port=5858 to start debugging.
- open Chrome pointing at http://127.0.0.1:8080/debug?port=5858
- finally, run
- node --debug myserver.js {JS starts running}
- node --debug-brk loadreservas.js {JS waits for debugger to connect}
- maybe you have to reload Chrome node-inspector screen
logger : Morgan
Homepage - see formats : combined, common, dev, short, tiny
Install it using "npm install morgan --save", and then code in your app :
var morgan = require('morgan') ; // logging middleware
app.use( morgan('dev') ) ; // log every request to the console, developer format
user entry
var prompt = require('prompt');
prompt.start(); // Start the prompt
// Get two properties from the user: username and email
prompt.get( ['username', 'email'], function ( err, result ) {
// Log the results.
console.log( 'Command-line input received:' ) ;
console.log( ' username: ' + result.username ) ;
console.log( ' email: ' + result.email ) ;
// your code here ...
} ) ; //
prompt package
parameters from command line
$ node yourscript.js banana=2 monkey
var program_name = process.argv[0] ; // value will be "node"
var script_path = process.argv[1] ; // value will be "yourscript.js"
var first_value = process.argv[2] ; // value will be "banana=2"
var second_value = process.argv[3] ; // value will be "monkey"
Stack Overflow
node access to ...
node access to shell
c:\Sebas\JavaScript\SubShell\Uno> type fem.js
// lets try to run an external command from node
// mycmd.cmd runs a MQ command with some output
//
// Documentation :
// https://nodejs.org/api/child_process.html
// https://nodejs.org/api/child_process.html#child_process_asynchronous_process_creation
var exec = require( 'child_process' ).exec, child ;
child = exec( 'mycmd.cmd', function ( error, stdout, stderr ) {
console.log ( ' stdout: ' + stdout ) ;
console.log ( ' stderr: ' + stderr ) ;
if ( error !== null ) {
console.log( JSON.stringify( error ) ) ; // luis crespo, again
console.log( 'exec error: ' + error ) ;
} ;
} );
c:\Sebas\JavaScript\SubShell\Uno> type mycmd.cmd
dspmqver
c:\Sebas\JavaScript\SubShell\Uno> node fem.js
stdout:
c:\Sebas\JavaScript\SubShell\Uno> dspmqver
Name: WebSphere MQ
Version: 7.5.0.2
Level: p750-002-130627
BuildType: IKAP - (Production)
Platform: WebSphere MQ for Windows
Mode: 32-bit
O/S: Windows 7 Professional x64 Edition, Build 7601: SP1
InstName: Installation1
InstDesc:
Primary: Yes
InstPath: C:\MQ
DataPath: C:\MQ
MaxCmdLevel: 750
stderr:
c:\Sebas\JavaScript\SubShell\Uno>
JavaScript Shell Scripting Tutorial -
use readline module to process each line individually :
#!/usr/bin/env node
var readline = require( 'readline' ) ;
var cp = require( 'child_process' ) ;
var tail = cp.spawn( 'tail', ['-500', 'mylogfile.log'] ) ;
var lineReader = readline.createInterface( tail.stdout, tail.stdin ) ;
lineReader.on( 'line', function(line) {
console.log('Line: ' + line);
});
tail.on( 'close', function(code, signal) {
console.log('ls finished...');
});
node access to python
(1) create python code :
sebas@minie:~/dades/Cifras_y_Letras/njs$ cat script.py
#!/usr/bin/python3
# -*- coding: utf-8 -*-
# script.py
import sys
def my_main():
# You can process command line arguments if needed
args = sys.argv[1:] # Get arguments passed from Node.js
print("Hello from Python!")
if args:
print("Arguments received:", args)
if __name__ == "__main__":
my_main()
(2) call it from node-js :
sebas@minie:~/dades/Cifras_y_Letras/njs$ cat app.js
// app.js
const { spawn } = require('child_process');
// Spawn a new process to run the Python script
const pythonProcess = spawn('python3', ['script.py', 'arg1', 'arg2']);
// Handle the output from the Python script
pythonProcess.stdout.on('data', (data) => {
console.log(`Output from Python: ${data}`);
console.log(`===========================`);
});
// Handle any errors
pythonProcess.stderr.on('data', (data) => {
console.error(`Error from Python: ${data}`);
});
// Handle the process exit
pythonProcess.on('close', (code) => {
console.log(`Python script exited with code ${code}`);
});
(3) Run it :
sebas@minie:~/dades/Cifras_y_Letras/njs$ node app.js
Output from Python: Hello from Python!
Arguments received: ['arg1', 'arg2']
===========================
Python script exited with code 0
hostname from node
If a node want to know its host name:
var child_process = require( "child_process" ) ;
child_process.exec( "hostname", function( err, stdout, stderr ) {
var hn = stdout.trim() ;
console.log( "HN (%s).", hn ) ;
} ) ;
hostname
Better code is:
var szHostName = require('os').hostname() ; // https://nodejs.org/api/os.html
console.log( '*** HN server (%s).', szHostName ) ;
\\JavaScript\hostname> node hn.js
*** HN server (pep250rw7).
IP from node
Simple one is node-ip
Complete one is
network-interfaces :
var interfaces = os.networkInterfaces();
var addresses = [];
for (var k in interfaces) {
for (var k2 in interfaces[k]) {
var address = interfaces[k][k2];
if (address.family === 'IPv4' && !address.internal) {
addresses.push(address.address);
}
}
}
var szMyIP = addresses[1] ;
console.log( "### my IP ", szMyIP ) ;
Arrow functions
We have node "v0.10.25" on Ubuntu 14.04 LTS.
The arrow function "=>"" are ES6 functions, which you can't use with ES5 which was the default for node under 4.4.5 version.
The ones I have ("timer" project, cant run on T60 Ubuntu) are :
fs.unlink( newFN, (err) => {
fs.writeFile( newFN, S1+S2+S3, (err) => {
fs.unlink( oldFN, (err) => {
fs.rename( oldFN, newFN, (err) => {
Solucio : instalar node v8
Documentation
express
Express is a minimal and flexible node.js web application framework
Express is fundamentally built on the concept of middlewares.
Middlewares are functions applied to an HTTP request.
Express applications map requests to a series (a stack) of middlewares based on the request (path, method, etc).
You can use Express to construct simple model view controller (MVC) web applications in little time.
Express "routes" are defined given an HTTP method, a regular expression,
or string for the path portion of the request, and a middleware function to apply.
Express
homepage, guide,
API,
as res.json or res.send,
debugging,
developer mozilla org [***]
express install
sebas@pi0alby:~$ npm install express --save
express declaration and use
const express = require("express") ; // express is a module that can be used to create more than one application
var app = express() ; // instantiate express and assign our app variable to it
If you only want one application (but it would be less readable) you could write
var app = require('express')();
HTTP methods
Use HTTP methods explicitly :
- to create data you use POST; es una ALTA o un INSERT en bbdd.
- to retrieve data you use GET; es una CONSULTA o un FIND en bbdd.
- to update or change data, you use PUT; es una MODIFICACION o un UPDATE en bbdd.
- to delete data you use DELETE; es una BAJA o un REMOVE en bbdd.
Docu :
wikipedia HTTP protocol +
"summary table" del "Request methods".
Lluis :
en el GET los datos se envían en la URL, en el POST se envían en el cuerpo del mensaje.
El "data" que se le pasa al $.get de jQuery, se codifica en un string y lo engancha al final de la URL, así:
/enviaWhatsapp?tel=1213141516&msg=hola
Codi :
$( function() {
$( '#send' ).click( function() {
var data = {
tel: $( '#idtel' ).val(),
msg: $( '#idmsg' ).val()
}; // data
$.get( url, data, function() {
alert( 'mensaje enviado' ) ;
}); // get
}); // click
}); // function()
El
query string forma parte de la especificación del formato de la URL para HTTP y HTTPS.
Por ejemplo sin JavaScript, si escribes
<form action="/enviar" method="get"><input name="pepe"><input type="submit"></form>
puedes ver que al darle al botón de enviar te abrirá la URL
http:/nombre.del.host/enviar?pepe=[lo que contenga el input]
Vamos, que los formularios lo han usado siempre cuando se les configura con el method get.
express configuration file
Lets declare it
var app = express() ; // instantiate Express and assign our app variable to it
var config = require ( './config.js' ) ; // read configuration file
Then write the details into "config.js"
var wCDT = {
titol : 'wCDT server',
col_reserves : 'reserves_pistes',
col_usuaris : 'wCDT_users',
iMaxReserves : '1',
ending : '.'
} ;
module.exports = wCDT ;
Then use it in "app.js"
app.set( 'Title', config.titol ) ;
app.set( 'rcolname', config.col_reserves ) ;
app.set( 'userscolname', config.col_usuaris ) ;
app.set( 'iMaxReservesUsuari', config.iMaxReserves ) ;
express routes
Writing routes is where the real action happens.
Docu : basic routing,
routing guide
We're going to define several routes (as a sample):
- a / route which just displays a simple home page.
- a /register route which renders a registration page. This route will need to accept both GET and POST requests.
- a /login route which will allow existing users to log in. This route will need to accept both GET and POST requests as well.
- a /logout route which will log users out of their account.
- a /dashboard route which will display a dashboard page for logged in users.
Serving static files in Express
The path that you provide to the express.static function
is relative to the directory from where you launch your node process.
If you run the express app from another directory,
it’s safer to use the absolute path of the directory that you want to serve
var path=require( 'path' ) ;
app.use( express.static( path.join( __dirname, '/publico' ) ) ) ; // serve static files from "publico" directory
By default this module will send index.html file in response to a request on a directory.
To disable this, set false or to supply a new index, passing a string or an array in preferred order.
static
files
Tool to trace all requests :
const express = require('express') ;
const path = require('path') ;
const app = express() ;
const PORT = 3000 ;
var myLogger = function (req, res, next) {
const { url, path: routePath } = req ;
console.log( 'my LOGGER - URL (' + url + '), PATH (' + routePath + ').' ) ;
next();
}
app.use(myLogger) ;
app.use( express.static( path.join( __dirname, '/public') ) ) ;
app.listen(PORT, () => {
console.log( 'app is running on port {'+PORT+'}.' ) ;
} ) ;
A bit shorter :
app.use( function ( req, res, next ) {
console.log( '### common TimeStamp:', Date.now() ) ;
next() ;
} ) ; // timestamp all
writing middleware
express deprecated coding
Sometimes express writes sentences as
express deprecated res.send(status, body): Use res.status(status).send(body) instead
My code was
szMsg_Logon_OK += szOcupacio ;
res.send( 200, szMsg_Logon_OK ) ;
} ;
Migrate express to v4
There are few change to version 4, with few deprecated expressions.
var app = express();
app.configure( function () { // deprecated ! http://expressjs.com/api.html#app.configure
// app.use( app.router ) ; // DEPRECATED !
// app.use( express.errorHandler({ dumpExceptions: true, showStack: true }));
// app.use( express.logger('dev') ); // default', 'short', 'tiny', 'dev'
app.use( logger( "combined" ) ) ; // https://github.com/expressjs/morgan
app.use( morgan('dev') ); // log every request to the console
// app.use( express.bodyParser() );
app.use( bodyParser.json() ); // parse application/json
app.use( bodyParser.urlencoded({'extended':'true'}) ); // parse application/x-www-form-urlencoded
app.use( bodyParser.json({ type: 'application/vnd.api+json' }) ); // parse application/vnd.api+json as json
});
Migrate xpress to v4 + code sample [***]
express & listen()
Binds and listens for connections on the specified host and port. This method
app.listen(port, [hostname], [backlog], [callback])
is identical to Node's
http.Server.listen()
The app returned by express() is in fact a JavaScript Function, designed to be passed to Node's HTTP servers as a callback to handle requests.
This makes it easy to provide both HTTP and HTTPS versions of your app with the same code base, as the app does not inherit from these (it is simply a callback).
var express = require( 'express' ) ;
var https = require( 'https' ) ;
var http = require( 'http' ) ;
var app = express() ;
http.createServer( app ).listen( 80 ) ;
https.createServer( options, app ).listen( 443 ) ;
listen() API
express & the index
When you visit a directory, it's often the case that index.html is served to you.
app.use ( express.static ( myStaticPath, { index: 'index.html' } ) ) ;
Deep dive,
options
We can set the options more explicitly :
var staticPath = __dirname + '/public' ;
var staticOptions = { index: 'index.htm' } ; // provide "index.htm" instead of the default "index.html"
app.get( '/*', express.static( staticPath, staticOptions ) ) ; // configure express options
express middleware(s)
Middleware que redireccioni a https les peticions que no vinguin de https :
var forcehttps = function () {
console.log ( '### (1) force HTTPS.' ) ;
return function ( req, res, next ) {
console.log ( '>>> (2) force HTTPS.' ) ;
console.log ( '>>> req.headers[x-forwarded-proto] = [%s].', req.headers['x-forwarded-proto'] ) ;
console.log ( '>>> req.secure = [%s].', req.secure ) ;
// console.dir( req.headers ) ;
// console.dir( req ) ;
if ( ! req.secure ) {
if ( req.get ( 'x-forwarded-proto' ) != 'https' ) {
console.log ( '+++ (3) force HTTPS.' ) ;
return res.redirect ( 'https://' + req.headers.host + req.url ) ;
// res.redirect requires "express" : http://expressjs.com/api.html#res.redirect
} else {
console.log ( '+++ (5) dont force HTTPS - has HTTPS (bluemix)' ) ;
return next() ;
} ;
} else {
console.log ( '+++ (4) dont force HTTPS - is SECURE (node)' ) ;
return next() ;
} ;
} ;
} ; // forcehttps()
El pots usar per totes les peticions
app.use ( forcehttps() ) ;
o només per unes quantes
app.use( '/login', forcehttps() ) ;
force HTTPS
middleware.transportSecurity = function () {
var applicationURL = "https://myapp.bluemix.net/"
scheme = url.parse(applicationURL).protocol;
function securityEnabled () {
if (scheme !== HTTP && scheme !== HTTPS) {
throw new Error(
"The application URL scheme must be 'http' or 'https'."
);
}
return scheme === HTTPS;
}
function redirectURL (request) {
return url.resolve(applicationURL, request.originalUrl);
}
return function (request, response, next) {
if (securityEnabled() && !request.secure) {
response.redirect(301, redirectURL(request));
}
else {
next();
}
};
};
Una altra
implementacio
HTTPS server
// wget https://appcdt.mybluemix.net/ --no-check-certificate
var express = require( 'express' ) ;
var app = express() ;
var fs = require( 'fs' ) ;
var https = require( 'https' ) ;
var privateKey = fs.readFileSync( './server.key', 'utf8' ) ;
// openssl req -x509 -nodes -days 365 -newkey rsa:2048 -keyout privateKey.key -out certificate.crt
var certificate = fs.readFileSync( './server.crt', 'utf8' ) ;
var credentials = { key: privateKey, cert: certificate } ;
// The IP address of the Cloud Foundry DEA (Droplet Execution Agent) that hosts this application:
var host = ( process.env.VCAP_APP_HOST || 'localhost' ) ;
// The port on the DEA for communication with the application:
var port = ( process.env.VCAP_APP_PORT || 3000 ) ;
https.createServer ( credentials, app ).listen ( port , host ) ;
console.log ( 'Our HTTPS server is running at host ('+ host +'), port ('+ port +'). URL = https://'+host+':'+port+'/ ' ) ;
If we want both:
// wget http://localhost/
// wget https://localhost/ --no-check-certificate
http.createServer ( app ).listen( port, host ) ;
console.log ( 'local - our HTTP server is running at host ('+ host +'), port ('+ port +'). URL = http://'+ host +':'+ port +'/ ' ) ;
https.createServer ( credentials, app ).listen ( portS , host ) ;
console.log ( 'local - our HTTPS server is running at host ('+ host +'), port ('+ portS +'). URL = https://'+ host +':'+ portS +'/ ' ) ;
express samples
Here is an example of a very basic Express app, in file app.js, so you must run "node app.js" :
var express = require('express') ;
var app = express() ;
app.get ( '/', function ( req, res ) {
res.send('Hello World!')
} ) ; // get()
var server = app.listen( 3000, "192.168.1.123", function () { ; IP is mandatory or we get "::" meaning "any IPv6"
var host = server.address().address ;
var port = server.address().port ;
console.log( 'Example app listening at http://%s:%s', host, port ) ;
} ) ; // listen()
server skeleton
falta (methods) POST i GET i ...
// server.js
// >>> http://scotch.io/tutorials/javascript/creating-a-single-page-todo-app-with-node-and-angular
// set up ========================
var express = require( 'express' );
// var mongoose = require( 'mongoose' ); // mongoose for mongodb
var morgan = require( 'morgan' ); // log requests to the console (express4)
var bodyParser = require( 'body-parser' ); // pull information from HTML POST (express4)
// var methodOverride = require( 'method-override' ); // simulate DELETE and PUT (express4)
var http = require( 'http' ) ;
var path = require( 'path' ) ;
// DB access
var mongo = require( 'mongodb' ) ; // basic
var monk = require( 'monk' ) ; // .. better
var mongoHost = 'localhost';
var mongoPort = 27017;
var db = monk('localhost:27017/apptest'); // com detectar un error as nom equivocat ?
var app = express(); // create our app w/ express
// configuration =================
app.set( 'mPort', process.env.PORT || 3000 ) ; // save port to use in APP var
app.set( 'views', path.join(__dirname, 'views') ) ;
// app.set( 'view engine', 'jade' ) ;
// tell express application to load and server static files (if there any) from public folder:
app.use( express.static( path.join( __dirname, 'public' ) ) ) ; // objects from the ./public/ uri will be served from ./public/ dir
app.use( express.static( __dirname + '/public' ) ) ; // set the static files location /public/img will be /img for users
app.use( '/', express.static( __dirname + '/public' ) ) ; // serve whatever is in the "public" folder at the URL /public/:filename
app.use( morgan('dev')); // log every request to the console
app.use( bodyParser.urlencoded({'extended':'true'}) ); // parse application/x-www-form-urlencoded
app.use( bodyParser.json() ); // parse application/json
app.use( bodyParser.json({ type: 'application/vnd.api+json' }) ); // parse application/vnd.api+json as json
// app.use( express.bodyParser() );
app.use( errorHandler ) ;
// app.use( methodOverride() );
// === Writing routes is where the real action happens
app.get( '/',function( req, res ) {
db.driver.admin.listDatabases( function( e, dbs ){
res.json( dbs );
});
} ) ;
// listen (start app with node server.js) ======================================
var MyServer = app.listen( app.get( 'mPort' ), function () {
var vPort = MyServer.address().port ;
console.log( "App listening on port (%s).", vPort ) ;
} ) ;
app.listen( 80, function() { // http://expressjs.com/api.html#app.listen
console.log( 'success' ) ;
} ).on( 'error', function( err ) {
if ( err.errno === 'EADDRINUSE' ) { // catch port in use error
console.log( 'port busy' );
} else {
console.log( err ) ;
} ;
} ) ;
http.createServer( app ).listen( app.get( 'mPort' ), function() {
console.log( 'express server v 1.0 listening on port [' + app.get('mPort') + '].' ) ;
} ) ; // listen
debug express
Set the DEBUG global var before starting node :
c:\> set DEBUG=express:*
c:\> node server
Images : send from server with HTML or get straight from client
From client, on click, fixed file
Nice way sugested by Luís :
<li> modo <a href="#" id="clkFoto_luis">luis</a>
<div id="imatge_div">
<img id="imatge_webcam" src="/images/blanc.jpg" width="300" height="250">
</div>
$( "#clkFoto_luis" ).click( function() {
$( "#imatge_webcam" ).attr( 'src', '/images/1_webcam.png' ) ; // src attribute applies to <img tag
}) ; // foto
Advantadges : only one filename.
Inconvenient : client browser or nodejs server can "cache" and return "304".
Solution : here
From client, on timeout, known files
<!DOCTYPE html>
<meta name="robots" content="noindex">
<html>
<head>
<meta charset="utf-8">
<meta name="viewport" content="width=device-width">
<title>JS Bin</title>
</head>
<body>
<img id="image1" src="https://picsum.photos/400/300/?random">
<script id="jsbin-javascript">
function changeImage(seconds, nextImg, element) {
setInterval(_ => {
element.src = nextImg()
}, 1000 * seconds)
}
let img1 = document.getElementById('image1')
let imageCount = 100
function nextImage() {
imageCount++
return 'https://picsum.photos/400/300/?image=' + imageCount
}
changeImage(2, nextImage, img1)
</script>
</body>
</html>
url
From client, on timeout, created files
Here's the project : envia foto @ github
create diferent png or jpeg
HTML, CSS
<hr>
<div id="id_photo">
<p>
</div>
<hr>
JS client
Using Ajax,
we code at client:
$( ".clkFerFoto" ).click( function() {
$.get( '/fem_foto', function( page ) {
console.log( '*** [' + genTimeStamp() + '] index - demanem al server la sub-pagina FER_FOTO' ) ;
$( "#id_photo" ).html( page ) ; // show received HTML at specific place
}) ; // get()
}) ; // clkFerFoto
To hide a pic (to restore it later) :
$( '#imatge_webcam' ).css( 'visibility', 'hidden' ) ; // use "visible" to restore it.
JS server
At server we code :
app.get( '/mostrar_foto', function (req, res) {
var pngFile ; // name generated by python includes timestamp
var imatge = fs.readFileSync( pngFile ) ;
res.writeHead( 200, { 'Content-Type': 'text/html' } ) ; // we send HTML !
res.write( '<img id='imatge_div' src="data:image/png;base64,' ) ;
res.write( new Buffer(imatge).toString( 'base64' ) ) ;
res.end( '"/>' ) ;
} ) ; // mostrar foto
request JSON, place calculated position
HTML, CSS
<table class="tseqima">
<tr>
<td> <img id="idn_imatge_0">
<td> <img id="idn_imatge_1">
<td> <img id="idn_imatge_2">
<td> <img id="idn_imatge_3">
<td> <img id="idn_imatge_4">
<td> <img id="idn_imatge_5">
<td> <img id="idn_imatge_6">
<td> <img id="idn_imatge_7">
<td> <img id="idn_imatge_8">
<td> <img id="idn_imatge_9">
</table>
JS client
Codi
aqui
$.getJSON( '/fes_photo_gimme_json', function( mi_json ) { // request picture filename and path (and status)
var szIdPutPic = '#idn_imatge_'+idxPics ;
let randomStr = Math.random().toString(36).substr(2) ; // avoid html 304
$( szIdPutPic ).attr( 'src', mi_json.imgURL+ '?random=' + randomStr ) ; // request pic file and place it in page
idxPics = idxPics + 1 ;
if ( idxPics === maxPics ) { idxPics = 0 ; } ;
JS server
var fixed_png_File = python_options.args[0] ; // "imatges/webcam/webcam3.png" ... el "/public/" va implicit amb l'express.static !
app.get( '/fes_photo_gimme_json', function ( req, res ) {
res.writeHead( 200, { 'Content-Type': 'application/json' }) ;
let my_json = { status: 'OK', imgURL: fixed_png_File };
res.end( JSON.stringify( my_json ) ) ;
Fronius SmartMeter web server
Project at gitlab
pi@pi0:~/njs/fronius $ sudo apt update ;
pi@pi0:~/njs/fronius $ apt list --upgradable ;
pi@pi0:~/njs/fronius $ sudo apt-get dist-upgrade ;
pi@pi0:~/njs/fronius $ npm init ; create "package.json"
pi@pi0:~/njs/fronius $ sudo apt install git ;
pi@pi0:~/njs/fronius $ git --version
git version 2.20.1
pi@pi0:~/njs/fronius $ git init ; create ".git" ; Initialized empty Git repository in /home/pi/njs/fronius/.git/
pi@pi0:~/njs/fronius $ git add README.md
pi@pi0:~/njs/fronius $ git add servidor.js
pi@pi0:~/njs/fronius $ git config --global user.email "sebastiasebas@gmail.com"
pi@pi0:~/njs/fronius $ git config --global user.name "Sebastia Altemir"
pi@pi0:~/njs/fronius $ git commit -am "first commit"
[master (root-commit) e772e22] first commit
2 files changed, 21 insertions(+)
create mode 100644 README.md
create mode 100644 servidor.js
pi@pi0:~/njs/fronius $ git remote add origin https://gitlab.com/sebastia-net/fronius.git
pi@pi0:~/njs/fronius $ git branch -M main
pi@pi0:~/njs/fronius $ git push -uf origin main
Username for 'https://gitlab.com': sebastiasebas
Password for 'https://sebastiasebas@gitlab.com':
remote: GitLab: You are not allowed to force push code to a protected branch on this project.
un-protect main branch
Dont enter usr+pwd every time
(url) :
pi@pi0:~/njs/fronius $ git config credential.helper store ; lets store usr+pwd
pi@pi0:~/njs/fronius $ git remote show origin ; we are asked to provide them ...
pi@pi0:~/njs/fronius $ git push -uf origin main ; .. and never more !
Branch 'main' set up to track remote branch 'main' from 'origin'.
Everything up-to-date
Els errors tipics :
pi@pi0:~/njs/fronius $ npm start
Cannot find module 'express'
pi@pi0:~/njs/fronius $ npm install -g express --save
npm WARN checkPermissions Missing write access to /usr/local/lib/node_modules
pi@pi0:~/njs/fronius $ sudo npm install -g express // cant "--save" as there is no global package.json
+ express@4.18.1
added 57 packages from 42 contributors in 48.384s
pi@pi0:~/njs/fronius $ npm link express
/home/pi/njs/fronius/node_modules/express -> /usr/local/lib/node_modules/express
pi@pi0:~/njs/fronius $ npm start
> fronius@1.0.0 start /home/pi/njs/fronius
> node servidor.js
app is running on port 3000.
Xorrada :
pi@pi0:~/njs/fronius $ npm list
fronius@1.0.0 /home/pi/njs/fronius
└── express@4.18.1 -> /usr/local/lib/node_modules/express extraneous
npm ERR! extraneous: express@4.18.1 /home/pi/njs/fronius/node_modules/express
pi@pi0:~/njs/fronius $ sudo npm prune
removed 1 package in 11.232s
found 0 vulnerabilities
pi@pi0:~/njs/fronius $ npm list
fronius@1.0.0 /home/pi/njs/fronius
└── (empty)
pi@pi0:~/njs/fronius $ sudo npm install express --save // use local
lets call python code
pi@pi0:~/njs/fronius $ sudo apt-get update
pi@pi0:~/njs/fronius $ sudo apt-get install python-pip
pi@pi0:~/njs/fronius $ python -m pip install requests #
requests.readthedocs.io
lets configure DDNS
- duckDNS instructions
- external access
To host :
nicolau@mars:~ $ ping sebas-r0.duckdns.org
PING sebas-r0.duckdns.org (83.42.163.30) 56(84) bytes of data.
64 bytes from 30.red-83-42-163.dynamicip.rima-tde.net (83.42.163.30): icmp_seq=1 ttl=64 time=3.61 ms
64 bytes from 30.red-83-42-163.dynamicip.rima-tde.net (83.42.163.30): icmp_seq=2 ttl=64 time=3.11 ms
To APP :
nicolau@mars:~ $ curl http://sebas-r0.duckdns.org:2000/ > /dev/null
% Total % Received % Xferd Average Speed Time Time Time Current
Dload Upload Total Spent Left Speed
100 1225 100 1225 0 0 7753 0 --:--:-- --:--:-- --:--:-- 7802
- on router, map external port 2000 to 192.168.1.222:3000, where NJS code is
- on client, go to "sebas-r0.duckdns.org:2000"
lets run it from a system service
We want to run it as "user system service" :
pi@pi0:~/njs/fronius $ journalctl -u fronius_nodejs.service
Jun 30 13:01:11 pi0 servidor.js[22060]: Error: ImportError: No module named requests
Solution - specify path to node :
pi@pi0:~/.config/systemd/user $ cat fronius_nodejs.service
[Unit]
Description=Servei que engega el servidor nodejs del Fronius - v 1.c
Wants=network-online.target
After=network-online.target
[Service]
Type=simple
WorkingDirectory=/home/pi/njs/fronius
ExecStart=/usr/local/bin/node servidor.js
Restart=always
RestartSec=5
StandardOutput=null
StandardError=journal
[Install]
WantedBy=default.target
And call python as needed :
var python_options = { // full documentation and source code
mode: 'text', // https://github.com/extrabacon/python-shell
pythonPath: '/usr/bin/python',
pythonOptions: ['-u'],
scriptPath: '/home/pi/njs/fronius',
args: ['value1', 'value2', 'value3']
} ;
...
PythonShell.run( './3_ramon.py', python_options, function( err, results ) {
Now :
pi@pi0:~/.config/systemd/user $ systemctl --user daemon-reload
pi@pi0:~/.config/systemd/user $ systemctl status --user fronius_nodejs.service
pi@pi0:~/.config/systemd/user $ journalctl -u fronius_nodejs.service
where is console.log now that we run nodejs from system service ?
pi@pi0:~ $ journalctl _PID=407 // find PID using "journalctl" and searching your output
-- Logs begin at Fri 2024-05-17 16:30:06 CEST, end at Mon 2024-05-20 14:42:02 CEST. --
May 20 14:37:41 pi0 node[407]: { PORT: '3000',
May 20 14:37:41 pi0 node[407]: NODE_ENV: 'development',
May 20 14:37:41 pi0 node[407]: API_KEY: '**************************',
May 20 14:37:41 pi0 node[407]: API_URL: '**************************' }
May 20 14:37:41 pi0 node[407]: *** Fronius WebServer [1.0.e] listening on port {3000}, host {pi0} ...
May 20 14:38:46 pi0 node[407]: *** 2024/05/20, 14:38:46 - branch logger - URL (/ts), PATH (/ts).
May 20 14:38:46 pi0 node[407]: *** 2024/05/20, 14:38:46 - >>> GET /ts method
May 20 14:38:46 pi0 node[407]: *** 2024/05/20, 14:38:46 - +++ return {*** 2024/05/20, 14:38:46 ; host (pi0) - port (3000) ; nodejs@R0 Fronius WebServer version [1.0.e] - /home/pi/njs/fronius/servidor.js }.
We can assign an "id" to be used as filter by journalctl :
pi@pi0:~/.config/systemd/user $ cat fronius_nodejs.service
StandardOutput=journal
StandardError=journal
SyslogIdentifier=fronius-nodejs
And the result is (-f means "dont stop") :
pi@pi0:~ $ journalctl -f -t fronius-nodejs
-- Logs begin at Fri 2024-05-17 16:30:06 CEST. --
May 20 17:14:40 pi0 fronius-nodejs[1719]: { PORT: '3000',
May 20 17:14:40 pi0 fronius-nodejs[1719]: NODE_ENV: 'development',
May 20 17:14:40 pi0 fronius-nodejs[1719]: API_KEY: '**************************',
May 20 17:14:40 pi0 fronius-nodejs[1719]: API_URL: '**************************' }
May 20 17:14:40 pi0 fronius-nodejs[1719]: *** Fronius WebServer [1.0.e] listening on port {3000}, host {pi0} ...
May 20 17:15:07 pi0 fronius-nodejs[1719]: *** 2024/05/20, 17:15:07 - branch logger - URL (/ts), PATH (/ts).
May 20 17:15:07 pi0 fronius-nodejs[1719]: *** 2024/05/20, 17:15:07 - >>> GET /ts method
May 20 17:15:07 pi0 fronius-nodejs[1719]: *** 2024/05/20, 17:15:07 - +++ return {*** 2024/05/20, 17:15:07 ; host (pi0) - port (3000) }.
run the service even user logs off
The systemd user instance is started after the first login of a user and killed after the last session of the user is closed.
Sometimes it may be useful to start it right after boot, and keep the systemd user instance running after the last session closes,
for instance to have some user process running without any open session.
Lingering is used to that effect.
pi@pi0:~ $ loginctl enable-linger pi
archlinux
final environment
- Use http://sebas-r0.duckdns.org:2000
but not https : This site can't provide a secure connection
See listen, as
http=require('https'),io=require('socket.io'),fs=require('fs');
var privateKey = fs.readFileSync('ssl/nginx.key');
var certificate = fs.readFileSync('ssl/nginx.crt');
var options = {key: privateKey,cert: certificate};
var server = http.createServer(options);
server.listen(3000);
io = io.listen(server);
- gitlab code
Usual packages
- express - fast, unopinionated, minimalist web framework
- cheerio - tiny, fast, and elegant implementation of core jQuery designed specifically for the server
- superagent - elegant & feature rich browser / node HTTP with a fluent API
SuperAgent
homepage npmjs
SuperAgent is light-weight progressive ajax API
crafted for flexibility, readability, and a low learning curve
after being frustrated with many of the existing request APIs.
It also works with Node.js!
Note that superagent considers 4xx and 5xx responses (as well as unhandled 3xx responses) errors by default.
This status information will be available via err.status.
Errors from such responses also contain an err.response field.
Network failures, timeouts, and other errors that produce no response
will contain no err.status or err.response fields.
Nodes Monitor Server version (v1.1.d) is now (2019/05/21 17:30:30) open for e-business at T60ubuntu:20035
>>> [2019/05/21 17:30:35] call SuperAgent with IP http://10.139.130.72
--- superagent() non-acceptable response, err Response timeout of 3000ms exceeded
>>> [2019/05/21 17:30:40] call SuperAgent with IP http://10.139.130.99
--- superagent() non-acceptable response, err self signed certificate
>>> [2019/05/21 17:31:00] call SuperAgent with IP http://10.139.130.113
+++ superagent() acceptable response. IP (http://10.139.130.113). Error message (Not Found), status (404).
>>> [2019/05/21 17:31:26] call SuperAgent with IP http://10.139.130.131
--- superagent() non-acceptable response, err connect ENETUNREACH 10.139.130.131:80
>>> [2019/05/21 17:31:56] call SuperAgent with IP http://10.139.238.77
+++ superagent() acceptable response. IP (http://10.139.238.77). Error message (Unauthorized), status (401).
url
See code sample at /home/nicolau/sebas/pere/njs/query_btc.js by "Lo Pere"
Cheerio
homepage
- Cheerio implements a subset of core jQuery.
- Cheerio removes all the DOM inconsistencies and browser cruft from the jQuery library, revealing its truly gorgeous API.
- Cheerio wraps around @FB55's forgiving htmlparser2.
- Cheerio can parse nearly any HTML or XML document
See code sample at /home/nicolau/sebas/pere/njs/query_btc.js by "Lo Pere"
EJS and Jade
Ara que ja li vas agafant el truquillo, et recomano que li facis un cop d'ull
a algunes eines que faciliten la creació i manteniment de les aplicacions nodejs,
creant per a tu un full stack de serveis.
La que em va semblar més complerta és mean.js de mean.io
També, per la part de continguts estàtics, és interessant fer-li una ullada a harp.js,
un generador basat en nodejs, que té una gran colecció de boilerplates disponibles.
EJS & Express,
app sample
first EJS
- express foobar
- cd foobar
- npm install
- npm install ejs --save {adds ejs to our package.json}
{
"name": "foobar",
"version": "0.0.1",
"private": true,
"dependencies": {
"express": "~2.5.8",
"ejs": "~0.7.1"
}
}
- express --ejs
MEAN demo
Juntem Express amb Eclipse !
ibm.com [***, AngularJS]
mongoDB
MongoDB is an open-source document database, and the leading NoSQL database.
MongoDB is a document-oriented database designed for ease of development and scaling.
MongoDB's ability to store JavaScript objects natively saves time and processing power.
Instead of a domain-specific language like SQL,
MongoDB utilizes a simple JavaScript interface for querying.
Looking up a document is as simple as passing a JavaScript object
that partially describes the search target.
homepage,
index,
coll.find(),
collections;
basic intro {***}
Basic
operations tutorial [****]
GUI tools for mongoDB :
mongoVUE
Mongo DB and Collections
Collections are the equivalent of tables in traditional databases and contain all your documents.
A database can have many collections.
CRUD
The Mongo DB wire protocol is built around 4 main operations :
CRUD
stands for Create, Read, Update, and Delete.
Get this
ePub,
PDF
monk
An unobtrusive data modeling, manipulation and validation library.
doc
JS + monk
complete sample(s)
get data from mongo into node.js
Build HTML code on the flight :
url [****]
apptest
Prepare directories and few files :
\\T430\\JavaScript> c:\node_modules\.bin\express --sessions apptest
Update package.json:
{
"name": "application-name",
"version": "0.0.1",
"private": true,
"scripts": {
"start": "node app.js"
},
"dependencies": {
"express": "3.4.8",
"jade": "*",
"mongodb": "*",
"mongoskin": "*"
}
}
Install dependencies into
c:\sebas\JavaScript\apptest> npm install
npm http GET https://registry.npmjs.org/jade
npm http GET https://registry.npmjs.org/express/3.4.8
npm http GET https://registry.npmjs.org/monk
npm http GET https://registry.npmjs.org/mongodb
npm http 200 https://registry.npmjs.org/express/3.4.8
npm http GET https://registry.npmjs.org/express/-/express-3.4.8.tgz
Create "data" directory under "apptest" dir and start mongod:
[W500] c:\eines\soft\mongo\bin\mongod.exe --rest --dbpath c:\Sebas\javascript\apptest\data
[T430] c:\mongodb\bin\mongod.exe --rest --dbpath c:\sebas\JavaScript\apptest\data
Verify connectivity and create initial data :
T430\\c:\> c:\mongodb\bin\mongo.exe
MongoDB shell version: 2.4.6
connecting to: test
> use apptest
switched to db apptest
> db.usercollection.insert({ "username" : "testuser1", "email" : "testuser1@testdomain.com" })
> db.usercollection.find().pretty()
{
"_id" : ObjectId("52f367b3994d19ad3f0c7603"),
"username" : "testuser1",
"email" : "testuser1@testdomain.com"
}
> newstuff = [{ "username" : "testuser2", "email" : "testuser2@testdomain.com" }, { "username" : "testuser3", "email" :
... "testuser3@testdomain.com" }]
[
{
"username" : "testuser2",
"email" : "testuser2@testdomain.com"
},
{
"username" : "testuser3",
"email" : "testuser3@testdomain.com"
}
]
> db.usercollection.insert(newstuff);
> db.usercollection.find().pretty()
{
"_id" : ObjectId("52f367b3994d19ad3f0c7603"),
"username" : "testuser1",
"email" : "testuser1@testdomain.com"
}
{
"_id" : ObjectId("52f367fb994d19ad3f0c7604"),
"username" : "testuser2",
"email" : "testuser2@testdomain.com"
}
{
"_id" : ObjectId("52f367fb994d19ad3f0c7605"),
"username" : "testuser3",
"email" : "testuser3@testdomain.com"
}
>
Start our application node and open browser :
url,
url
DB access
// Retrieve
var MongoClient = require('mongodb').MongoClient ;
// Connect to the db
MongoClient.connect ( "mongodb://localhost:27017/exampleDb", function ( err, db ) {
if ( ! err ) {
console.log ( "+++ We are connected" ) ;
} ; // no error
} ) ; // connect()
url
var MongoClient = require('mongodb').MongoClient, format = require('util').format;
MongoClient.connect ( 'mongodb://127.0.0.1:27017/test', function ( err, db ) {
if ( err ) throw err ;
var collection = db.collection ( 'test_insert' ) ; // select collection
collection.insert ( { a : 2 }, function ( err, docs ) { // do insert()
collection.count ( function( err, count ) {
console.log(format("count = %s", count));
} ) ; // count()
// Locate all the entries using find
collection.find().toArray( function( err, results ) {
console.dir ( results ) ; //
// Let's close the db
db.close () ;
} ) ; // find()
} ) ; // insert()
} ) ; // connect()
url
start MongoDB cmd
Enable REST interface (be aware of security implications).
With no support for insert, update, or remove operations,
it is generally used for monitoring, alert scripts, and administrative tasks
c:\sebas\JavaScript\apptest> type $_start_mongo_for_APP.cmd
start "MongoDB for APP demo" c:\mongodb\bin\mongod.exe --rest --dbpath c:\sebas\JavaScript\apptest\data
Complete
samples, using mongoose :
(full REST capabilities)
Mongoose provides a straight-forward, schema-based solution
to modeling your application data
and includes built-in type casting, validation, query building, business logic hooks and more
use MongoDB from command line
$ mongo ; start command line
> show dbs ; display database's
> use <nom> ; now we can use "db."
> db.getName() ; display actual ddbb name
> show collections ; display tables/collections
> db.<tblname>.find() ; display elements in table
> db.<tblname>.drop() ; delete table/collection
> db.dropDatabase() ; delete database, no "db." anymore
> db.<tblname>.count() ; display number of elements in table
MongoDB admin interface
MongoDB provides a simple http interface listing information of interest to administrators.
This interface may be accessed at the port with a numeric value 1000 more than the configured mongod port.
The default port for the http interface is 28017.
To access the http interface an administrator may, for example, point a browser to
http://localhost:28017
Mongod start error
exception in initAndListen: 12596 old lock file, terminating
Goto \data\db\mongod.lock, and run mongod --repair
use MongoDB from REST / curl
HTTP interfaces,
documents API
http://127.0.0.1:28017/databaseName/collectionName/ ; get contents of a collection - note trailing slash - http://127.0.0.1:28017/winedb/wines/
http://host:port/db/$cmd/?filter_count=collection&limit=1 ; count documents in a collection
curl -i -X GET http://localhost:3000/wines
curl -i -X POST -H "Content-Type: application/json" -d @fitxer.txt %MYURL% + "fitxer.txt" has {"name": "Nou vi 2010", "year": "2010"}
curl -i -X DELETE http://localhost:3000/wines/%2%
Complete wine
sample
- Get all wines:
curl -i -X GET http://localhost:3000/wines
- Get wine with _id value of 5069b47aa892630aae000007 (use a value that exists in your database):
curl -i -X GET http://localhost:3000/wines/5069b47aa892630aae000007
- Delete wine with _id value of 5069b47aa892630aae000007:
curl -i -X DELETE http://localhost:3000/wines/5069b47aa892630aae000007
- Add a new wine:
curl -i -X POST -H 'Content-Type: application/json' -d '{"name": "New Wine", "year": "2009"}' http://localhost:3000/wines
curl -i -X POST -H "Content-Type: application/json" -d @fitxer.txt http://localhost:3000/wines
- Modify wine with _id value of 5069b47aa892630aae000007:
curl -i -X PUT -H 'Content-Type: application/json' -d '{"name": "New Wine", "year": "2010"}' http://localhost:3000/wines/5069b47aa892630aae000007
curl -i -X PUT -H "Content-Type: application/json" -d @fitxer_modificar.txt http://localhost:3000/wines/5069b47aa892630aae000007
A complete CMD:
c:\Sebas\javascript\vinatxo> type $_use_CURL.cmd
@echo off
set MYURL=http://localhost:3000/wines
if .%1%. == .A. goto afegir
if .%1%. == .E. goto esborrar
if .%1%. == .L. goto llistar
if .%1%. == .l. goto llistarUN
goto ajuda
:afegir
curl -i -X POST -H "Content-Type: application/json" -d @fitxer.txt %MYURL%
:: curl -i -X POST -H "Content-Type: application/json" -d '{ "name": "Nou vi", "year": "2009" }' %MYURL%
goto final
:esborrar
if .%2%. == .. goto esborrarerror
curl -i -X DELETE http://localhost:3000/wines/%2%
goto final
:esborrarerror
echo error : falta el ID del vi
goto final
:llistar
echo equal to http://localhost:3000/wines
curl -i -X GET http://localhost:3000/wines
goto final
:llistarUN
if .%2%. == .. goto llistarUNerror
curl -i -X GET http://localhost:3000/wines/%2%
goto final
:llistarUNerror
echo error : falta el ID del vi
goto final
:ajuda
echo Comandes implementades :
echo A = afegir un vi - cal NAME i YEAR - posar a FITXER.TXT
echo E = esborrar un vi - cal ID
echo L = llistar tots els vins
echo l = llistar un vi especific (param 2 = mongoDB id)
:final
echo Bye, MongoDB user ...
On el fitxer conté:
H:\nodejs\vinatxo> type fitxer.txt
{"name": "Nou vi 2010", "year": "2010"}
Basic BBDD access
BBDD display / consulta / alta / baixa.
En anglès
CRUD : create, read, update and delete.
- {get, consulta} pagina amb un boto que, quan el pico, va a la base de dades de "tenistes coneguts" i me'ls llista tots
- {get, consulta} pàgina que hi poso un nom i pico un boto i em diu si el senyor es tenista conegut o no
- {post, insert/put, update} pagina que hi poso un nom i pico un boto, i em posa el tenista a la base de dades, si no hi era. Si hi era, m'avisa i el modifica
- {delete, remove} pagina que hi poso un nom i pico un boto, i m'esborra el tenis de la base de dades, si hi era
Reservas : a complete application
Falta un modul que no es meu:
c:\> node server
module.js:340
throw err;
^
Error: Cannot find module 'express'
at Function.Module._resolveFilename (module.js:338:15)
express es el FrameWork per desenvolupar amb JavaScript al servidor
Solució :
c:\> npm link express
npm http GET https://registry.npmjs.org/express
npm http 200 https://registry.npmjs.org/express
npm http GET https://registry.npmjs.org/express/-/express-3.4.0.tgz
npm http 200 https://registry.npmjs.org/express/-/express-3.4.0.tgz
npm http GET https://registry.npmjs.org/connect/2.9.0
. . .
npm http 200 https://registry.npmjs.org/readable-stream/-/readable-stream-1.0.17.tgz
express@3.4.0 ..\..\..\..\..\Users\IBM_ADMIN\AppData\Roaming\npm\node_modules\express
??? methods@0.0.1
??? range-parser@0.0.4
??? buffer-crc32@0.2.1
??? cookie-signature@1.0.1
??? fresh@0.2.0
??? cookie@0.1.0
??? debug@0.7.2
??? mkdirp@0.3.5
??? commander@1.2.0 (keypress@0.1.0)
??? send@0.1.4 (mime@1.2.11)
??? connect@2.9.0 (uid2@0.0.2, qs@0.6.5, bytes@0.2.0, pause@0.0.1, multiparty@2.1.8)
c:\sebas\MisCosas\Pere\Reserves\v_01\node_modules\express -> ..\..\..\..\..\Users\IBM_ADMIN\AppData\Roaming\npm\node_modules\express ->
C:\Users\IBM_ADMIN\AppData\Roaming\npm\node_modules\express
I tampoc veu els meus moduls :
c:\> node server
module.js:340
throw err;
^
Error: Cannot find module 'pastrings'
at Function.Module._resolveFilename (module.js:338:15)
Solució:
set NODE_PATH=d:\src\mymods
c:\> echo %node_path%
c:\MisCosas\Pere\Reserves\v_01
C:\Users\bisc\AppData\Roaming\npm\node_modules
See "npm ls" to find where modules are installed !
Omplim la base de dades
c:\> node loadreservas
Collection has 100 items
First item: {"when":"2013-09-20T08:53:54.280Z","resource":"Pista4","user":"Fuapebeeqisecehok","start":"2013-09-19T22:00:
00.000Z","comments":"Depeperaeyetu g a aromecilaqafu mexoinejoserukasefeyam afesefi otis ecalaejim oefapusuqagamelaye do
feteaii nadayer e motirahi, diga s.","_id":"523c0d22d60e104810000001"}
I verifiquem el seu contingut
c:\> C:\mongodb\bin\mongo reservas
MongoDB shell version: 2.4.6
connecting to: reservas
> db.reservas.find()
{ "when" : ISODate("2013-09-20T08:53:54.280Z"), "resource" : "Pista4", "user" : "Fuapebeeqisecehok", "start" : ISODate("
2013-09-19T22:00:00Z"), "comments" : "Depeperaeyetu g a aromecilaqafu mexoinejoserukasefeyam afesefi otis ecalaejim oefa
pusuqagamelaye do feteaii nadayer e motirahi, diga s.", "_id" : ObjectId("523c0d22d60e104810000001") }
Sembla que tot va be ...
web page templates
www.freewebsitetemplates.com,
OSWD
T'aconsello que usis un framework, com ara el
Bootstrap de twitter.
Té molts
exemples fets,
i és potent i molt
customitzable.
Despres, mira't themes ja fets, i gratuits, a
bootswatch.com
o, inclús, comprar-ne de més guais a
wrapbootstrap.com
Compte : bootstrap requires bower, and bower requires npm (included in node.js) and also git.
So, we can do "npm install -g bower" and then "bower install bootstrap"
Run It !
Koltrane or 201
Start Mongo DataBase we shall use :
c:\sebas\JavaScript\vinatxo> type $_start_mongo_for_VINATXO.cmd
start "MongoDB for VINATXO demo" c:\mongodb\bin\mongod.exe --rest --dbpath c:\sebas\JavaScript\vinatxo\data
Or, with more elegance, using:
c:\Sebas\javascript\vinatxo> type $_start_mongo_for_VINA"TX"O.cmd
start "MongoDB for VINATXO demo" c:\mongodb\bin\mongod.exe --rest --config c:\Sebas\javascript\vinatxo\mongod.cfg
where
c:\Sebas\javascript\vinatxo> type mongod.cfg
smallfiles=true
logpath=c:\mongodb\log\mongo.log
dbpath=c:\sebas\JavaScript\vinatxo\data
DDBB design
una_reserva = record
data_que_es_reserva : t_data ; // clau d'entrada al mongo
hora_que es reserva : t_hora ; // scan vertical
pista_que_es_reserva : t_num_pista ; // scan horitzontal
jugadors_que_jugaran : t_2_noms ; // dades per la celda
persona_que_fa_la_reserva : t_nom ;
data_que_es_fa_la_reserva : t_data ;
end ;
HTML design
.------------.--------.--------.--------.
| 28/11/2014 | P3 | P4 | P5 |
.------------.--------.--------.--------.
9 | | | |
10 | | | |
-----.--------.--------.--------.
10 | | | |
11 | | | |
-----.--------.--------.--------.
11 | | | |
12 | | | |
-----.--------.--------.--------.
Navigating around a document
En Pere és el meu mestre !
HTML
<table id="calendar">
<thead>
<tr> <td>d1</td> <td>d2</td> <td>d3</td> </tr>
</thead>
<tbody>
<tr> <td>f1.c1</td> <td>f1.c2</td> <td>f1.c3</td> </tr>
<tr> <td>2.1</td> <td>2.2</td> <td>2.3</td> </tr>
<tr> <td>3.1</td> <td>f3.c2</td> <td>3.3</td> </tr>
</tbody>
</table>
CSS
body { width:900px; margin: 0 auto; }
table { min-width:800px; margin-top:40px; }
td { min-width:250px }
JS
$( '#calendar > tbody > tr' ).each( function(i){ // for each row
$(this).find('td').each( function(j){ // scan all columns
var $thistd = $(this);
$thistd.prepend( 'Irow', i, '.Jtd', j, ' -- ' ) ; // add text to cell
if ( ( i==1 ) && ( j==2 ) ) { // OJO index comença a 0 (javascript-style)
$thistd
.css( 'font-weight', 'bold' )
.css( 'color', '#36c' )
.append( '# sebas aquí' ) ; // 2rd row, 3rd column
} // if
}) // each function (j)
}); // each( function (i)
$( '#calendar > tbody > tr:nth-child(3) > td:nth-child(2)' ) // OJO index comença a 1 (CSS-tyle)
.css( 'font-weight', 'bold' )
.css( 'color', '#c63' )
.append( '# i aquí en Pere' ) ; // 3rd row, 2nd column
A
codepen pots modificar el codi i veure'n el resultat.
Mostrar un link o no
if ( usertype=="admin" ) {
$( ".siusuari" ).removeClass( "amagat" )
} else {
$( ".siusuari" ).addClass( "amagat" )
}
Però m'agrada molt més
$sisuaris.toggleClass("amagat",!(usertype=="admin));
Basic client / server
Enter a url as
http://127.0.0.1:1337/abc?xxx=aaa&bbb=yyy
into a client browser and "aaa" and "yyy" come back in UPPER case !
Client, INDEX.HTML
<!doctype html>
<html>
<head>
<script src="https://code.jquery.com/jquery-2.1.1.min.js"></script> // see
https://code.jquery.com/
<style type="text/css">
.st1 {
background: #FF0000 ;
}
body {
font-family: sans-serif;
}
</style>
</head>
<body>
<hr>
<p> Hello!
<hr>
<form id="myFormReqDades1Soci">
<label for="firstName">First Name: </label><input type="text" autofocus name="firstName" /><br/>
<label for="lastName"> Last Name: </label><input type="text" name="lastName" /><br/>
<input type="submit"> // The input element with a type attribute wh"ose value is "submit" represents a button for submitting a form.
</form>
<hr>
<p>
Response:<br/">
First Name: <span class="st1" id="resp-firstName"> </span><br/>
Last Name: <span class="st1" id="resp-lastName"> </span><br/>
<hr>
<script>
$( "#myFormReqDades1Soci" ).submit( function() {
$.get("/?" + $(this).serialize(), function(data) { // produces a msg as "GET /?firstName=aaa&lastName=ccc"
console.log(">>> Server response: ", data);
$("#resp-firstName").html(data.firstName);
$("#resp-lastName").html(data.lastName);
});
return false;
});
</script>
</body>
</html> // dins el tag HTML nomes hi pot anar el HEADER i el BODY
Server, SVR.JS
var http = require('http');
var url = require('url');
var fs = require('fs');
http.createServer( function (req, res) {
if (/\/$/.test(req.url)) {
console.log( 'Sending INDEX.HTML.' );
respondFile(res, "index.html");
} else {
// console.log( 'Request: ', req ); // quite LARGE !
var outObj = computeResponse(req);
respondJson(res, outObj);
}
}).listen( 1337, '127.0.0.1' ) ;
console.log('Server running at http://127.0.0.1:1337/');
function computeResponse(req) {
var params = url.parse(req.url, true).query;
console.log( 'Params: ', params );
for (var param in params)
if (params.hasOwnProperty(param))
params[param] = params[param].toUpperCase();
return params;
}
function respondJson(res, obj) {
console.log('Response: ', obj);
res.writeHead(200, { 'Content-Type': 'application/json' });
return res.end(JSON.stringify(obj));
}
function respondFile(res, fname) {
res.writeHead(200, {'Content-Type': 'text/html'});
fs.readFile(fname, function(err, data) {
res.end(data);
});
}
Gracias, Luís !
APP "llista de la compra"
Client - APP al mobil
Servidor - un Linux
BBDD -
Firebase o
sqlite
docs
(wiki),
node sqlite 3
Estic pensant que al client puc fer servir un browser llavors el servidor pot ser NODE.
Operacions
- veure que cal comprar
- afegir un element a la llista
- esborrar un element de la llista
Totes les operacions es poden fer des un Browser
TCP/IP
Ping
How to ping from JS:
Uptime monitor
url
Telnet
Can I run a Telnet client from JavaScript ?
jsTerm is an HTML5 implementation of a Telnet client.
You'll need a browser that supports HTML5 WebSockets.
WebSockets is the only method of doing non-HTTP requests with pure JavaScript
sftp from nodeJS
node-sftp
sftptogo (basic code),
npmjs package
Install :
pi@pi0:~/njs/fronius $ npm install --save ssh2-sftp-client@^8.0.0
+ ssh2-sftp-client@8.1.0
Code :
pi@pi0:~/njs/fronius/proves $ cat 4_sftp.js
// 4_sftp.js
//
// source : https://sftptogo.com/blog/node-sftp/
//
// connect to your SFTP server and run some file operations using Node.js
//
// run : node 4_sftp.js
let Client = require('ssh2-sftp-client') ; // npm install --save ssh2-sftp-client
let remoteFN = '/home/pi/python/pkw/dades/potencies/csv/pot_CSV_2024_03_10.csv'
class SFTPClient {
constructor() {
this.client = new Client();
}
...
}
(async () => {
const port = 22;
const host = 'r4';
const username = 'pi';
const password = 'clau.de.pas';
var szCWD = '';
//* Open the connection
const client = new SFTPClient();
await client.connect({ host, port, username, password });
//* Download remote file to local file
await client.downloadFile( remoteFN, "./download_sftp.txt");
//* Close the connection
await client.disconnect();
})();
Run :
pi@pi0:~/njs/fronius/proves $ node 4_sftp.js
Connecting to r4:22
Display CWD
actual CWD is /home/pi
Downloading /home/pi/python/pkw/dades/potencies/csv/pot_CSV_2024_03_10.csv to ./download.txt ...
scp from nodeJS
Install :
pi@pi0:~ $ npm install --save node-scp
+ node-scp@0.0.23
added 9 packages from 17 contributors and audited 68 packages in 151.836s
found 1 moderate severity vulnerability
run `npm audit fix` to fix them, or `npm audit` for details
pi@pi0:~/njs/fronius $ cat package.json
{
"name": "fronius",
"version": "1.0.0",
"dependencies": {
"dotenv": "^16.0.1",
"express": "4.18.1",
"node-scp": "0.0.23",
"python-shell": "^3.0.1"
},
Code the file transfer for NJS :
// with commonJS
const { Client } = require('node-scp')
// with ES Module
import { Client } from 'node-scp'
Client({
host: 'your host',
port: 22,
username: 'username',
password: 'password',
// privateKey: fs.readFileSync('./key.pem'),
// passphrase: 'your key passphrase',
}).then(client => {
client.downloadFile(
'/workspace/test.txt',
'./test.txt',
// options?: TransferOptions
)
.then(response => {
client.close() // remember to close connection after you finish
})
.catch(error => {})
}).catch(e => console.log(e))
node-scp uses Promise
(1) El client ha de estructurar-se millor : use promises
(2) Que passa si hi ha timeout ?
scp via async by Pere
async function longname_veure_scp(filename, remotepath) {
let remoteFQFN = remotepath + '/' + filename;
try {
let client = await Client({
host: 'r4', // host remot
port: 22,
username: 'pi', // usuari remot
password: 'pwdpwd', // clau de pas remota
});
let result = await client.exists(remoteFQFN);
return result;
} catch (e) {
return null;
}
}
As ES6 modules ...
pi@pi0:~/njs/fronius $ sudo npm install -g npm
pi@pi0:~/njs/fronius/proves $ cat package.json
{
"name": "fronius",
"type": "module",
Code :
export async function longname_veure_scp(filename, remotepath) {
i
import { longname_veure_scp } from ('./scp_from_remote.js');
Run as ...
node --experimental-modules my-app.mjs
scp second style
chilkatsoft
git
Per mantenir el codi en un repositori fem servir git.
Tenir una codebase única és una gran idea.
Mantenir-la amb un sistema de control de versions, és obligat.
Tenir-ne un backup és indispensable per seguretat.
Posar-la en un servidor al núvol, millora la seva disponibilitat.
Read its
documentation,
com funciona,
diferents maneres de treballar,
best practices (gracies, Pere),
Git Pro book
From "git" command :
- 1. Git User’s Manual : file:///usr/share/doc/git/html/user-manual.html
- 2. Git concepts chapter of the user-manual : file:///usr/share/doc/git/html/user-manual.html#git-concepts
- 3. howto : file:///usr/share/doc/git/html/howto-index.html
- 4. Git API documentation : file:///usr/share/doc/git/html/technical/api-index.html
Cheat
sheet,
(visual)
Git Pro book,
500
pg
A Giondous tenim
Git for Windows, amb un Git Bash molt interessant.
Fer-lo servir en mode basic i grafic amb
git gui or gitk.
Resum d'en
Lluis.
En resum, tenim un repositori en la màquina local i després podem tenir diversos repositoris remots:
- github
- repositori propi en un servidor local
- usb
git concepts
|
git data transport commands
|
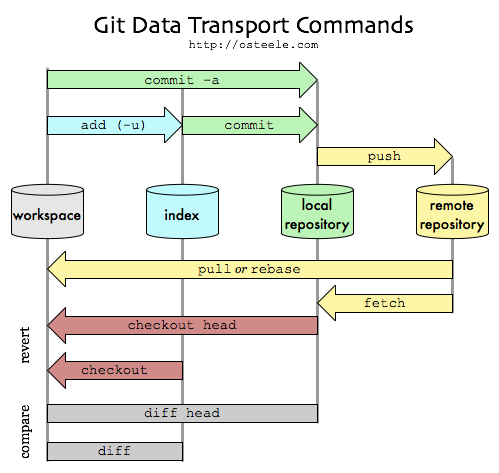
|
working directory . staging area . local repository . remote repository
.
--- git add ---> --- git commit ---> ---- git push ----->
<--- --- --- --- --- --- --- --- --- --- --- --- --- --- --- ---- git pull ---
<--- --- --- -- git checkout -- --- --- --- <---- git fetch ----
|
All you have to do is "cd" into your project folder and run git init, and you'll have a fully functional Git repository.
However, for most projects, git init only needs to be executed once to create a central repository.
Developers typically don't use git init to create their local repositories.
Instead, they'll usually use git clone to copy an existing repository onto their local machine,
creating the (new) local directory.
"git init --bare" sólo es necesario cuando creas un repositorio remoto en una máquina que es tuya.
En el caso de github, ya lo hacen ellos "por dentro".
Think of --bare as a way to mark a repository as a storage facility, opposed to a development environment.
Shared repositories should always be created with the --bare flag.
Conventionally, repositories initialized with the --bare flag end in .git.
git configuration
The git config command lets you configure your Git installation (or an individual repository) from the command line.
This command can define everything from user info to preferences to the behavior of a repository.
Git stores configuration options in three separate files, which lets you scope options to individual repositories, users, or the entire system:
url
- System level, system-wide settings :
- file : $(prefix)/etc/gitconfig
- view : git config --list --system
- set : git config --system color.ui true
- edit config file : git config --edit --system
- Global level, user-specific settings :
- file : ~/.gitconfig
- view : git config --list --global
- set : git config --global user.name xyz
- edit config file : git config --edit --global
- Repository-specific settings :
- file : <repo>/.git/config
- view : git config --list --local
- set : git config --local core.ignorecase true (--local is optional)
- edit config file : git config --edit --local {--local is optional}
When options in these files conflict, local settings override user settings, which override system-wide.
My git configuration
$ git config --global core.editor "vim" ; set VIM as editor for GIT, not EMACS
url
$ git config --global --edit
$ git commit --amend --reset-author
$ git config --global user.name "ramonet" ; set git user
url :
1) git config credential.helper store ; ... start "save usr/pwd forever"
2) git push -u origin master ; ... asks u/p and stores in ~/.git-credentials
$ git config --list
$ git remote -v ; verify your remote URL
$ git pull ; get some file from github
$ git commit -am "v 1 - inici" ; commit local changes
$ git push -u github master ; send changes to github
$ git remote show origin ;
$ git pull origin master --allow-unrelated-histories ; fatal
error
git commands intro
The git clone command copies from an existing Git repository into a new directory.
As a convenience, cloning automatically creates a remote connection called origin pointing back to the original repository.
You can display all your remote connections using git remote -v
The git add command adds a change in the working directory to the staging area.
It tells Git that you want to include updates to a particular file in the next commit.
The staging area is a buffer between the working directory and the project history.
Each developer's local repository is a buffer between their contributions and the central repository.
The git rm removes one file from the index and the working tree
The git commit command commits the staged snapshot to the project history.
The git status command displays the state of the working directory and the staging area.
It will list which files are staged, unstaged, and untracked.
The git log command displays committed snapshots.
It only operates on the committed history.
The git help command has plenty of info.
git help push opens a browser with info related to "push".
old versions
You can manage them using one of those ways:
- use gitk to explore history {launch from git bash}, while you use git gui for commits, pushes, etc
- use "git hub" (or "git blit", minimal github)
- use git log to see the history and then "git checkout <hash> -- <:filename>" - mind detached head problem
Use to restore a complete old version
git install - SLES 11 - SDK
From
source
From SDK :
- once
downloaded, mount the first DVD. (make sure it is for the correct architecture)
- load up YaST and go to Software->Add-on products
- select 'Add' and continue the installation by selecting the installation source, accepting the license, etc
- repeat for DVD2, unless DVD1 had everything you needed
git setup
To
set it up, we do
- set the server (RH)
- $ sudo adduser git
- $ su git
- $ mkdir reserves.git
- $ cd reserves.git
- $ git init --bare ; create an empty repository (.git subdirectory in the project root)
- fill it from source
- c:\pere\reserves> git init ; set up neccessary Git files
- c:\pere\reserves> git add . ; add to the list of files in staging area
- c:\pere\reserves> git commit 'initial commit' ; commit your files
- c:\pere\reserves> git remote add git-sebas git@rhv6:/home/git/reserves.git ; create a remote named "git-sebas" pointing at repository
- c:\pere\reserves> git push git-sebas master ; send your commits in the "master" branch to git-sebas
- modify from any place
- c:\sebas> git clone git@rhv6:/home/git/reserves.git (once in lifetime, creates new directory)
- c:\sebas> cd reserves
- c:\sebas\reserves> git pull (every day)
- c:\sebas\reserves> vi README
- c:\sebas\reserves> git status
- c:\sebas\reserves> git commit -am "README fix"
- c:\sebas\reserves> git push (origin master)
github
My
wCDT code is now located at
github, in sync with
SourceForge.
Dont use Google Code yet.
Also Delphi MQ
units
and
API access sample
To share just some lines of code, there is gist !
Other users o'mine are :
How to use it :
- at the producer :
\\JavaScript\simple_web_server> type GIT_posa_a_github.cmd
rem --- git remote remove github
rem --- git remote add github https://<user>:<pwd>@github.com/sebastianet/wCDT.git
git remote -v ; verify your remote URL
git push -u github master
- at the consumer :
c:\js> git clone https://github.com/sebastianet/wCDT // create new directory
Cloning into 'wCDT'...
remote: Counting objects: 108, done.
remote: Compressing objects: 100% (60/60), done.
Receiving objects: 100% (108/108), 34.77 KiB | 0 bytes/s, done.
Resolving deltas: 100% (49/49), done.
Checking connectivity... done.
Next time, we do :
c:\js> cd wCDT
c:\Sebas\JavaScript\simple_web_server>
git remote -v
origin https://github.com/sebastianet/wCDT (fetch)
origin https://github.com/sebastianet/wCDT (push)
c:\Sebas\JavaScript\simple_web_server>
git pull origin master
remote: Counting objects: 37, done.
remote: Compressing objects: 100% (20/20), done.
remote: Total 37 (delta 30), reused 23 (delta 16)
Unpacking objects: 100% (37/37), done.
From https://github.com/sebastianet/wCDT {https://github.com/palbcn/wCDT}
* branch master -> FETCH_HEAD
7f7dbe4..265fc95 master -> origin/master
Updating 7f7dbe4..265fc95
Fast-forward
my_server.js | 23 +++--
public/client.js | 284 +++++++++++++++++++++++++++++++++++++++++++++++++++
public/consulta.htm | 115 +--------------------
public/css/sebas.css | 11 +-
public/help.htm | 60 +----------
public/index.htm | 82 ++-------------
public/links.htm | 2 +-
public/logon.htm | 31 +-----
public/reserva.htm | 34 +-----
welcome.sag | 8 +-
10 files changed, 339 insertions(+), 311 deletions(-)
npm install
gulp
git clone mygit
és igual a
git init
git remote add origin mygit
git fetch --all
git pull origin master
On "mygit" vol ser "sebastianet@github.com/sebastianet/wCDT.git"
git credentials store - dont provide password anymore
If we want to store our credentials (as plain text) in "~/.git-credentials"
we can do :
pi@odin:~/timer $ git config credential.helper store
pi@odin:~/timer $ git push https://github.com/sebastianet/timer
Username for 'https://github.com': sebastianet
Password for 'https://sebastianet@github.com':
Everything up-to-date
Add an existing project to github
- create a new repository on GitHub
- open Git Bash - do we need this on Linux ?
- change current directory to your local project
- initialize the local directory as a Git repository : "$ git init"
- add the files in your new local repository : "$ git add ."
- commit the staged files : "$ git commit -am 'v 1.0 - first commit' "
- at the top of your GitHub repository's Quick Setup page, click "copy icon" to copy the remote repository URL
- in the Command Prompt, add the URL for the remote repository where your local repository will be pushed :
$ git remote add origin <remote repository URL> # sets the new remote
$ git remote -v # verifies the new remote URL
- push the changes in your local repository to GitHub : "git push origin master"
url
git colaborator
- select repository, as
pere-delphi-AvailabilityDisplay
- click "Settings" at right bottom
- click "Collaborators" al top left
- enter collaborator name/nick
gitlab
GitHub is uSoft, GitLab is free, I am told.
I get "free Ultimate" for 3 months, then it will revert to "Free" :
comparison
import from github to gitlab
- from the top navigation bar, select + and select New project.
- select the "Import project" tab and then select GitHub.
- select the first button to List your GitHub repositories. You are redirected to a page on GitHub to authorize the GitLab application.
- select Authorize GitlabHQ. You are redirected back to the GitLab Import page and all of your GitHub repositories are listed.
- continue on to selecting which repositories to import.
import status
git commands
Use "git --help"
- git add server/lib : this directory is also under git control
- git add . : add all file(s)
- git commit -a -m "fita important : dibuixo taula HTML i rebo dades" : -a means "stage all files", -m means "message"
- git config --global --add user.name sebas
- git config --global --add user.email sebas@gmail.com
- git config --list = list
- git config --list --global = list global
- git gui : engega un client GUI
- git init
- git log --since=5.days (2.weeks)
- git rm fileone.txt - remove this file from index and working tree
- git show-ref
- git status
c:\sebas\JavaScript\pere\reservas\reserves> git config --list
core.symlinks=false
core.autocrlf=true
color.diff=auto
color.status=auto
color.branch=auto
color.interactive=true
pack.packsizelimit=2g
help.format=html
http.sslcainfo=/bin/curl-ca-bundle.crt
sendemail.smtpserver=/bin/msmtp.exe
diff.astextplain.textconv=astextplain
rebase.autosquash=true
user.email=sebastiasebas@gmail.com
user.name=sebas
core.repositoryformatversion=0
core.filemode=false
core.bare=false
core.logallrefupdates=true
core.symlinks=false
core.ignorecase=true
core.hidedotfiles=dotGitOnly
remote.origin.url=git@rhv6.bar.es.ibm.com:/home/git/reserves.git
remote.origin.fetch=+refs/heads/*:refs/remotes/origin/*
branch.master.remote=origin
branch.master.merge=refs/heads/master
.gitignore file
Son els fitxers/directoris que no van al repositori : modules, dades del Mongo ...
git will automatically commit and push all files in a repo up unless you tell it to “ignore” them.
The exception to this is the .git folder which is automatically ignored.
.gitignore will only ignore files that you haven't already added to your repository.
If you did a git add ., and the file got added to the index, .gitignore won't help you.
You'll need to do
- git rm -r --cached node_modules
- git rm sites/default/settings.php
Finally, do "$ git add .gitignore", so this file is tracked by git
List tracked files :
sebas@minie:~/Arduino/esp32-ttgo/btc$
git ls-files #
doc
.gitignore
README.md
btc.ino
git administration
Git Blit : open-source, pure Java stack for managing, viewing, and serving Git repositories.
Gitblit requires a Java 6 Runtime Environment (JRE) or a Java 6 Development Kit (JDK).
- download and unzip
- edit data/gitblit.properties and set server.httpsBindInterface to blank (remove localhost)
- execute gitblit.sh
- open https://9.137.164.32:8443 (mind httpS)
- user admin
git as service
We run
[root@rhv6-64b gitblit]# ./install-service-centos.sh
[root@rhv6-64b gitblit]#
Edit /etc/rc.local to include
/etc/init.d/gitblit start
Then restart the server and have
[root@rhv6-64b gitblit]# ps -ef | grep git
sebas 19152 17624 0 Mar03 pts/1 00:00:00 /bin/bash ./gitblit.sh
sebas 19153 19152 0 Mar03 pts/1 00:00:27 java -jar gitblit.jar --baseFolder data
root 2038 1 11 11:26 pts/0 00:00:03 java -server -Xmx1024M -Djava.awt.headless=true -jar /home/sebas/eines/gitblit/gitblit.jar
--httpsPort 8443 --httpPort 0
--baseFolder /home/sebas/eines/gitblit/data
git and me (thanx to Pere)
Imagina que tens tots els fonts en la carpeta marxbrothers
- crea un git en local
cd c:/projectes/marxbrothers
git init
- crea un .gitignore - copia el de
https://github.com/github/gitignore/blob/master/Node.gitignore, com a partida
Ha de ser com
# Compiled binary addons (http://nodejs.org/api/addons.html)
build/Release
# Dependency directory
# https://www.npmjs.org/doc/misc/npm-faq.html#should-i-check-my-node_modules-folder-into-git-
node_modules
# mongo database
data
# old code, cmds, etc
oldies
bCDT
- carrega el contingut inicial
git add . // add all files (".") to staging area
git commit -am "tot el contingut inicial"
- formateja i encripta el usb drive
- crea una carpeta en el usb
md U:/projectes/marxbrothers.git
cd U:/projectes/marxbrothers.git
- inicialitza el contingut amb un repositori buit
git init --bare
El resultat es:
Directory of J:\GIT-repositoris\simple_web_server.git
12-01-15 10:26 131 config
12-01-15 10:26 73 description
12-01-15 10:26 23 HEAD
12-01-15 10:26 <DIR> hooks
12-01-15 10:26 <DIR> info
12-01-15 10:26 <DIR> objects
12-01-15 10:26 <DIR> refs
3 File(s) 227 bytes
- ves al teu contingut i configura el git del usb com a remote i crea un alias (usb)
cd c:/projectes/marxbrothers
git remote add usb file://U:/projectes/marxbrothers.git
- treballa amb el usb com si fos un network repositori
En cada commit del local, o quan vulguis, fes (posar al USB)
git push usb master
o cada cop que portis contingut nou, fes (treure del USB)
git pull usb
- per instalar el projecte a un altre ordinador, només cal que facis un
git clone -o usb file://U:/projectes/marxbrothers.git c:/here/myprojects/marxbrothers
reserves and git
c:\sebas\JavaScript\simple_web_server> git init
Initialized empty Git repository in c:/sebas/JavaScript/simple_web_server/.git/
c:\sebas\JavaScript\simple_web_server> git add .
c:\sebas\JavaScript\simple_web_server> git commit -am "aixo ja rutlla - consulta i reserva"
[master (root-commit) 07cd9d6] aixo ja rutlla - consulta i reserva
. . .
H:\javascript\reserves.git> git init --bare
Initialized empty Git repository in H:/javascript/reserves.git/
c:\sebas\JavaScript\simple_web_server> git remote add usb file://H:\javascript\reserves.git
c:\sebas\JavaScript\simple_web_server> git push usb master
Counting objects: 47, done.
Delta compression using up to 4 threads.
Compressing objects: 100% (43/43), done.
Writing objects: 100% (47/47), 23.52 KiB | 8.00 KiB/s, done.
Total 47 (delta 5), reused 0 (delta 0)
To file://H:\javascript\reserves.git
* [new branch] master -> master
c:\sebas\JavaScript\simple_web_server> git remote -v
usb file://H:\javascript\reserves.git (fetch)
usb file://H:\javascript\reserves.git (push)
c:\sebas\JavaScript\simple_web_server> git status
On branch master
nothing to commit, working directory clean
c:\sebas\JavaScript\simple_web_server> git remote remove usb
delphi units and git
- {origin} go to github and create a new
repository
- go to local source directory \\Delphi\Units and create a local repository : git init
c:\sebas\Delphi\Units>git init
Initialized empty Git repository in c:/sebas/Delphi/Units/.git/
- review git config -l and edit git config -e --global if neccessary
- create .gitignore and fill it up appropiatelly ("tmp", "oldies")
- add some files to repository : git add *.pas
- do an initial commit with stage : git commit -am "v1.0 - save units in github"
- create a link to remote repository : git remote add origin https://github.com/sebastianet/delphimqunits
Complete form is git remote add origin https://{username}:{password}@github.com/{username}/project.git
after git remote remove origin
- display remote connections :
c:\sebas\Delphi\Units> git remote -v
origin https://github.com/sebastianet/delphimqunits (fetch)
origin https://github.com/sebastianet/delphimqunits (push)
- send code to github : git push -u origin master
- {destination} create a new repository under actual directory : git clone https://github.com/sebastianet/delphimqunits
vinatxo and git
Source to usb :
- \\w500\c:\Sebas\JavaScript\vinatxo> git init // Initialized empty Git repository in c:/Sebas/JavaScript/vinatxo/.git/
- \\w500\c:\Sebas\JavaScript\vinatxo> git add . // add all files to project list
- git config
- git config --list
- \\w500\c:\Sebas\JavaScript\vinatxo> git commit -am "un vinatxo ben maco per començar" // put files into repos
- git status
- \\usb\E:\JS\Vinatxo.git> git init --bare // init repos on usb - Initialized empty Git repository in E:/JS/Vinatxo.git/
- \\w500\c:\Sebas\JavaScript\vinatxo> git remote add usb file://e:/JS/Vinatxo.git // create a remote git called "usb" in w500
- git remote // display the "remote" git name
- \\w500\c:\Sebas\JavaScript\vinatxo> git push usb master // write repos into usb, write files
USB to Destination:
- git remote
- git pull usb master // get files
c:\Sebas\JavaScript\vinatxo> git push usb master
Counting objects: 23, done.
Delta compression using up to 2 threads.
Compressing objects: 100% (21/21), done.
Writing objects: 100% (23/23), 154.86 KiB | 25.00 KiB/s, done.
Total 23 (delta 3), reused 0 (delta 0)
To file://e:/JS/Vinatxo.git
* [new branch] master -> master
c:\Sebas\JavaScript\vinatxo>
FamilyTree and git
\\w500\C:\sebas\miscosas\node\pere\family_tree> git clone https://github.com/palbcn/altemirs.git
git and me (thanx to Lluis)
Environment is like this:
TP developer #1 (acá, "el Sebas") .---> GIT en RH (all developers) <--- TP developer #2 (acá "lo pere")
! {repositori}
!
.---> [ usb ], to move code to prod ---> Servidor en Internet (acá, "el Colt")
3 environments:
- TP's - developers
- RH - internal server
- Colt - external server
3 basic commands :
- init / create
- normal operation (get/put code)
- clean / end / remove
Question : what data does "developer #2" need to contact repository in RH ?
install a project from git
First you find a project from github using its
explore page, as cosway
Now we go
cd //T60/home/sebas/eines/ ; go to destination cd //T60/home/sebas/node_projects/pere
git clone git://github.com/schacon/cowsay ; install project into new directory git clone https://github.com/palbcn/nodesmonitor
cd cowsay ; go to program directory cd nodesmonitor
cat README ; read description .
sudo sh install.sh ; install cowsay into system npm install
cowsay Goof Morning Everybody ; see the result sudo npm install forever -g
sudo ./nodesmonitor.init.d.sh start
origin
jQuery concepts & sample
What is jQuery?
jQuery is an open source JavaScript library that simplifies the interactions between an HTML document,
or more precisely the Document Object Model (aka the DOM), and JavaScript.
jQuery is a lightweight, "write less, do more", JavaScript library
para el browser cliente, y enfocada a manipulacion del DOM.
The purpose of jQuery is to make it much easier to use JavaScript on your website.
jQuery takes a lot of common tasks that require many lines of JavaScript code to accomplish,
and wraps them into methods that you can call with a single line of code.
jQuery also simplifies a lot of the complicated things from JavaScript, like AJAX calls and DOM manipulation.
Unifica (entre browsers) la API de JavaScript i de Ajax, y simplifica el acceso al DOM.
The jQuery library contains the following features:
- HTML/DOM manipulation
- CSS manipulation
- HTML event methods
- Effects and animations
- AJAX
- Utilities
jQuery fundamentals,
selectors at
Cody Lindley,
Code Academy,
samples,
CookBook {pere}
The line
<script src="https://code.jquery.com/jquery-2.1.1.min.js"></script>
in an HTML file is used to load the jQuery library into your webpage from a Content Delivery Network (CDN).
What is jQuery?
jQuery is a popular JavaScript library designed to simplify HTML DOM tree traversal and manipulation,
as well as event handling, CSS animation, and Ajax.
Instead of writing long lines of "vanilla" JavaScript, jQuery allows you to perform complex tasks with much shorter code.
jQuery serialize()
Creates a text string in standard URL-encoded notation.
jQuery selector samples
Most simple
Si a la pagina HTML tenim
<div id="content">
Llavors podem fer :
$('#content').html(my_text); // "html" or "text"
Navigate over the DOM
Try it at
codepen.io
$( '#calendar > tbody > tr' ).each( function(i){ // per totes les files ...
$(this).find('td').each( function(j){ // ... scanejar totes les columnes
var $thistd = $(this) ; // cella actual
$thistd.prepend( 'Irow', i, '.Jtd', j, ' -- ' ) ; // hi posem una mica de texte
if ( (i==1) && (j==2) ) { // OJO index comença a 0 (javascript-style)
$thistd
.css( 'font-weight', 'bold' )
.css( 'color','#36c' )
.append( '# sebas aquí' ) ; // ... i en una especifica, una mica mes
}
})
});
Shoot to target
If we define :
<tbody>
<tr> <td id="thora"> 09-10 </td> <td id="tdh09p3"> </td> <td id="tdh09p4"> </td> </tr>
Then we can
var szCella = "#tdh"+szHora+"p"+szPista ; // calculem a quina cella va el texte - veure els noms al css !
$( szCella ).html( szNom ) ; // posem el texte a la cella
Another sample {\\JavaScript\pere\lore_ipsum}:
function displayDates(d) {
for ( var i=1; i<=5; i++ ) {
var wd = d.getDay();
var wdn = weekday[wd];
if ( d.isToday() ) {
wdn = 'avui';
$('#col'+i).toggleClass('today');
}
if ( (wd==0) || (wd==6) ) {
$('#col'+i).toggleClass('closed');
}
$("#th"+i).html(wdn+'<div class="dates">'+d.getDate()+'/'+(d.getMonth()+1)+'</div>');
d.setDate( d.getDate() + 1 );
}
} ;
jQuery Syntax
The jQuery syntax is tailor made for selecting HTML elements and performing some action on the element(s).
Basic syntax is: $(selector).action()
jQuery .val()
Quan el que torna del servidor no és HTML sino un valor, fem servir .val()
API
jQuery selectors
API
$("string" = select
$( function() = call this function when document is loaded
<!DOCTYPE html>
<html>
<head>
<title>jQuery test</title>
<script src="http://code.jquery.com/jquery-1.10.1.min.js"></script> // requirement !
</head>
<body>
<img id="theImage"><br>
<button type="button" id="butGoogle"> Google </button>
<button type="button" id="butFacebook"> Facebook </button>
<button type="button" id="butTwitter"> Twitter </button>
<script>
$( function() {
var imgs = {
google: 'http://cdn5.iconfinder.com/data/icons/yooicons_set01_socialbookmarks/128/social_google_button_blue.png' ,
facebook: 'http://cdn5.iconfinder.com/data/icons/yooicons_set01_socialbookmarks/128/social_facebook_box_white.png' ,
twitter: 'http://cdn5.iconfinder.com/data/icons/yooicons_set01_socialbookmarks/128/social_twitter_box_blue.png'
};
function setImg(url) {
$( "#theImage" ).attr( "src", url );
}
setImg(imgs.google);
$("#butGoogle").click( function() {
setImg(imgs.google);
});
$("#butFacebook").click( function() {
setImg(imgs.facebook);
});
$("#butTwitter").click( function() {
setImg(imgs.twitter);
});
});
</script>
</body>
</html>
Modify an image on a click
HTML :
<!DOCTYPE html>
<html>
<head>
<script src="https://code.jquery.com/jquery-3.0.0.js"></script>
<meta charset="utf-8">
<meta name="viewport" content="width=device-width">
<title>JS Bin</title>
</head>
<body>
<button id="but">Show img</button><br/><br/>
<img id="imagen">
</body>
</html>
JS :
var mysrc = 'https://www.google.com/images/branding/googlelogo/2x/googlelogo_color_272x92dp.png';
$(function() {
$('#but').click(function() {
$('#imagen').attr('src', mysrc);
});
});
JSbin
Send a request with tf number and text data from user fields
HTML :
<!DOCTYPE html>
<html>
<head>
<script src="https://code.jquery.com/jquery-3.0.0.js"></script>
<meta charset="utf-8">
<meta name="viewport" content="width=device-width">
<title>JS Bin</title>
</head>
<body>
<label>Teléfono:</label><br>
<input id="idtel"><br>
<label>Mensaje:</label><br>
<textarea id="idmsg"></textarea><br>
<button id="send">Enviar mensaje</button>
</body>
</html>
JS :
var url = '/enviaWhatsapp';
$( function() {
$( '#send' ).click( function() {
var data = {
tel: $( '#idtel' ).val(),
msg: $( '#idmsg' ).val()
} ; // data
$.post( url, data, function() {
alert( 'mensaje enviado' ) ;
}) ; // post
}); // click
}); // function
JSbin, Luis, 20160720
Al server recollim les dades :
app.post('/enviarmsgwhatsapp',function ( req, res ) {
console.log( 'tf (%s)', req.body.tel ) ;
console.log( 'msg (%s)', req.body.msg ) ;
Another try, by Pere :
#!/usr/bin/env node
var express = require("express");
var bodyParser = require("body-parser");
var app = express();
app.get( '/',function( req, res, next ) {
res.send('
<html>
<head><title> *** Sebas whatsapp form *** </title></head>
<body>
<form name="whtspp-form" action="/whtspp" method="POST">
<input type="text" name="tfnum" size="10" placeholder="Phone number"><br>
<textarea type="text" name="msgtxt" rows="5" cols="50" placeholder="enter some text"></textarea><br>
<input type="submit" value="Send"><br>
</div>
</form>
</body>
</html>
');
});
app.use( bodyParser.urlencoded( { extended:true } ) ) ;
app.post( '/whtspp', function( req, res, next ) {
res.send( 'posted ' + JSON.stringify( req.body ) ) ;
}); // whtspp
app.post('/enviarmsgwhatsapp',function ( req, res ) {
/* respon al submit de <form action="/enviarmsgwhatsapp" method="POST"> i aon
req.body.tfnum sera el contingut del camp <input name="tfnum"> del <form>
req.body.msgtxt sera el contingut de <textarea name="msgtxt"> del <form>
per tant
*/
var python_options = {
mode: 'text',
pythonPath: '/usr/bin/python',
pythonOptions: ['-u'],
scriptPath: '/usr/local/bin',
args:[ 'demos', '-c', '/usr/local/bin/mydetails', '-s', req.body.tfnum, req.body.msgtxt ]
};
console.log( 'tf (%s)', req.body.tfnum ) ;
console.log( 'msg (%s)', req.body.msgtxt ) ;
}) ; // enviarmsgwhatsapp
app.listen( 8282 ) ;
console.log( 'http://localhost:8282 is open for e-business' ) ;
Amb la 1a obtenim :
posted {"tfnum":"12092398","msgtxt":"bas nsd mas qwr"}
A la 2a es modifica la declaracio cada cop que entra un missatge !
Si no ens agrada aquest metode, podem fer
app.post( '/enviar_msg_whatsapp/ParamTfNum=:req_tf_num', function ( req, res ) {
python_options.args[4] = req.body.tfnum ;
python_options.args[5] = req.body.txtmsg ;
DOM Document Ready event
All jQuery methods are inside a document ready event:
$(document).ready( function(){
// jQuery methods go here...
});
The jQuery team has also created an even shorter method for the "Document Ready" event:
$( function(){
// jQuery methods go here...
});
Also in js.shtml
jQuery.ajax
jQuery tambien unifica el acceso a la API de Ajax de los diversos navegadores.
http://api.jquery.com/jquery.ajax/
How to get a response from server
Usually we request some HTML from server.
But, sometimes, we want to receive one of two answers : (a) user and password are ok, or (b) user logon is rejected.
How do we manage this situation ?
On client :
var szURL = logon_url + '/nom_Logon=' + logon_data.logon_usr + '&pwd_Logon=' + logon_data.logon_pwd
console.log( 'LOGON() URL is ('+ szURL +').' ) ;
event.preventDefault() ; // the default action of the event will not be triggered. http://api.jquery.com/event.preventdefault/
$.ajax({ // as we can receive an "ok" or an "no ok" answer, we use the core $.ajax() method
url: szURL, // The URL for the request
data: { // The data to send (will be converted to a query string)
logon_data
},
type: "POST", // Whether this is a POST or GET request
dataType : "html", // The type of data we expect back
success: function( page ){
// alert( "OK" ) ;
$( "#contingut" ).html( page ) ;
// posem al SPA_data (we are a SPA) la seguent sub-pagina inicial que veu el client : SEM.HTM
$.get( '/sem.htm', function( page ) {
console.log( '*** Demanem al server SEM.HTM, page user sees after LOGON.' ) ;
$( "#SPA_data" ).html( page ) ; // show received HTML at specific <div>
}) ; // get(logon.htm)
},
statusCode: {
401: function() { $( "#contingut" ).html( (new Date).yyyymmdd() + ' --- Logon() user('+ logon_data.logon_usr +') not authorized' ) },
402: function() { $( "#contingut" ).html( (new Date).yyyymmdd() + ' --- Logon() unavailable' ) },
403: function() { $( "#contingut" ).html( (new Date).yyyymmdd() + page ) },
404: function( xhr ) {
console.log( xhr.responseText ) ;
},
500: function() { $( "#contingut" ).html( (new Date).yyyymmdd() + ' --- Logon() Server error' ) }
}
})
return false ; // stop processing
} ) ; // click()
On server :
app.post( '/fer_logon/nom_Logon=:req_username&pwd_Logon=:req_pwd', function ( req, res ) {
var szUserName = req.params.req_username ;
var szUser_Pwd = req.params.req_pwd ;
var headers = req.headers ;
var userAgent = headers[ 'user-agent' ] ;
console.log( '>>> Menu Logon() - usr (%s) pwd (%s) ch(%s) ua(%s).', szUserName, szUser_Pwd, chSel, userAgent ) ;
if ( UsrPwdOK() ) {
app.set( 'Nom_Usuari_Logged', szUserName ) // we have a user logged in
szResultat = '+++ raspall001 - LOGON(' + szUserName + ') OK' ;
res.status( 200 ).send( szResultat ) ;
} else {
szResultat = '--- raspall002 - LOGON FAILED' ;
console.log( szResultat ) ;
res.status( 404 ).send( szResultat ) ;
} ;
} ) ; // fer logon
jQuery $.get()
Used to load data from the server using a HTTP GET request.
GET is used to request data from a specified resource.
Syntax:
jQuery.get( url [, data ] [, success ] [, dataType ] )
This is a shorthand Ajax function, which is equivalent to:
1 $.ajax({
2 url: url,
3 data: data,
4 success: success,
5 dataType: dataType
6 });
Sample:
$( "#myFormReqDades1Dia" ).submit( function() {
// produces a msg as "GET /qui_te_reserves/data_Reserva=2014/12/06"
console.log( '*** Demanem al server la llista de reserves de un dia.' ) ;
console.log( $( this ).serialize() ) ; // output is "data_Reserva=2014/12/06"
$.get( "/qui_te_reserves/" + $(this).serialize(), function( dades ) {
$.get() versus $.getJSON()
Using $.get() with "dataType: JSON" would work exactly the same as $.getJSON()
These are just abstractions of the .ajax method :
jQuery Ajax methods
All differences :
getScript: function(url, callback) {
return $.get(url, null, callback, "script");
}
getJSON: function(url, data, callback) {
return $.get(url, data, callback, "json");
}
jQuery $.post()
Used to load data from the server using a HTTP POST request.
POST is used to send data to a server to create/update a resource.
$.get versus $.post()
- HTTP GET requests include all required data in the URL - mind " URL lengths are limited"
- HTTP POST requests supply additional data from the client (browser) to the server in the message body
- GET does not change data in server
- POST sends new values for tha data in server
url
jQuery toggleClass
toggleClass() té varies versions - see https://api.jquery.com/toggleClass/
La que t'interessa és .toggleClass( className, state )
The second version of .toggleClass() uses the second parameter for determining whether the class should be added or removed.
If this parameter's value is true, then the class is added; if false, the class is removed. In essence, the statement:
$( "#foo" ).toggleClass( className, addOrRemove );
... is equivalent to:
if ( addOrRemove ) {
$( "#foo" ).addClass( className );
} else {
$( "#foo" ).removeClass( className );
}
jQuery misc
El Ajax del browser envia un REST, i el Server contesta amb un JSON
El atributo VALUE especifica una etiqueta no editable que se mostrará en el botón de envío :
<input type="button" value="Input Button">
jQuery examples
gulp / grunt
Grunt - the JavaScript Task Runner
Gulp - automating system tasks.
GitHub.
Tutorial,
intro.
All plugins.
Slides
Other tasks require repeated effort every time you make a change
- compressing new or modified images
- removing console and debugger statements from scripts
- concatenating and minifying CSS and JavaScript files
- deploying updates to a production server
5 tasks
- gulp.task()
- gulp.run()
- gulp.watch()
- gulp.src
- gulp.dst
#!/usr/bin/env node
var gulp = require('gulp');
var exec = require('child_process').exec;
var spawn = require('child_process').spawn;
var livereload = require('gulp-livereload');
var node;
gulp.task('watch', function(){
livereload.listen();
gulp.watch(['./server/*.js','./server/lib/*.js','./common/lib/*.js'],function() {
gulp.run('server');
});
gulp.watch(['./**/*'],function() {
livereload.changed();
});
});
gulp.task('server', function() {
if (node) node.kill();
node = exec('pushd server & start node server & popd');
});
gulp.task('open', function(){
exec('chrome http://localhost:8080');
});
gulp.task('default', ['server','open']);
// clean up if an error goes unhandled.
process.on('exit', function() {
if (node) node.kill()
});
dont use gulp / grunt
Dont use
grunt,
use NPM!
npm = node.js package manager
NPM es el manejador de librerias, del ecosistema de modulos.
Bower is npm for clients
Get it here : npmjs.org
Install it by
$ sudo apt install npm
Update it (20210313) by
mars $ sudo npm install -g npm@7.6.3
Beginner's guide
Display installed version :
c:\> npm -v
3.5.1 {w500, 20151206}
Latest version (20170531) :
Starting today, typing "npm install npm@latest -g" will update you to npm version 5.0.1
20251201 - enable 2FA -> requires client version 5.5.1 or higher
Display the current global location
c:\> npm config get prefix
{w500, 20151204} C:\Users\bisc\AppData\Roaming\npm
{RSPI3, 20170227} /usr
how to update npm
c:\> npm install npm -g
C:\Users\bisc\AppData\Roaming\npm\npm -> C:\Users\bisc\AppData\Roaming\npm\node_modules\npm\bin\npm-cli.js
npm@3.5.1 C:\Users\bisc\AppData\Roaming\npm\node_modules\npm
Compte : al PiZero, el darrer "node" per la arquitectura 'linux-armv6l' es el v11.15.0
Aixi, amb el npm ens hem de quedar a la versio 6.7.0
npm-debug.log
When a package fails to install or publish, the npm CLI will generate an npm-debug.log file
You can find the npm-debug.log file in your .npm directory. To find your .npm directory, use "npm config get cache"
See common errors
docs.npmjs
two-factor authentication (2FA)
To enable 2FA, please follow the
instructions found here
If you want to automate publishing in CI/CD, you can use an automation token to publish without 2FA.
To create an automation token, please follow
the instructions found here
Questions ? Concerns ?
Reach the npm support team
get rid of package-lock.json
package-lock.json is hell on earth
Globally :
$ npm config set package-lock false
mate@punt-omnia:~/nodejs-projects/timer$ npm config list
; cli configs
metrics-registry = "https://registry.npmjs.org/"
scope = ""
user-agent = "npm/6.9.0 node/v11.11.0 linux x64"
; userconfig /home/mate/.npmrc
package-lock = false
; node bin location = /usr/bin/node
; cwd = /home/mate/nodejs-projects/timer
; HOME = /home/mate
; "npm config ls -l" to show all defaults.
url
Mind
pi@odin:~/semafor $ npm audit fix
npm ERR! code EAUDITNOLOCK
npm ERR! audit Neither npm-shrinkwrap.json nor package-lock.json found: Cannot audit a project without a lockfile
npm FAQs
Display FAQs on a browser using
Fix vulnerability
GitHub sends an email saying
We found a vulnerable dependency in a repository you have security alert access to.
sebastianet/timer
Known high severity security vulnerability detected in cryptiles < 4.1.2 defined in package-lock.json.
package-lock.json update suggested: cryptiles ~> 4.1.2.
Lets see where does this dependency come from
mate@punt-omnia:~/nodejs-projects/timer$ npm ls cryptiles
timer@1.0.0 /home/mate/nodejs-projects/timer
ââ⬠node-wget@0.4.3
ââ⬠request@2.85.0
ââ⬠hawk@6.0.2
âââ cryptiles@3.1.4
How do we fix that warning ?
what is a package ?
A package is:
- a folder containing a program described by a package.json file
- a gzipped tarball containing (a)
- a url that resolves to (b)
- a <name>@<version> that is published on the registry with (c)
- a <name>@<tag> that points to (d)
- a <name> that has a "latest" tag satisfying (e)
- a git url that, when cloned, results in (a)
what is a module ?
A module is anything that can be loaded with require() in a Node.js program.
The following things are all examples of things that can be loaded as modules:
- a folder with a package.json file containing a main field
- a folder with an index.js file in it
- a JavaScript file
Modules can only be used for server javascript code !
how a module is found ?
If the NODE_PATH environment variable is set to a colon-delimited list of absolute paths,
then node will search those paths for modules if they are not found elsewhere.
On Windows, NODE_PATH is delimited by semicolons instead of colons.
NODE_PATH=c:\sebas\MisCosas\Pere\Reserves\v_01
Additionally, node will search in the following locations:
- $HOME/.node_modules
- $HOME/.node_libraries
- $PREFIX/lib/node
Where $HOME is the user's home directory, and $PREFIX is node's configured node_prefix.
Read API on modules
using own modules
Code simplest-module-ever-complete.js :
exports.answer = 42; // What is the question?
Use it in "simplest-module-ever-complete-test.js" :
var simple = require('./simplest-module-ever-complete');
console.log(simple.answer); // This will output 42
creating custom modules
custom modules,
module exports
my own module
Before :
// (1) if customers asks for a "ping", we send actual date and a link back to main page :
app.get( '/ping', function ( req, res ) {
var currentdate = new Date();
var datetime = "Last Sync: " + currentdate.getDate() + "/"
+ (currentdate.getMonth()+1) + "/"
+ currentdate.getFullYear() + " @ "
+ currentdate.getHours() + ":"
+ currentdate.getMinutes() + ":"
+ currentdate.getSeconds() ;
var texte = "Hello from Koltrane, " + myVersioLong ;
texte += "<p>(" + datetime + ")<p><hr>" ;
res.writeHead( 200, { 'Content-Type': 'text/html' } ) ; // write HTTP headers
res.write( texte ) ;
res.end( ) ;
} ) ; // get '/ping'
After (invocation):
// Lets set some routes for express() :
// =====================================
var miMDW = require( './mimdwr.js' ) ;
// (1) if customers asks for a "ping", we send actual date and the version of the code
miMDW.handlePing( app ) ; // app.get( '/ping', function ( req, res ) {
After (implementation) :
exports.handlePing = hPing;
// (1) if customers asks for a "ping", we send actual date and the version of the code
function hPing(app) {
app.get( '/ping', function ( req, res ) {
var currentdate = new Date();
var datetime = "Last Sync: " + currentdate.getDate() + "/"
+ (currentdate.getMonth()+1) + "/"
+ currentdate.getFullYear() + " @ "
+ currentdate.getHours() + ":"
+ currentdate.getMinutes() + ":"
+ currentdate.getSeconds() ;
var texte = "Hello from Koltrane, " + myVersioLong ;
texte += "<p>(" + datetime + ")<p><hr>" ;
res.writeHead( 200, { 'Content-Type': 'text/html' } ) ; // write HTTP headers
res.write( texte ) ;
res.end( ) ;
} ) ; // get '/ping'
} ; // hPing()
Read writing middleware (bottom)
another (and better) own module
pi@pi0:~/njs/fronius/proves $ cat 6_scp_from_remote.js
let longname_fer_scp = function ( filename, remotepath, localpath ) {
} ; // longname_fer_scp
module.exports.fer_scp = longname_fer_scp // module.exports is the object that's actually returned as the result of a require call.
And we use it like this :
pi@pi0:~/njs/fronius/proves $ cat index.js
const eina = require('./6_scp_from_remote');
iRC = eina.fer_scp( "hola.txt", "/home/pi/proves", "/tmp" ) ;
console.log( '>>> SCP rc (%i)', iRC )
To execute our code we do :
pi@pi0:~/njs/fronius/proves $ node index.js
fer_scp : filename (hola.txt)
fer_scp : remote path (/home/pi/proves)
fer_scp : local path (/tmp)
fer_scp : remote FQFN (/home/pi/proves/hola.txt)
fer_scp : local FQFN (/tmp/hola.txt)
>>> SCP rc (0)
>>> download
Source(s) :
npm commands
Start all projects with npm init and git init
That will create "package.json" and ".git"
- npm cache clean
- npm cache ls
- npm config list = show user configuration
- npm config ls -l = show all defaults
- npm config set = set config value
- npm help list = opens a browser with help on "npm list"
- npm init = create package.json file
- npm install = instala un mòdul localment, en el directori de la app {modify package.json first}
- npm install -d = add your dependencies into package.json
- npm install -g node-inspector = instala un mòdul globalment, disponible per totes les apps (/usr/lib/node_modules)
- npm install async --save = add the most recent version of the async module to package.json
- npm link express = crea un enllaç local a un mòdul global, i si no hi és l'instala
- npm link express --save = idem, i actualitza el fitxer package.json
- npm ls / npm list = list installed packages
- npm list -g / npm ls -g = show all (global) installed packages
- npm outdated -
- npm rebuild - useful when you install a new version of node, and must recompile all addons with the new binary
- npm rm <module_name> = remove module (from .\node_modules\)
- npm remove -g <module_name> = remove global module (from %node_path%)
- npm search = (large list) search the registry for packages
- npm start = start application indicated in package.json, start sentence
- npm update -g = update global (from package.json)
Pere : jo el que faig és instalar tots els moduls en global i només fer link als que uso en cada projecte
Using "-g" flag, npm installs modules on a global location.
Where ?
Use "npm root -g" command
Comandes d'administració
Setup .npmrc
És molt maco poder posar "--save" per actualitzar package.json, pero jo m'ho deixo, m'en oblido
Solució :
$ npm config set save=true
Es guarda en el fitxer .npmrc - on es troba aquest fitxer ? Pica npm config ls -l
rspi : userconfig = "/home/pi/.npmrc"
win : userconfig = "C:\\Users\\Administrator\\.npmrc"
Homepage npmrc
npm init
c:\JavaScript\rn3> npm init
This utility will walk you through creating a package.json file.
It only covers the most common items, and tries to guess sensible defaults.
See "npm help json" for definitive documentation on these fields and exactly what they do.
Use "npm install <pkg> --save" afterwards to install a package and save it as a dependency in the package.json file.
Press ^C at any time to quit.
name: (rn3)
Com actualitzar els moduls que requereix una aplicacio
$ npm-check !
Veure'ls :
C:\sebas\JavaScript\pere\icatplayer-master> npm ls --depth=0
icatfm@0.1.0 C:\sebas\JavaScript\pere\icatplayer-master
├── cheerio@0.19.0 -> C:\Users\bisc\AppData\Roaming\npm\node_modules\cheerio
├── express@4.13.3 -> C:\Users\bisc\AppData\Roaming\npm\node_modules\express
└── superagent@1.5.0 -> C:\Users\bisc\AppData\Roaming\npm\node_modules\superagent
Els móduls locals :
C:\sebas\JavaScript\pere\icatplayer-master> npm update
icatfm@0.1.0 C:\sebas\JavaScript\pere\icatplayer-master
├── cheerio@0.19.0
├── express@4.13.3
└── superagent@1.5.0
Un cas real :
/home/pi/semafor/node_modules/bindings/bindings.js:83
throw e
^
Error: The module '/home/pi/semafor/node_modules/epoll/build/Release/epoll.node'
was compiled against a different Node.js version using
NODE_MODULE_VERSION 47. This version of Node.js requires
NODE_MODULE_VERSION 67. Please try re-compiling or re-installing
the module (for instance, using `npm rebuild` or `npm install`).
Solucio :
- pi@odin:~/semafor $ rm -rf node_modules
- npm cache clean --force
- sudo npm install -g node-gyp
- npm install
Com veure quins moduls no estan actualitzats
pi@odin:~/semafor $ npm outdated
Package Current Wanted Latest Location
python-shell 0.4.0 0.4.0 1.0.7 semafor
rpi-gpio 0.7.0 0.7.0 2.1.3 semafor
Com actualitzar un modul
- posar "*" a la versio del modul dins package.json
- npm update <nom_modul>
Com veure la darrera versio disponible de un modul
pi@odin:~/semafor $ npm view python-shell version
1.0.7
I amb tot detall :
pi@odin:~/semafor $ npm view rpi-gpio
rpi-gpio@2.1.3 | MIT | deps: 3 | versions: 27
Control Raspberry Pi GPIO pins with node.js
https://github.com/JamesBarwell/rpi-gpio.js#readme
dist
.tarball: https://registry.npmjs.org/rpi-gpio/-/rpi-gpio-2.1.3.tgz
.shasum: 683985f4e197d369fb47d65f99f7175754f92b43
.integrity: sha512-DiOU+u1Wi2SWafNfLpSJRgMnBnoVsCxg2tm+7RjktZHspFD6hp/C+ACfqyA8h7d5pp/7gd7SNgehi3bYAfrYSw==
.unpackedSize: 61.8 kB
dependencies:
async-retry: ^1.2.1 debug: ^3.1.0 epoll: ^2.0.3
maintainers:
- jamesbarwell <jb@jamesbarwell.co.uk>
dist-tags:
latest: 2.1.3
published 4 months ago by jamesbarwell <jb@jamesbarwell.co.uk>
Com instalar
És a dir que pots triar entre
"npm install -g" + "npm link" (instalació global, "npm link" fa el "link" al modul global)
o bé "npm install" (instalació local)
Instalar sempre globalment, amb "npm link <module-name>" per evitar directoris repetits
Error: Cannot find module 'mongodb'
c:\sebas\JavaScript\mongo> npm link mongodb
c:\sebas\JavaScript\mongo\node_modules\mongodb -> C:\Users\IBM_ADMIN\AppData\Roaming\npm\node_modules\mongodb
npm link
c:\> npm link express
c:\node_modules\express -> C:\Users\IBM_ADMIN\AppData\Roaming\npm\node_modules\express
c:\> npm link monk
c:\node_modules\monk -> C:\Users\IBM_ADMIN\AppData\Roaming\npm\node_modules\monk
c:\> npm ls
c:\
└─┬ monk@0.7.1 -> C:\Users\IBM_ADMIN\AppData\Roaming\npm\node_modules\monk
├── debug@0.7.2
└─┬ mongoskin@0.4.4
└─┬ mongodb@1.1.11
└── bson@0.1.5
npm behind a proxy
c:\eines> type set_nodejs_proxy.cmd
set PXIP=1.2.3.4:3128
set PXUS=nom.cognom
set PXPW=mypwd
call npm config set proxy http://%PXUS%:%PXPW%@%PXIP%
call npm config set https-proxy http://%PXUS%:%PXPW%@%PXIP%
package.json file
This is the NPM configuration file. It is created using npm init
Sample :
{
"name": "application-name",
"version": "0.0.1",
"description": "",
"main": "1-sem.js",
"private": true,
"scripts": {
"start": "node app.js" // used by command npm start
},
"dependencies": {
"express": "3.4.4",
"jade": "*"
},
"repository": {
"type": "git",
"url": "git://github.com/username/repository.git"
},
"author": "Sebastia",
"license": "ISC"
}
It gets updated with the command
- npm install : install modules listed in package.json into (local) node_modules folder
- npm install <module-name> --save
- npm update --save
- npm link <module-name> --save : install into global directory and link to it
Error "No repository field"
If you get
$ npm install superagent-logger
npm WARN nodesmonitor@0.1.0 No repository field.
... it means you are missing in package.json those lines :
"repository": {
"type": "git",
"url": "https://github.com/palbcn/nodesmonitor"
},
capacitats de desplegament automàtic de node + npm
Volem que el servidor :
- actualitzi components automaticament cada cop que apareguin noves versions.
- arranqui i rearranqui els serveis mongo node etc.
- arranqui i rearranqui les apps.
- rearranqui les apps en cas de desplegar nou codi.
Update all packages to latest level
To see which packages have newer versions available, then use the following command
$ npm outdated
npm-check-updates is a utility that automatically adjusts a package.json with the latest version of all dependencies.
See https://www.npmjs.org/package/npm-check-updates :
$ npm install -g npm-check-updates
$ npm-check-updates -u
$ npm install
Passport
Imagina que tens dos serveis
var appStatic = express.static(PATH_app);
var loginStatic = express.static(PATH_login);
Pots muntar els dos sobre la mateixa ruta, amb una funció de middleware que contingui el codi condicional
app.use(function(req, res, next) {
if (req.isAuthenticated()) {
// user is authenticated
return appStatic(req, res, next);
} else {
// user is not authenticated
return loginStatic(req, res, next);
}
});
Read
scotch.io.
M'agrada "app.get('/profile', isLoggedIn, function(req, res) {"
Cookies
display cookies in browser
We can display cookies using :
- chrome - Tools, Developer Tools, Resources, Cookies
- firefox - botó dret, page info, security, view cookies
HttpOnly cookies
httponly: prevents client-side javascript to read this cookie
A checkmark at the Http column of Chrome devtool's Cookie resource panel indicates a HttpOnly cookie.
Enter document.cookie in the console, and you'll see that none of the checked cookies are visible.
Trace them like this:
var iCnt = 0 ;
app.use( function( req, res, next ) {
res.cookie( 'sagcuki', ++iCnt ) ;
console.log( '### My Cookies are (%s) - [%s].', iCnt, JSON.stringify( { unsigned: req.cookies, signed: req.signedCookies } ) ) ;
next() ;
} ) ; // trace own cookie
signed / unsigned cookies
Create cookies in server code:
app.use( cookieParser( 'my-secret' ) ) ; // pwd to encrypt all cookies
app.use( session( { secret: 'my-secret', resave: false, saveUninitialized: false } ) ) ; // encrypt session contents, allow "req.session.*" header
app.use( function( req, res, next ) { // own middleware, catching all messages
res.cookie( 'kuk-H1', 'MYHTK', { httpOnly: true } ) ; // chrome : HTTP "check"
res.cookie( 'kuk-SIG1-SEC1', 'MYSEC', { signed: true, secure: true } ) ; // chrome : SECURE "check"
res.cookie( 'kuk-CON.SID', 'MYSID', { signed: true, httpOnly: true, secure: false, maxAge: null } ) ; // try to emulate connect.sid
console.log( '### My Cookies are [%s].', JSON.stringify( { unsigned: req.cookies, signed: req.signedCookies } ) ) ;
next() ;
} ) ; // trace own cookie
Display/use cookies in client code:
function llegirCookie( name ) {
var nameEQ = name + "=" ;
var ca = document.cookie.split( ';' ) ;
for( var i=0 ; i < ca.length; i++ ) {
var c = ca[i] ;
while ( c.charAt(0)==' ' ) c = c.substring( 1, c.length ) ;
if ( c.indexOf(nameEQ) == 0 ) return c.substring( nameEQ.length, c.length ) ;
} ;
return null ;
} ; // llegirCookie()
// server sets 'kuk-TIT'
// HELP.HTM has <div id="listcki">
var x = llegirCookie( 'kuk-TIT') ;
if ( x ) {
var szOut = '# server set cookie >' + x + '<' ;
$( "#listcki" ).html( szOut ) ; // show received HTML at specific <div>
} ;
Sessions
Using sessions
to keep track of users as they journey through your site is key to any respectable application.
Each session has a unique cookie object accompany it.
Session data is not saved in the cookie itself, just the session ID.
Session data is stored server-side.
github
The default value name of the session ID cookie is connect.sid,
and the default value is { path: '/', httpOnly: true, secure: false, maxAge: null }.
connect.sid is the cookie for the express session and by default that cookie is a browser session cookie.
By default cookie.maxAge is null, meaning no "expires" parameter is set so the cookie becomes a browser-session cookie.
When the user closes the browser the cookie (and session) will be removed.
To store or access session data, simply use the request property req.session,
which is (generally) serialized as JSON by the store, so nested objects are typically fine.
The requisite to use
req.session.nomsoci = Logon_NomSoci ; // guardar nom soci en la sessio
is to have
app.use( session ) ;
app.use( session( { secret: 'secretSebas', resave: false, saveUninitialized: false } ) ) ; // encrypt session contents, allow "req.session.*" header
Nice sample :
sessions and cookies in node (gone ?)
The example below is a user-specific view counter:
app.use( session( { secret: 'keyboard cat', cookie: { maxAge: 60000 } } ) ) ;
app.use( function( req, res, next ) {
var sess = req.session ;
if ( sess.views ) {
sess.views++ ;
res.setHeader( 'Content-Type', 'text/html' ) ;
res.write( '<p>views: ' + sess.views + '</p>' ) ;
res.write( '<p>expires in: ' + (sess.cookie.maxAge / 1000) + 's</p>' ) ;
res.end() ;
} else {
sess.views = 1 ;
res.end( 'Welcome to the session demo. Refresh!' ) ;
} ;
} ) ;
Complete code set
Init
app.use( session( { secret: 'secretSebas', resave: false, saveUninitialized: false } ) ) ; // encrypt session contents, allow "req.session.*" header
Set
req.session.wcdt_nom = Logon_Nom ;
Clear
req.session.wcdt_nom = '' ;
delete req.session.wcdt_nom ; // remove session field when async function ends - see [sess]
or
req.session.reset() ; //
url
Verify
// funcio per determinar si el usuari ha fet logon
function Usuari_Ha_Fet_Logon( ParamSessio ) {
return ( typeof ParamSessio === 'object' && typeof ParamSessio.wcdt_nom === 'string' ) ;
} ; // Usuari_Ha_Fet_Logon()
or
if ( req.session && req.session.user ) { // Check if session exists -
url
Or even implement a middleware as
function loggedIn( req, res, next ) {
if ( req.user ) {
next();
} else {
res.redirect('/login');
}
}
Used as
app.get('/orders', loggedIn, function(req, res, next) {
// req.user - will exist
// load user orders and render them
});
How to access MQ from node.js
Use the websockets interface of mqtt to connect to MQTT from any JavaScript runtime - Node.js for example.
Google groups
discussion :
blocking calls, thread pool, etc :
The primary thing you are going to run into is that the MQI C API is primarily a blocking API
whereas node.js only talks to non-blocking APIs as part of its main event loop.
See
mqsimple
Here it says
You could use the node
STOMP client.
This would let you integrate with a variety of message queues including:
- ActiveMQ
- RabbitMQ
- HornetQ
Here it says :
I was able to make the connection successfully
<transportConnector name="openwire" uri="tcp://localhost:61616" discoveryUri="multicast://default"/>
Code I was using to make the connection
var stomp = require("stomp");
var stompClient = new stomp.Stomp("localhost", 8161);
var destHeaders = {
destination: '/topic/testTopic',
ack: 'acknowledgeResp'
};
client.connect();
client.on('connected', function() {
client.subscribe(destHeaders);
});
C++ callback
How to properly implement
callbacks,
by
Lluis, StackOverflow user
nodejs intro,
callback sample
how can a NanAsyncWorker parameter be “undeclared identifier"
How to access Rabbit from node.js
What is RabbitMQ ?
RabbitMQ is a message-queueing software called a message broker or queue manager.
Simply said : it is a software where queues can be defined, applications may connect to the queue and transfer a message onto it.
A basic messaging application consists of 3 parts : the Publisher, the Broker, and the Consumer.
The Publisher publishes messages to the broker,
the Broker decides which consumer will receive the message
and the Consumer processes the message.
Basic (but complete) sample
Channels : these are like a virtual connection over the real TCP connection.
The reason they exist is that RabbitMQ connections are expensive to create.
Every channel has an ID assigned to it.
Queue is the place where the messages end up ready to be picked up by the consumer.
Consumers receive messages in one of two ways:
- basic.consume
This places the channel into subscribe mode until unsubscribed from the queue,
during this time the consumer automatically receives all the messages sent.
- basic.get
This will receive only one message in the queue but will not automatically receive further messages
It is not a good idea to put basic.get into a loop - just use basic.consume for high throughput subscriptions.
Exchange: is where the producer of the message delivers the message
There are different exchange types in RabbitMQ
- Direct
If the routing key matches, then the message is delivered to the corresponding queue, so basically 1:1 transmission.
- Fan-out
This type of exchange publishes the message to multiple queues (1:n)
- Topic
Here the messages can arrive to a queue from different sources (n:1)
- Headers
Almost never used due to its poor performance
RabbitMQ direct-reply-to page :
Direct reply-to is a feature that allows RPC (request/reply) clients to avoid declaring a response queue per request.
.env file
Module dotenv loads environment variables from a .env file into process.env,
allowing to store configuration separate from code
Projecte al github
S'instala el modul aixi :
$ npm install dotenv --save
Es configura aixi, en el fitxer ".env" del mateix directori :
NODESJSON=./data/nodes.json
PORT=20335
DB_USER=root
DB_PASS=s1mpl3
MY_BOT_TOKEN=123456:ABC-DEF1234ghIkl-zyx57W2v1u123ew11
S'invoca el modul aixi :
require('dotenv').config()
"config" will read your ".env" file, parse the contents, assign it to "process.env",
and return an Object with a parsed key containing the loaded content or an error key if it failed.
const result = dotenv.config()
if (result.error) {
throw result.error
}
console.log(result.parsed)
Podem codificar :
app.set( 'cfgPort', process.env.PORT || 3001 ) ; // set port value to app.cfgPort
config() rc
config will read your .env file, parse the contents, assign it to process.env, and return an Object with a parsed key
containing the loaded content or an error key if it failed.
const result = dotenv.config()
if (result.error) {
throw result.error
}
console.log(result.parsed)
url
should I commit my .env file ?
No. We strongly recommend against committing your .env file to version control.
It should only include environment-specific values such as database passwords or API keys.
remove dotenv from code
Use "require" flag :
node -r dotenv/config server.js
url
how is .env located
Tot comença quan el codi per tc74 fa servir ".env" - funciona en local pero no des /etc/rc.local -> /urb/bin/odin_start.
Hem de posar
# use .env
cd /home/sag/tc74
/usr/bin/node /home/sag/tc74/servidor.js &>> /home/sag/logs/temperature.log &
Aixo no es lo mes correcte i ho millorem al codi del nodejs :
# abans
// require( 'dotenv' ).config() ;
// console.log( require( 'dotenv' ).config( {debug: true} ) ) ;
# despres
require( 'dotenv' ).config( {path:__dirname+'/.env'} ) ; // __dirname is the directory in which the currently executing script resides
// console.log( require( 'dotenv' ).config({path:__dirname+'/.env'}) ) ;
Puedes pasarle el path como parámetro :
Node restart / code reload (on change)
Eines per fer restart després de re-carregar un codi nou :
nodemon (dev), forever (prod)
Run it :
nodemon <nom>.js
forever : keep app running
La resposta a la teva pregunta és forever,
un mòdul nodejs que justament serveix per mantenir un script o app de node en marxa.
El trobaràs a https://www.npmjs.com/package/forever
Si les dades ls guardes en memoria i no tens cap mecanisme de persistencia (json en filesystem, sqlite, redis...) previst,
les dades es perdran en recarregar el proces node. Es inevitable.
PodCatcher
Pagina
programación,
el sótano.
RSS = "feeds" :
all,
el Sótano,
Saltamontes
Los archivos RSS o feeds son archivos que contienen información sobre una determinada página.
Accediendo a ellos puedes saber si se han actualizado los contenidos
(por ejemplo, si tu programa favorito de rock/pop ha publicado un nuevo podcast o una noticia)
sin necesidad de visitar la página.
Los feeds tienen una URL que puede visualizarse mediante un navegador,
pero para no tener que visitar la página en busca de contenidos nuevos
suele usarse un agregador o lector de feeds
como Google Reader (discontinued), Bloglines,
Netvibes []
FAQs,
Feedzilla o My Yahoo!.
More : iTunes, Zune,
List of
podcatchers
Juice
Juice, former iPodder -
wiki,
homepage
Wrote 3 entries to C:\Users\bisc\AppData\Roaming\iPodder\favorites.txt
iCat player
Guarda totes les cançons que van sonant,
i deixa esborrar les que no vull,
i marcar les que més m'agraden.
GitHub
SWF player
<object type="application/x-shockwave-flash" data="http://statics.catradio.cat/ria/rrp/srp.swf" width="90" height="30">
<param name="flashvars" value="item=353&skin=http://statics.catradio.cat/ria/rrp/skin_rrp_directe.swf">
</object>
internals
- get XML from
{http://dinamics.catradio.cat/dalet/catradio/icat/v1/refresh_icat.xml}
It looks like
<mcs>
<mc id="info" idBloc="AA-158239" ucs="true" t="1449855603290"/>
<mc id="played" t="1449855798423"/>
<mc t="1435346172731"/>
<mc id="canals" t="1449855798436"/>
</mcs>
- using idBloc, build URL as
{http://catradio.cat/icat/standalone/icatPlayer/icatplayer/directe/3/AA-158239}
- from the file we receive, get the album cover :
<img src="http://statics.catradio.cat/multimedia/jpg/0/5/1436165140750.jpg
and the artist and song name :
<h1>
<a href="/icat/directes/DECLARACION-UNIVERSAL/AA-158239"
title="DECLARACIÓN UNIVERSAL">DECLARACIÓN UNIVERSAL</a> /<span>TACHENKO</span>
</h1>
RN3 player
Initial
URL :
there are few streams to choose one - how is the selection coded ?
<div id="player">
<object type="application/x-shockwave-flash" id="directoradioPlayer" height="37" width="100%" data="http://swf.rtve.es/swf/4.3.13/RTVEPlayerAudio.swf">
<param name="movie" value="http://swf.rtve.es/swf/4.3.13/RTVEPlayerAudio.swf"/>
<param name="allowScriptAccess" value="always">
<param name="allowFullScreen" value="true">
<param name="bgcolor" value="#FFFFFF">
<param name="flashvars" value="assetID=1712469_es_audios&location=alacarta_audios&playerId=directoradioPlayer">
<a href="http://www.rtve.es/alacarta/audios/programa/rne_rne3-live/1712469/" itemprop="url"> // dont know what is it used for - not important
<span class="audioplay">
<strong>Escuchar audio</strong>
</span>
<img src="http://img.rtve.es/css/i/player-radio-dummy.png" alt="RNE_RNE1o3 LIVE" title="RNE_RNE1o3 live" />
</a>
</object>
</div>
They use some kind of JSON:
http://www.rtve.es/api/audios/1712469/config/alacarta_audios.json
I see a
icecast URL (using Fiddler), funcionant com "netradio" :
http://radio3.rtveradio.cires21.com/radio3/mp3/icecast.audio?rnd=119858
steps to start a new project - the RN3 project
The steps to start a new project are:
- create project directory and go into it : "nd rn3"
- prepare for npm : npm init - create package.json
- code rn3.js, index.html and main.js
- install required nodejs modules, storing dependencies in package.json : npm install module_name --save (mind express has to be global)
- run your code : npm start
- sign-in into github and create a new repository - create README.md and .gitignore
- prepare local directory for git : git init
- add all files to project : git add . {mind "." meaning "all files"}
- baixem "README.md" from github : git pull origin master
- edit .gitignore and tailor it to your needs
- commit code at this point and stage files : git commit -am "v 1.0 - codi inicial - escoltem RN3"
- apuntem al repositori remot : git remote add origin https://github.com/sebastianet/rn3player
- mostrem la conexió remota : git remote -v
- indicate we want to store usr/pwd forever : git config credential.helper store
- send code to github and provide usr/pwd just once : git push -u origin master
SlideShow project
homepage
echo # SlideShow >> README.md
git init
git add README.md
git commit -am "first commit"
git remote add origin https://github.com/sebastianet/SlideShow.git
git push -u origin master
JB-antena project
Jordi vol saber el estat de la seva antena
Copiem el codi de tc74 - will reuse polling, graphics, etc
Passos per engegar
- R0 : cd nodejs
- baixar el codi
sebas@pi0alby:~/nodejs $ git clone https://github.com/sebastianet/tc74.git
Cloning into 'tc74'...
remote: Enumerating objects: 87, done.
remote: Counting objects: 100% (87/87), done.
remote: Compressing objects: 100% (59/59), done.
remote: Total 87 (delta 41), reused 67 (delta 24), pack-reused 0
Unpacking objects: 100% (87/87), done.
- mv tc74 JB-antena ; cd JB-antena
- cd .git ; rm -f -r * ; cd .. ; rmdir .git
- init npm :
sebas@pi0alby:~/nodejs/JB-antena $ npm init
This utility will walk you through creating a package.json file.
It only covers the most common items, and tries to guess sensible defaults.
See `npm help json` for definitive documentation on these fields and exactly what they do.
Use `npm install <pkg>` afterwards to install a package and save it as a dependency in the package.json file.
Press ^C at any time to quit.
package name: (jb-antena)
version: (1.0.0)
description: JB's antena monitoring
entry point: (servidor.js)
test command:
git repository:
keywords:
author: El Sebas
license: (ISC)
About to write to /home/sebas/nodejs/JB-antena/package.json:
{
"name": "jb-antena",
"version": "1.0.0",
"description": "JB's antena monitoring",
"main": "servidor.js",
"scripts": {
"test": "echo \"Error: no test specified\" && exit 1"
},
"author": "El Sebas",
"license": "ISC"
}
Is this OK? (yes)
- change nodejs and python code
- init git :
A timer on the server
I want to generate a HTML page every minute.
First, read some lines about
The Node.js Event Loop, Timers, and process.nextTick()
Read
documentation and
API on
timers
Lets start, step by step
- create empty git :
c:\sebas\miscosas\node\timer> git init
Initialized empty Git repository in C:/sebas/miscosas/node/timer/.git/
- create ".gitignore"
C:\sebas\miscosas\node\timer> type .gitignore
data
node_modules
client/vendor
client/other
client/tests
tests
scratch
*.log
- see "npm" config
C:\sebas\miscosas\node\timer> npm config list
; cli configs
user-agent = "npm/2.15.8 node/v4.4.7 win32 x64"
; builtin config undefined
prefix = "C:\\Users\\Administrator\\AppData\\Roaming\\npm"
; node bin location = C:\Program Files\nodejs\node.exe
; cwd = C:\sebas\miscosas\node\timer
; HOME = C:\Users\Administrator
; 'npm config ls -l' to show all defaults.
- create "package.json"
C:\sebas\miscosas\node\timer> npm init
This utility will walk you through creating a package.json file.
It only covers the most common items, and tries to guess sensible defaults.
See "npm help json" for definitive documentation on these fields and exactly what they do.
Use "npm install <pkg> --save" afterwards to install a package and
save it as a dependency in the package.json file.
Press ^C at any time to quit.
name: (timer)
version: (1.0.0)
description:
entry point: (gen_html.js)
test command:
git repository:
keywords:
author:
license: (ISC)
About to write to C:\sebas\miscosas\node\timer\package.json:
{
"name": "timer",
"version": "1.0.0",
"description": "",
"main": "gen_html.js",
"scripts": {
"test": "echo \"Error: no test specified\" && exit 1"
},
"author": "",
"license": "ISC"
}
Is this ok? (yes)
- codificar una mica de APP
var express = require( 'express' ) ;
var app = express() ;
app.set( 'cfgPort', process.env.PORT || 3001 ) ; //
app.set( 'cfgLapse', 1900 ) ; // mili-seconds
var http = require ( 'http' ) ;
function myFunc(arg) {
var currentdate = new Date();
var my_datetime = "Now is: " + currentdate.getDate() + "/"
+ (currentdate.getMonth()+1) + "/"
+ currentdate.getFullYear() + " @ "
+ currentdate.getHours() + ":"
+ currentdate.getMinutes() + ":"
+ currentdate.getSeconds() ;
console.log( "Timestamp {" + my_datetime + "}." ) ;
}
setInterval( myFunc, app.get( 'cfgLapse' ) ) ;
http.createServer ( function ( req, res ) {
var myhost = server.address().address ;
var myport = server.address().port ;
console.log( 'Example app listening at http://%s:%s', myhost, myport ) ;
} ).listen ( app.get( 'cfgPort' ) ) ;
- instalar "express" en local
C:\sebas\miscosas\node\timer> npm install express --save
npm WARN package.json timer@1.0.0 No description
npm WARN package.json timer@1.0.0 No repository field.
npm WARN package.json timer@1.0.0 No README data
express@4.15.3 node_modules\express
├── setprototypeof@1.0.3
├── escape-html@1.0.3
├── array-flatten@1.1.1
├── cookie-signature@1.0.6
├── methods@1.1.2
├── content-type@1.0.2
├── utils-merge@1.0.0
├── merge-descriptors@1.0.1
├── etag@1.8.0
├── encodeurl@1.0.1
├── cookie@0.3.1
├── vary@1.1.1
├── fresh@0.5.0
├── parseurl@1.3.1
├── range-parser@1.2.0
├── content-disposition@0.5.2
├── serve-static@1.12.3
├── path-to-regexp@0.1.7
├── statuses@1.3.1
├── depd@1.1.0
├── qs@6.4.0
├── on-finished@2.3.0 (ee-first@1.1.1)
├── finalhandler@1.0.3 (unpipe@1.0.0)
├── proxy-addr@1.1.4 (forwarded@0.1.0, ipaddr.js@1.3.0)
├── debug@2.6.7 (ms@2.0.0)
├── send@0.15.3 (destroy@1.0.4, ms@2.0.0, mime@1.3.4, http-errors@1.6.1)
├── accepts@1.3.3 (negotiator@0.6.1, mime-types@2.1.15)
└── type-is@1.6.15 (media-typer@0.3.0, mime-types@2.1.15)
- verificar modificació package
C:\sebas\miscosas\node\timer>
type package.json
{
"name": "timer",
"version": "1.0.0",
"description": "",
"main": "gen_html.js",
"scripts": { //
https://blog.jayway.com/2014/03/28/running-scripts-with-npm/
"test": "echo \"Error: no test specified\" &&exit 1",
"start": "node gen_html.js"
},
"author": "",
"license": "ISC",
"dependencies": {
"express": "^4.15.3"
}
}
- run :
C:\sebas\miscosas\node\timer> node gen_html.js
Timestamp {Now is: 23/7/2017 @ 12:41:11}.
Timestamp {Now is: 23/7/2017 @ 12:41:12}.
Timestamp {Now is: 23/7/2017 @ 12:41:14}.
Ara al RSPI
El client demanarà la pagina un cop cada minut, automaticament.
guess "<META HTTP-EQUIV="Refresh" CONTENT="90;URL=./pagina.htm">" does the trick
El Servidor ha de generar el mateix fitxer cada Timeout, aixi que el manegament de fitxers és important.
Fem-lo al Linux.
Al ODIN tenim :
ls -al /home/pi/timer
.gitignore
package.json
On
pi@odin:~/timer $ cat package.json
{
"name": "timer",
"version": "1.0.0",
"description": "genera HTML cada Timeout",
"main": "gen_html.js",
"scripts": {
"test": "echo \"Error: no test specified\" && exit 1",
"start": "node gen_html.js"
},
"author": "En Sebas",
"license": "MIT",
"private": "true",
"repository": {
"type": "git",
"url": "git://github.com/sebastianet/timer.git"
},
"dependencies": {
"express": "^4.15.3"
},
"devDependencies": {}
}
Fem
pi@odin:~/timer $ git init
Initialized empty Git repository in /home/pi/timer/.git/
$ sudo apt-get update
$ npm init (create package.json)
$ npm install
$ npm start
Com que comença a funcionar, ho posem al github :
Crear nova entrada "timer" al github i llavors al Odin, fem :
pi@odin:~/timer $ git remote add origin https://github.com/sebastianet/timer.git
pi@odin:~/timer $ git add .
pi@odin:~/timer $ git commit -am "first"
[master (root-commit) b5bc5eb] first
4 files changed, 164 insertions(+)
create mode 100644 .gitignore
create mode 100644 gen_html.js
create mode 100644 package.json
create mode 100644 public/pagina.html
pi@odin:~/timer $ git push -u origin master
Username for 'https://github.com': sebastianet
Password for 'https://sebastianet@github.com':
Counting objects: 7, done.
Delta compression using up to 4 threads.
Compressing objects: 100% (6/6), done.
Writing objects: 100% (7/7), 2.26 KiB | 0 bytes/s, done.
Total 7 (delta 0), reused 0 (delta 0)
To https://github.com/sebastianet/timer.git
* [new branch] master -> master
Branch master set up to track remote branch master from origin.
Fem un ping()
En el "Odin" instalem el modul i el codi :
pi@odin:~/timer $
cat 2_do_ping.py
#!/usr/bin/python
import pyping
# sudo pip install pyping
szDesti = '74.125.143.104'
print 'IP (',szDesti,').' # ret string #1
try: #
url
response = pyping.ping( szDesti, timeout=900, count=2 ) # -t 900 -c 2
if response.ret_code == 0:
print( "RC 0 - Viagra, reachable" ) # 74.125.143.104
else:
print( "RC KO - Promescent, unreachable" ) # 1.2.3.4
except ZeroDivisionError:
print( "RC KO - divBy0" )
I tenim que funciona :
pi@odin:~/timer $ sudo ./2_do_ping.py
Lets ping ( 74.125.143.104 ).
RC 0 - Viagra, reachable
Ara anem a cridar-ho des el node :
python_options.args[0] = iPing_IP ; // set IP to ping in python params
PythonShell.run( '2_do_ping.py', python_options, function( err, results ) { // call python code implementing "ping()"
if ( err ) {
if ( err.code === 'ZeroDivisionError' ) { // accept this error
results[1] = '-' ;
} else {
throw err ; // fatal error : stop
}
} ;
console.log( genTimeStamp() + ' (+) Python results (%j).', results ) ; // results is an array of messages collected during execution
// if "RC 0" then "on", if "RC KO" then "off"
var ss_OK = "RC 0" ;
var idx = results[1].indexOf( ss_OK ) ; // search meaningful string : "-1" means "not found"
console.log( '(#) PING result IDX str (%s) in (%s) is (%j).', ss_OK, results[1], idx ) ;
szNow = genTimeStamp() ; // get timestamp
if ( idx >= 0 ) { // substring found, meaning IP is ALIVE at this moment
DivByZero using pyping()
/home/sebas/node_projects/timer/1_gen_html.js:182
if ( err ) throw err;
^
Error: ZeroDivisionError: float division by zero
at PythonShell.parseError (/home/sebas/node_projects/timer/node_modules/python-shell/index.js:183:17)
at terminateIfNeeded (/home/sebas/node_projects/timer/node_modules/python-shell/index.js:98:28)
at ChildProcess.<anonymous> (/home/sebas/node_projects/timer/node_modules/python-shell/index.js:88:9)
at emitTwo (events.js:125:13)
at ChildProcess.emit (events.js:213:7)
at Process.ChildProcess._handle.onexit (internal/child_process.js:200:12)
----- Python Traceback -----
File "/home/sebas/node_projects/timer/2_do_ping.py", line 27, in <module>
response = pyping.ping( szDesti, timeout=900, count=2 ) # -t 900 -c 2
File "/usr/local/lib/python2.7/dist-packages/pyping/core.py", line 426, in ping
return p.run(count)
File "/usr/local/lib/python2.7/dist-packages/pyping/core.py", line 288, in run
self.print_exit()
File "/usr/local/lib/python2.7/dist-packages/pyping/core.py", line 208, in print_exit
lost_rate = float(lost_count) / self.send_count * 100.0
sebas@T60ubuntu:~/node_projects/timer$
guifi server on T60 under Ubuntu 14.04 LTS
Instalem el projecte, despres de "npm", "node" i "git" :
sebas@T60ubuntu:/home/sebas/node_projects $ git clone https://github.com/sebastianet/timer.git
sebas@T60ubuntu:/home/sebas/node_projects $ cd timer
sebas@T60ubuntu:/home/sebas/node_projects/timer $ npm install
sebas@T60ubuntu:/home/sebas/node_projects/timer $ sudo node 1_gen_html.js
$ sudo apt-get install python-pip
$ sudo pip install pyping
sebas@T60ubuntu:/home/sebas/node_projects/timer $ sudo node 1_gen_html.js ; funciona !
Promise
The problem to be solved is that of asynchronous/async operations.
That is, when an operation or function begins executing but for whatever reason has some delay before completion.
A promise is an object representing the eventual completion or failure of an asynchronous operation.
An async function can return a promise, to which we can then attach .then ,
which essentially acts as an event listener for when the async function completes.
Que es
Sample "promise" i "await"
The await keyword can be used to indicate that the function that follows will be returning a promise,
which should be awaited before executing any other dependent code.
await can only be used inside an async function
app.get("/getdata", async function(req, res){
var data = await pullData();
var filteredData = await filterByYear(data);
res.json(filteredData);
})
url
New and old code
No se pas si son equivalents :
=== (new) ===
app.get( '/', (req,res) => res.send( 'Hola, nen !' ) ) ;
===
=== (old) ===
app.get( '/', function(req,res) {
res.send( ' *** Hola, nen ! ***' ) ;
} ) ;
===
Pere 2024.06
la manera més fàcil és passar-ho tot funcions asíncrones i fer awaits de les promises
per començar, crea una funció main asíncrona i invocala inmediatament
(async function main() {
let result = await funcioasincrona(parametres, imes);
console.log(result);
})()
funcioasincrona retorna una promise i amb await esperes el fullfill de la promise
promise's links
Benefits of using Node.js
Node.js is a part of wide JavaScript full stack, that unifies language, data and all resources.
Thus, making developer’s life much easier.
Benefits of Node.js apps are:
- speed (runs on Google JS engine)
- non-blocking I/O paradigm
- data streaming (HTTP requests and responses as a single event)
- real-time apps (client-side and server-side)
- unified database queries (JSON format)
- easy and fast coding
- open-source NPM repository (over 60.000 modules)
- proxy server ability
- fast development cycles
- business logic on the server
- appropriate for Android devices
One of the things that makes Node.js uniquely suited to running in production
is that you can inspect and change a program without restarting it.
Matt Ranney, Sr. staff engineer at Uber
Node.js, being a non-blocking event-driven model presented developers a possibility to build applications in real-time.
Blue-Green deployment
Por el tipo de aplicaciones que se hacen en node.js, generalmente preparadas para cloud,
donde una aplicación puede ser reiniciada en cualquier momento por que a la plataforma cloud le conviene,
se puede programar fácilmente un mecanismo de reinicio de la aplicación sin desatender las peticiones en curso.
Hay una forma estándar para cualquier lenguaje:
el blue-green deployment
localtunnel
exposing your app to the world :
- localtunnel
See
localtunnel/server for details on the server that powers localtunnel.
the boroer (mantenidor)
- ngrok ,
dashboard ,
docs
- now + new homepage
- staqlab (free)
How it works?
Staqlab tunnel is a light-weight reverse-proxy ssh client which creates a tunnel between your dev machines and our server.
Whenever we get webhooks / http requests on provided url we forwards the encrypted secure requests to your machine. S
imilarly, whenever your machine produces output out of given request, we take the output and transports it to the client.
Taking altogether, we are acting as a middle man between your dev machine and public internet.
- serveo (funciona ?)
example
- showoff
Localtunnel is free but gives you different URL every time you start it. Showoff will give you a permanent address but costs money. Such is life.
Lo Pere, 20200911, codifica :
#!/usr/bin/env node
// tool : https://www.npmjs.com/package/localtunnel
// commands :
// curl https://lopere4sebas.loca.lt # access this app
// curl https://freegeoip.app/xml/193.34.76.44 # geolocate the reverse proxy server
const express = require('express');
const localtunnel = require('localtunnel');
let config = { port_number: 7357, tunnel_name: 'lopere4sebas' } ;
let app = express();
app.get( '/', (req,res) => res.send('Hola, Sebas!') ) ;
app.listen( config.port_number, err=>console.log( 'server listening at port ', config.port_number ) ) ;
// Creates a new localtunnel to the specified local port.
// Will return a Promise that resolves once you have been assigned a public localtunnel url.
let tunnel = localtunnel( { port: config.port_number, subdomain: config.tunnel_name },
()=>console.log( 'and at public url ', tunnel.url ) ) ;
I accedeixo :
$ curl https://lopere4sebas.loca.lt
Jo veig :
nicolau@mars:~$ ping lopere4sebas.loca.lt
PING lopere4sebas.loca.lt (193.34.76.44) 56(84) bytes of data.
64 bytes from 193.34.76.44 (193.34.76.44): icmp_seq=1 ttl=48 time=122 ms
64 bytes from 193.34.76.44 (193.34.76.44): icmp_seq=2 ttl=48 time=123 ms
Que eixa url situa a Ontario, Canada
Some links :
localtunnel at pi0
sebas@pi0alby:~/nodejs/tunel $ npm install express --save
sebas@pi0alby:~/nodejs/tunel $ npm install localtunnel --save
sebas@pi0alby:~/nodejs/tunel $ npm start
> tunel_pere@1.0.0 start /home/sebas/nodejs/tunel
> node tunel_pere.js
server listening at 7357
and at https://lotunelsebas.loca.lt
From another machine I can see
nicolau@mars:~$ ping lotunelsebas.loca.lt
PING lotunelsebas.loca.lt (193.34.76.44) 56(84) bytes of data.
And access from outside guifi.net :
nicolau@mars:~$ curl https://lotunelsebas.loca.lt
Hola, nen !
el meu esquema del localtunnel
( )
[client] ---( internet ) --- FO Aj --- --- --- --- --- --- guifi campanar --- --- --- --- --- guifi casa --- --- --- --- --- PiZero --- --- --- APP njs
( ) 83.35.232.32 / 192.168.1.1 192.168.1.254 / 10.139.130.97 10.139.130.117 / 192.168.1.1 192.168.1.222
( )
( ) --- 193.34.76.44
reverse proxy location
Use this tool while providing the IP :
nicolau@mars:~$ curl https://freegeoip.app/xml/193.34.76.44
<Response>
<IP>193.34.76.44</IP>
<CountryCode>CA</CountryCode>
<CountryName>Canada</CountryName>
<RegionCode>ON</RegionCode>
<RegionName>Ontario</RegionName>
<City>Kitchener</City>
<ZipCode>N2H</ZipCode>
<TimeZone>America/Toronto</TimeZone>
<Latitude>43.4595</Latitude>
<Longitude>-80.485</Longitude>
<MetroCode>0</MetroCode>
</Response>
music web player
music web player link s
Google "javascript music web player" :
Some JavaScript code by Lo Pere
random number
Generate a random real number Math.random() and convert it to integer :
pi@raspberrypi-llovet:~/semafor $ cat 7_random.js
i = Math.random() ; // generate a (floating point) random number in [0 and 1)
console.log( 'I = [' + i + '].' ) ;
j = Math.floor( i * 10 ) ; // integer value in [0..9]
console.log( 'J = [' + j + '].' ) ;
Floating Status Line (click to fade), by Pere (gràcies !)
CSS :
.topalert {
background-color: #336;
text-align: center;
padding: 10px 40px;
color: white;
font-size: 1.2em;
display:none;
position:relative;
height: 50px;
}
.topalert.warning {
background-color: orange;
}
.topalert.info {
background-color: green;
}
.topalert.caution {
background-color: red;
}
.topalert a {
color: #ccf;
}
.topalert:hover {
border-bottom: 8px solid rgba(255,255,255,0.4);
}
JavaScript :
function topalert( anid, moreclasses, alertmsg, okmsg, cb ) {
var $topalert = $('<div>').attr( "id", anid ).addClass( "topalert" ).addClass( moreclasses ) ;
var $msg1 = $('<span>').addClass( "msg1" ).html( alertmsg ).appendTo( $topalert ) ;
$msg1.show();
var $msg2 = $('<span>').addClass( "msg2" ).html( okmsg ).appendTo( $topalert ) ;
$msg2.hide();
$topalert.on( 'click', function(){
$msg1.hide();
$msg2.show();
$topalert.delay(1000).fadeOut();
if (cb) cb();
});
$('body').prepend($topalert);
$topalert.fadeIn();
}
HTML :
<title>JS Bin</title>
<script src="https://code.jquery.com/jquery-3.0.0.js"></script>
</head>
<body>
<hr>
<div>header text</div>
<hr>
<button onclick = 'topalert( "done", "info", "<strong>Done!</strong>", "Got it")'>Click me</button>
</body>
Fixed Status Line, by Pere (gràcies !)
CSS :
#visiblelog {
font-family: Consolas, Menlo, Monaco, Lucida Console, Liberation Mono, DejaVu Sans Mono, Bitstream Vera Sans Mono, Courier New, monospace;
background-color: black;
color: lime; /* .info and .log considered equivalent to default */
max-height: 240px;
overflow-y: scroll;
}
#visiblelog p { margin:0; }
#visiblelog .warning, #visiblelog .warn {
color: orange;
}
#visiblelog .caution, #visiblelog .error {
color: red;
}
#visiblelog .time {
color: white;
font-size: 0.6em;
}
#sebasaqui {
margin-top: 12px;
border-top: 4px solid green;
}
JavaScript :
var $visibleLog;
function createVisibleLog(parent) {
if ($('#visiblelog').length) return $('#visiblelog');
return $('<div id="visiblelog">').appendTo($(parent));
}
function visibleLog(s, classes) {
if (!$visibleLog) $visibleLog=createVisibleLog('body');
var ds = new Date().toLocaleTimeString();
console.log('<i>'+ds+'</i> '+s);
var sds='<span class="time">'+ds+'</span> '+s;
var $sds = $('<p>').addClass(classes).html(sds);
$visibleLog.append($sds);
}
function visibleError(s) {
console.error(s);
visibleLog(s,'error');
}
function visibleWarning(s) {
visibleLog(s,'warn');
}
HTML :
<title>JS Bin</title>
<script src="https://code.jquery.com/jquery-3.0.0.js"></script>
</head>
<body>
<hr>
<button onclick = 'visibleLog("Com daia el poeta Oh, què cansat estic!");'>Click LOG</button>
<hr>
<div id="sebasaqui"></div>
<hr>
<p>
<button onclick = 'visibleWarning("Ya va siendo hora de que los peques nos vayamos a la cama");'>Click WARN</button>
<hr>
</body>
<script>
$(document).ready( function(){
createVisibleLog("#sebasaqui");
});
</script>
</html>
Nodes Monitor, by Pere (20190520, gràcies !)
nodesmonitor at github (és privat -> fer "Sign In")
//T60/home/sebas/node_projects/pere/nodesmonitor
Punts interessants
Fitxer de configuracio
let nodesJsonFn = path.normalize( path.resolve( process.argv[2] || // passem la ubicacio del fitxer com a parametre ...
process.env.NODESJSON || // o al fitxer ".env" com "NODESJSON=./data/nodes.json"
path.join( os.homedir(), 'nodes.json' ) ) ) ; // o fem servir un fitxer fixe
Mostrar configuracio al client
Al servidor enviem un JSON :
app.get( '/info', function (req, res) {
let szGetInfo = ">>> /info" ;
console.log( szGetInfo ) ;
res.send( { serverfn, myVersion, servername, nodesJsonFn, hostname, started, pid:process.pid } ) ;
} ) ; // app.get ( '/info' )
Al client demanem la configuracio i la mostrem :
<h1> Estat del servidor </h1>
<p id="info-server"> </p>
function setInfo( info ) {
$( "#info-server").text( `APP [ ${info.servername} ] version [ ${info.myVersion} ]
serving [ ${info.nodesJsonFn} ] at host [ ${info.hostname} ]
since [ ${dmy(info.started)} ].` ) ;
} ;
...
$.getJSON( '/info', setInfo ) ;
jQuery.getJSON() :
Load JSON-encoded data from the server using a GET HTTP request
Llegir dades de un fitxer JSON
Suposem que tenim un fitxer de texte com aquest :
{
"desc": "example nodes file for test",
"list": [
{ "user": "someone", "ip": "192.68.1.1", "lnk": "router" },
{ "user": "anotherone", "ip": "192.68.1.2", "lnk": "router" },
]
}
El llegim aixi :
let nodesText = fs.readFileSync(config.nodesJsonFn, "utf-8")
if (!nodesText) return console.error("--- can't read "+config.nodesJsonFn);
let nodes = JSON.parse(nodesText) ;
if (!Array.isArray(nodes.list)) return console.error('--- invalid '+config.nodesJsonFn);
Projecte a github
Mocha i Chai
En Pere els fa servir per fer testing amb "npm test"
package.json
{
"name": "nodesmonitor",
"version": "0.2.0",
"description": "A quick example of a nodejs app that monitors a list of nodes by IP",
"main": "server.js",
"scripts": {
"test": "mocha test --exit",
"start": "node server"
},
test.js
const chai = require('chai');
const chaiHttp = require('chai-http');
const server = require('./server');
// Configure chai
chai.use(chaiHttp);
chai.should();
describe("Nodes Monitor Server", () => {
mocha
Homepage
chai
Homepage
socket.io running sample
airpair url - \\w500\node\socket_io
socket.io homepage
make socket.IO to listen on an instance of a HTTPS server :
var fs = require('fs');
var https = require('https');
var options = {
key: fs.readFileSync('key.pem'),
cert: fs.readFileSync('cert.pem')
};
var server = https.createServer(options);
var io = require('socket.io').listen(server);
server.listen();
Timestamping served pages from client
JS code on client
Usually the client begins with a file like this :
sag@odin:~/express-sendfile/public $ cat index.html
<hr>
<div id="id_date">
</div>
<hr>
<script src="//code.jquery.com/jquery-2.1.1.min.js"></script>
<script src="client.js" defer></script>
</body>
</html>
That includes some code like this :
sag@odin:~/express-sendfile/public $ cat client.js
function index_ready() { // DOM ready for index.htm
console.log( '*** (' + genTimeStamp() + ') *** index DOM ready.' ) ;
// posar la data actual a la pagina - aixi diferenciem re-loads
var szAra = '<center>./public/index.html - now is [' + genTimeStamp() + '] </center>' ;
$( "#id_date" ).html( szAra ) ; // show actual date
} ; // index_ready(), DOM ready for INDEX.HTM
$( function() {
index_ready(); // DOM ready event
} ) ; // DOM ready
Minimal code
If we just want to have a timestamp to monitor, but not in the HTML page,
we can use "F12" console
Used sending automatic pages from R0 and R3 :
sebas@pi0alby:~/python/tinet $ cat enviar_ip_a_tinet.py
<script src="https://code.jquery.com/jquery-2.1.1.min.js"></script>
<script src="dom_timestamp.js" defer></script>
</body>
Where te code generating the actual timestamp is
sebas@pi0alby:~/python/tinet $ cat dom_timestamp.js
// nova funcio yymmdd de Date() - at client
Date.prototype.yyyymmdd = function () {
var yyyy = this.getFullYear().toString() ;
var mm = (this.getMonth()+1).toString() ; // getMonth() is zero-based
var dd = this.getDate().toString() ;
return yyyy + '/' + (mm[1]?mm:"0"+mm[0]) + '/' + (dd[1]?dd:"0"+dd[0]) ;
} ; // yyyymmd
Date.prototype.hhmmss = function () {
function fixTime(i) {
return (i < 10) ? "0" + i : i;
}
var today = new Date(),
hh = fixTime( today.getHours() ),
mm = fixTime( today.getMinutes() ),
ss = fixTime( today.getSeconds() ) ;
var myHHMMSS = hh + ':' + mm + ':' + ss ;
return myHHMMSS ;
} ; // hhmmss
// get a timestamp
function genTimeStamp ( arg ) {
var szOut = (new Date).yyyymmdd() + ' - ' + (new Date).hhmmss() ;
return szOut ;
} ; // genTimeStamp()
function dom_is_ready() { // DOM ready event
console.log( '*** (' + genTimeStamp() + ') *** DOM is ready.' ) ;
} ; // DOM ready ()
$( function() {
dom_is_ready() ; // DOM ready event
} ) ; // DOM ready
can I know the client's IP ?
nodejs app is a server that waits for some request from the client browser
We want to display the client IP
request.headers['x-forwarded-for']
request.connection.remoteAddress
console.dir(req.ip) ;
expressjs api
var ip = req.headers['x-forwarded-for'] ||
req.connection.remoteAddress ||
req.socket.remoteAddress ||
(req.connection.socket ? req.connection.socket.remoteAddress : null); //
url
var ip = (req.headers['x-forwarded-for'] || '').split(',').pop().trim() ||
req.connection.remoteAddress ||
req.socket.remoteAddress ||
req.connection.socket.remoteAddress
What tool can we use to test this code without an actual node in my PC or Raspy ?
glitch commands
glitch &
support / forum
- (terminal) curl ifconfig.so - mostra la IP del contenidor (pot canviar fins a cada 12 hores
URLs about client's IP
Running node as service
See my projects -> fronius at R0
Links
Ending node abruptly
process.on('exit', ..) isn't called if the process crashes or is killed.
It is only called when the event loop ends, and since server.close() sort of ends the event loop
(it still has to wait for currently running stacks here and there) it makes no sense to put that inside the exit event...
On crash, do process.on('uncaughtException', ..) and on kill do process.on('SIGTERM', ..)
That being said, SIGTERM (default kill signal) lets the app clean up, while SIGKILL (immediate termination) won't let the app do anything.
ESP "terminator"
pending
my projects using nodejs
host path to project how to start see result que fa github-gitlab notes
----- ---------------- ------------- ----------- ------- -------------- ------
R3, odin /home/sag/express-sendfile ./1_engega.sh http://odin:2415 mostra fotos que fa la webcam Envia_Foto
R0, piZero /home/pi/njs/fronius fronius_nodejs.service http://sebas-r0.duckdns.org:2000 mostra les energies del SmartMeter fronius update /home/pi/njs/fronius/dades from R4
http://pi0:3000
La ciencia de Luís
- myTimer()
- send / receive a JSON object
- dump all "err" contents
- destructuring
- backticks and interpolation
- let vs var
- triple equal
- pc and mobile
myTimer
Funciona bien :
function MyTimeout( ) {
console.log( '*** [' + genTimeStamp() + '] MyTimeout (' + seconds + ') sec, id ' + myTimer ) ;
}
$( ".clkStartFotoSeq" ).click( function() {
myTimer = setInterval(_ =>
{ MyTimeout() }, 1000 * seconds) ;
console.log( '*** [' + genTimeStamp() + '] start Timer' + ', id ' + myTimer) ;
}) ; // clkStartFotoSeq
###
START a photo sequence ### 10x 160x120 ###
Funciona mal :
function MyTimeout( ) {
console.log( '*** [' + genTimeStamp() + '] MyTimeout (' + seconds + ') sec, id ' + myTimer ) ;
}
$( ".clkStartFotoSeq" ).click( function() {
myTimer = setInterval( MyTimeout(), 1000 * seconds) ;
console.log( '*** [' + genTimeStamp() + '] start Timer' + ', id ' + myTimer) ;
}) ; // clkStartFotoSeq
Lo que estás pasando es "el resultado de ejecutar la función MyTimeout",
que en este caso retorna "undefined" porque es una función que no tiene "return".
Lo que deberías usar en el caso 2 es simplemente el nombre de la función:
myTimer = setInterval( MyTimeout, 1000 * seconds) ;
Ahora setInterval recibe la función MyTimeout, no el resultado de su ejecución,
porque si no le pones "()" no se ejecuta.
Y cuando pase el tiempo especificado en el segundo parámetro, entonces la ejecutará.
send / receive a JSON object
At the server we do :
app.get( '/fes_photo_gimme_json', function ( req, res ) {
res.writeHead( 200, { 'Content-Type': 'application/json' }) ;
let my_json = { status: 'OK', imgURL: fixed_png_File } ;
res.end( JSON.stringify(my_json) ) ;
} ) ; // get(/fes_photo_gimme_json) do photo and send its name
At the client we do :
function MyTimeout( ) {
console.log( '*** [' + genTimeStamp() + '] event : MyTimeout (' + seconds + ') sec, id ' + myTimer + ' - ask JSON' ) ;
$.getJSON( '/fes_photo_gimme_json', function( mi_json ) {
if ( mi_json.status == "OK" ) {
console.log( '+++ rebem JSON : q(' + mi_json.status + '), url (' + mi_json.imgURL + ').' ) ;
let randomStr = Math.random().toString(36).substr(2); // avoid html 304
$( "#id_imatge" ).attr( 'src', mi_json.imgURL+ '?random=' + randomStr ) ; // request pic file and place it in page
} else {
var szError = genTimeStamp() + 'Error RxJSON ' + mi_json.status ;
$( "#id_estat" ).szError ; // show error message at specific <div>
} ;
}) ;
} ; // MyTimeout( )
Dump full "err" contents
If we want to trace all the cotents of "err" we must use
doSomething ( aThing, function ( err, newThing ) {
if ( err ) {
console.log( JSON.stringify( err ) ) ; // luis crespo, again
return handleError ( err ) ;
} ;
// . . .
} ) ; // doSomething()
See details
Destructuring
El destructuring te permite, en una asignación, condensar varios pasos.
En lugar de:
let a = calcularArray();
let a0 = a[0]; let a1 = a[1];
Podemos hacer directamente:
let [a0, a1] = calcularArray();
Una sintaxis equivalente existe para objetos. En lugar de:
const url = req.url;
const routePath = req.path;
Podemos abreviar:
const { url, path: routePath } = req;
El caso de ":" sirve cuando quieres que tu variable se llame distinto de la property que quieres extraer del objeto.
Template Literals and Backtick : interpolation
You're already well aware of declaring string literals with (") or (') delimiters,
and you also know that these are not smart strings (as some languages have),
where the contents would be parsed for interpolation expressions.
ES6 introduces a new type of string literal, using the (`) backtick as the delimiter.
These string literals allow basic string interpolation expressions to be embedded,
which are then automatically parsed and evaluated.
The fancy term for such parsing and evaluating is interpolation (much more accurate than templating).
JSON eval
let vs var
The difference is scoping.
var is scoped to the nearest function block and let is scoped to the nearest enclosing block, which can be smaller than a function block.
Both are global if outside any block.
let vs var
Otra ventaja más de "let" respecto de "var":
si definimos una misma variable dos veces (en el mismo ámbito),
en el caso de "let" da un error, como debería ser,
y en el caso de "var" se lo traga y simplemente redefine la variable.
En C, el ámbito de las variables alcanza al bloque en el cual fueron definidas;
sin embargo en JavaScript el ámbito de las variables es el de la función en la cual fueron declaradas.
Esto cambia con la versión de ECMAScript 2015, ya que añade compatibilidad con block scoping por medio de la palabra clave let.
wiki JS
Triple equal
Este
artículo explica la diferencia
El "=="" hace coerción de tipos antes de comparar, el "==="" no.
Así, 0 == "0" es true, pero 0 === "0" es false.
La recomendación es usar el "===""
porque el "=="" es muy arbitrario cuando los datos que comparas a la izquierda y derecha del "==""
pueden ser de distinto tipo, mientras que el "==="" sólo evaluará a cierto si son del mismo tipo y además iguales.
HTML al PC i al mobil
Pues hay todo un mundo de técnicas para que un mismo CSS se vea bien tanto en móvil como en Desktop,
se le llama responsive design.
Pero en resumen, lo que te recomiendo es usar un framework de CSS (que también los hay)
y que resuelve este tema para que tú no tengas que preocuparte.
Yo utilizo Bootstrap, que además da un aspecto muy profesional a todas las páginas.
Simplemente define una serie de clases CSS que tú debes poner a los elementos HTML.
En particular, la sección de
layout es la más útil para "responsive design".
Com executar JS on-line
Provo
- repl.it - node.js online editor, IDE, compiler ...
- jDoodle :
online nodeJS IDE
online Python 3 IDE
- prueba codesandbox.io y usa "Vanilla" al crear el sandbox.
Luego verás que abajo a la izquierda hay un hueco para añadir las "Dependencies", ahí añades superagent y cheerio.
Luego copias y pegas el código y verás que ya no se queja de las librerías.
Todos estos entornos son de ejecución para navegador, no de entorno node.js
Si quieres ejecutar aplicaciones node.js tipo servidor y quieres evitar instalar node.js en tu máquina, tienes dos opciones:
- 1) usar algún hosting de node.js, los hay gratuitos.
- 2) instalar Docker en tu máquina y ejecutar node.js desde Docker.
Docker es una maravilla porque te permite ejecutar cualquier software sin tener que instalar nada en tu máquina (aparte de Docker la primera vez).
Son como micro máquinas virtuales...
Docker al MARS Ubuntu
Use:
If you don’t want to preface the docker command with "sudo", create a Unix group called "docker" and add users to it.
When the Docker daemon starts, it creates a Unix socket accessible by members of the "docker" group.
- $ sudo groupadd docker
- $ sudo usermod -aG docker $USER
- log out and log back in so that your group membership is re-evaluated.
- verify that you can run docker commands without sudo : $ docker run hello-world
nicolau@mars:~$ cat /etc/group | grep docker
docker:x:1001:nicolau
nicolau@mars:~/sebas/_local_tinet_files$ docker run hello-world
docker: Got permission denied while trying to connect to the Docker daemon socket at unix:///var/run/docker.sock:
Post http://%2Fvar%2Frun%2Fdocker.sock/v1.40/containers/create: dial unix /var/run/docker.sock: connect: permission denied.
See 'docker run --help'.
Sembla problema de "sudo" :
nicolau@mars:~$ sudo docker run hello-world
Unable to find image 'hello-world:latest' locally
latest: Pulling from library/hello-world
0e03bdcc26d7: Pull complete
Digest: sha256:31b9c7d48790f0d8c50ab433d9c3b7e17666d6993084c002c2ff1ca09b96391d
Status: Downloaded newer image for hello-world:latest
Hello from Docker!
This message shows that your installation appears to be working correctly.
To generate this message, Docker took the following steps:
1. The Docker client contacted the Docker daemon.
2. The Docker daemon pulled the "hello-world" image from the Docker Hub.
(amd64)
3. The Docker daemon created a new container from that image which runs the
executable that produces the output you are currently reading.
4. The Docker daemon streamed that output to the Docker client, which sent it
to your terminal.
To try something more ambitious, you can run an Ubuntu container with:
$ docker run -it ubuntu bash
Share images, automate workflows, and more with a free Docker ID:
https://hub.docker.com/
For more examples and ideas, visit:
https://docs.docker.com/get-started/
Here they say :
nicolau@mars:~$ ls -al /var/run/docker.sock
0 srw-rw---- 1 root root 0 Jan 22 12:44 /var/run/docker.sock
nicolau@mars:~/sebas/_local_tinet_files$ sudo chmod 666 /var/run/docker.sock
nicolau@mars:~/sebas/_local_tinet_files$ docker run hello-world
Hello from Docker!
run a NJS app
- create package.json
- $ npm install {crea node_modules}
- $ npm run
Use nodejs-docker
htmx és un petit modul de javascript que carregat en una pàgina permet fer crides AJAX des de qualsevol element i sense codi javascript,
només afegint un parell de atributs a l'element.
Simplifica tots els problemes de creació de pàgines html "davant" del teu codi al servidor, sense matxacarte amb javascript.
Gracies, Pere ! {20221020}
htmx gives you access to
AJAX,
CSS Transitions,
WebSockets and
Server Sent Events
directly in HTML, using attributes
"Uncaught ReferenceError: $ is not defined"
Veiem aquest error fent servir F12 = Chrome Console
Causa : que no hem posat (just abans de </body>)
<script src="https://code.jquery.com/jquery-3.0.0.js"></script>
abans
<script src="http://code.jquery.com/jquery-1.10.1.min.js"></script>
ara
<script src="http://code.jquery.com/jquery-2.1.1.min.js"></script>
20210218 : Blocked loading mixed active content
<meta http-equiv="Content-Type" content="text/html; charset=utf-8">
<meta http-equiv="Content-Security-Policy" content="upgrade-insecure-requests">
<script src="http://code.jquery.com/jquery-2.1.1.min.js"></script>
Dubtes
- quina diferencia hi ha entre app.get() i app.use() ?
app.use() is intended for binding middleware to your application
app.get() is part of Express' application routing and
is intended for matching and handling a specific route when requested with the GET HTTP verb
- what's the difference between :
var app = new Express();
and
var app = express();
- es pot ficar un <script> en una pagina carregada dinamicament via $.get() ?
Ha de portar el seu "DOM ready" propi ? {jQuery el porta a $.load()}
Es a dir, ha de anar al INDEX.HTM "global" ?
Aixo implicaria que al INDEX.HTM global hi hauria tots els scripts de totes les sub-pagines !
- on es posa el codi "tancar la conexio amb la base de dades" ?
- Buffer deprecation :
Use
- export NODE_OPTIONS='--trace-warnings --pending-deprecation'
- node yourcode.js
- get a full stack trace to the module using "Buffer"
- diferencia
entre "Full Stack" i "Front End" i "Back End"
- error
Block-scoped declarations (let, const, function, class) not yet supported outside strict mode - update "node"
- how to send data from server to client - see
SRV_PUSH
- difference between "console.log" and "console.dir" : presentation
"console.dir" does not present "\t" as TAB, while "console.log" does
- console.error() - Outputs an error message to the Web Console
console.log() - Outputs a message to the Web Console
console.dir() - Displays an interactive list of the properties of the specified JavaScript object
- "for" versus "forEach" -
url
Links
- MEAN = Mongo, Express, Angular, Node - a complete path using JavaScript
- Angular = client-side SPA framework
Un article que explica qué vol "solucionar" el angular :
why and when to use angular, a JavaScript Data Binding framework
- Mes frameworks :
- Mercury - a modular Front-end framework
- Meteor is a full-stack JavaScript platform for developing modern web and mobile applications
- JSON
viewer for Chrome
- own Disk Use
- RESTful API -
RESTful web services are CRUD-oriented, rather than business- or transaction-oriented
-
RESTful considered harmful
- build a simple notification service
with Node.js and MongoDB
[\\T430\JavaScript\notifsrv]
- passport
-
Stormpath
allows you to create, edit, and securely store
your application's user accounts and user account data
- always send the correct
HTTP codes
- mr Crockford has nice
page, with tools as
JS Lint (see appendix "C" of "the good parts")
-
wCDT has a "reservas" application, and the code is in
github - v5 uses HTTPS !
En Enric hi te sAGeSP,
pero jo tinc el seu codi a Enric
Tambe el posem a Bluemix
- SPA, Single Page Application
-
jQuery CDN &
jQuery UI
- learn
git branching {*** demo amb exercicis ***}
- nice demo by
Eli
- ask questions at
stack overflow - I am
Sebastia.Net
- nice tools :
- glitch - run nodejs code
- CodePen.io/ - create, copy and paste nice sample into your HTML
- JS fiddle - test your JavaScript, CSS, HTML or CoffeeScript online
- JSbin - collaborative JavaScript debugging
- JSON lint - validator and reformatter for JSON
- CRUD, Express and MongoDB tutorial :
github,
description
- all my github projects
node.js links
-
http://nodejs.org/,
v5.1.0,
excelent
API documentation [***],
download (4.2.2 @ 20151203), maybe
latest (5.1 @ 20151203)
(will need
python
too)
- video Ryan Dahl (got 760 MB)
- Node beginner book, libro
para principiantes,
Execution in the Kingdom of Nouns,
understanding node.js,
v8 {see 2 videos}
- (20130416)
Introduction to Node.js by Ryan Dahl,
20110222@SF (01:06:34)
- Good links list
- Manual & documentation, as
modules.
- v8 api ref
- chrome v8 descr
- v8 cookbook
- libuv
- libuv book
- style guides :
- {20160322} en Enric va cap a
FireBase -
Quick Start ;
StartOverflow - API questions, technical help.
Gràcies, Lluís !
- Ejemplos cortitos JS :
- how to manage an
array
- Node.js Tutorial: Learn in 3 Days
- ESP 201903 :
- helmet package
- PythonShell package
- JWS
- node + express + mongo + CRUD sample (with Postman)
- Google DataSheets nodejs client
Books, llibres, articles
Plataformes
